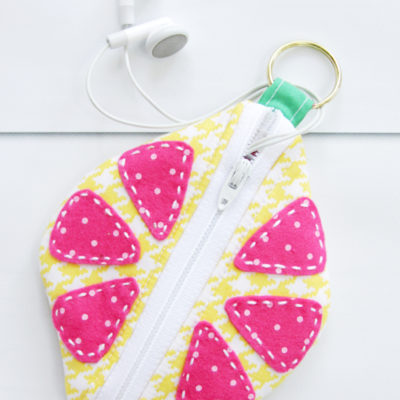
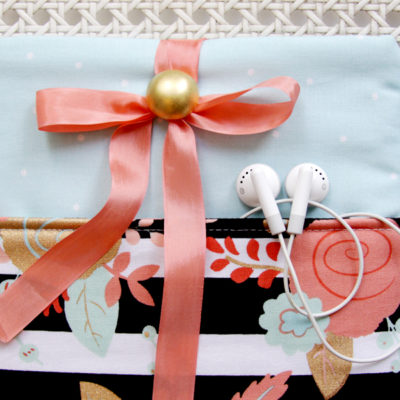
Tag-Archive for » accessories «

Business Card Holder/Luggage Tags

I’m excited to share with you a little project I made for the attendees of the SoCal Social!

Viv (from The V Spot) and I were discussing what we wanted to do for the nametags this year. And she had the genius idea to do some sort of tag or holder that could be slipped onto the bags, like a luggage tag. She’s a smarty.

So I dug into the fabric stash and came up with these fun little Business Card Holders – or Luggage Tags! You could use them for either!

One of the features I love about them is the little pocket on the back. So you can slip in extra business cards, or the cards of your new friends! These would be great to make up for gifts – or to whip up before your next conference or event!

They go together really quickly too.

Ready for a tutorial?

To make one holder you’ll need:

  • small amount of fabric (measurements below)
  • Pellon Decor Bond
  • Clear Plastic Vinyl – this is 12 guage (you can often find this in the remnant section of the fabric store – or you can cut up a vinyl tablecloth or use the bags that sheets/comforters come in)

Cut out your fabric and interfacing. You will need:

  • 2 pieces 5″ x 5 1/2″ (pay attention to the print on the fabric and cut out the pieces accordingly. 5 1/2″ is the width measurement) of both fabric and Decor Bond
  • 1 piece 7″ x 5 1/2″ of fabric and decor bond each
  • 1 piece 1 1/2″ x 14″ of fabric cut on bias
  • 1 piece 1″ x 5 1/2″ of fabric cut on bias
  • 1 piece 1/4″ x 14″ decor bond
  • 1 piece 3 1/2″ x 5 1/2″ of clear vinyl

Begin by ironing your decor bond to the wrong side of your fabric pieces.

To make the strap, iron the 1 1/2″ x 14″ piece of fabric in half, wrong sides together long ways. Open back up the fabric and lay the thin strip of Decor Bond so it is just to one side of the center fold. Press in place. Fold each long side in so they meet in the center and press, then fold the entire piece along the first center pressed line and press again.

Basically making bias tape with a little stabilizer in the middle. (If you don’t want to make your own, you can definitely use store-bought bias tape. Just open it up and add in the stabilizer and press everything back together!)

Make the small 1″ x 5 1/2″ piece into bias tape as well – but you don’t need stabilizer. This is to cover the top of the clear vinyl. Also – if you can do this without singing your fingers a bit, that’s a plus. Me? Not going to happen.

Sew down the folded edge of your strap.

Place the tiny bias top along the top edge of the clear vinyl piece, so there is a folded section on each side of the vinyl. Sew the bias tape onto the vinyl, just inside the bottom folded edge.

Now we’re going to make a little sewing sandwich. Which is not as fun as a BLT but it’s close.

Place one of the 5″ x 5 1/2″ pieces right side up. Then fold your larger 7 1/2″ x 5 1/2″ piece in half. Place it so the bottom raw edges line up. Place the vinyl piece on next, with the bias tape on top, and finish it with the last 5″ x 5 1/2″ piece, right side down. The bottom edges of the folded piece and the vinyl should line up with the bases of the other pieces.

Pin the whole shebang together, double checking that your vinyl didn’t slip around while you weren’t looking. It can do that, and sometimes you don’t know until you’ve sewn it all together, which in turn makes you have to undo the whole thing and say fake swear words. Good times.

Sew the pieces together with a 1/2″ seam allowance, leaving most of the center top open for turning. Trim the top corners, and trim 1/4″ off the sides and bottom. This will help with turning right side out.

This is a little tricky to turn right side out, but you can do it. Once it’s mostly turned, you’ll want to make sure you use something to really get the corners straight. I use a little metal chopstick that is perfect – but you can use a turning tool or anything similar. You have to be pretty firm with those bottom corners because of the vinyl.

Once you’ve got it turned right side out, press the top folds in. Be careful not to press over the vinyl, that’s bad for the vinyl and your iron. If you need to, you can press the holder on the back side.

Fold the strap in half and tuck the short ends into the opening of the main section. Center them and pin in place. Sew around the entire tag, using a 1/8″ topstitch along the top edge and a 1/4″ seam on the sides and bottom.

In order to sew over the vinyl portion, you’ll need to cut some small strips of tissue paper and lay them along the edge. Just sew over the top of the strips.

Gently tear the tissue off – and you’re all finished with your super cute little tag!!

These are so quick to do that you can make up a bunch (like say . .  60) and give them out to your friends!

I’m going to use mine just to keep in my purse – and for all my blogging events too!!

I think it looks cute with my fabulous bag from Nest of Posies too!

What do you think? :)

Linking up at Sunday Scoop, Today’s Creative Blog, Met Monday, Tutorials & Tips Tuesday, Quilt Story, Shabby Creek Cottage, My Repurposed Life and the other fabulous parties on the party page – make sure you check them out!

Category: Sewing  Tags: ,  24 Comments

Going Batty Halloween Headband

My kids are teenagers now – so I don’t get to do full up costumes for them.

But I wanted to create something that was fun and Halloween-y, without getting too crazy. I came up with the idea to do a cute, fun headband that can be worn to Halloween parties or work – when you want to show off just a little bit of Halloween Spirit!

I love how it came out!

My daughter trying to look all spooky. :)

So here’s what you’ll need to make your own Batty Headband!

  • thin headband
  • 18 gauge wire
  • black glitter felt (the stiff kind)
  • regular black felt
  • black/silver fabric
  • glue gun/glue
  • Black Satin Ribbon
  • Black Tulle and Silver Fringe ribbon

Begin by cutting small Bat shapes out of the stabilized Glitter Felt. You’ll want 7 shapes – these are about 2″ long.

Wrap strands of the 18 gauge wire around the headband, to one side. You’ll want the longest pieces in the center.

Try and flatten the wire to the headband as much as possible – you can use pliers to help with this if you need to.

Once the wire is as flat as you can make it,  cut a small strip of black felt and glue this along the underside of the headband. This will make sure you don’t feel the wire when you’re wearing it.

Starting at one side, glue the end of your black satin ribbon down and begin wrapping it around the headband. Keep wrapping between the wires until they are all covered and you reach the other side.
Glue the other end down.

Now we’re going to get to the fun stuff. Add a little bit of tulle to the headband by cutting pieces and knotting them on between each wire. I didn’t measure how long, just make sure the center pieces are a little taller.

Add in a little lighter trim for some contrast. I had some wired silver fringe, but you could use anything – silver ribbon, rick rack, beaded trim – whatever you have on hand!

Make four rolled fabric flowers – two large and two medium-sized. If you need a tutorial, you can check out my How To Make Flowers page. I have several different flower tutorials there for you to reference.

Glue the fabric flowers along the front of the headband, but not too low so it will still sit on your head.
(I promise the wires are still there – they’re just hard to see in the photo.)

Last up – glue your bats onto the wires with a little hot glue. Cut small strips of regular felt to glue over the top of the wire on the back side. This will help hold them on, and keep it looking nice from the back too!

Isn’t it fun? I love that it’s super eye catching but still cute!

And you can’t go wrong with bats and glitter. It’s like a spooky little Halloween tiara. :)

I hope you like it!

So do you dress up for Halloween? I’d love to know if you have your costume planned yet!

Linking up at Sunday Scoop, Today’s Creative Blog, Met Monday, Tutorials & Tips Tuesday, Quilt Story, Shabby Creek Cottage, My Repurposed Life and the other fabulous parties on the party page – make sure you check them out!

Fun Fashion Finds For Fall!

Oh my goodness – are you sick of me saying how ready for Fall I am yet? Yes?

So sorry. I would like to consider this Fall – it is September for goodness sake, but it’s really still too warm for chili and sweaters and boots (I can’t find) and scarves.

So until it cools down a little – I have to pretend – and I’m going to do a little online shopping to keep us in the mood.
I’m sharing my wish list and awesome finds with you!

I’m a giver like that.

So let’s go browsing!

(Do I get points for using five “F’s” in the title? I’m a sucker for alliterations)

Ok – let’s start off with Coats and Jackets – and I’m pretty sure that all of these need to be in my wardrobe right now.
That yellow peacoat is killing me!

1, 2, 3, 4,

And oh the dresses. With tights and boots or cute little heels – I tried to find a mix between casual and dressy for us.

1, 2, 3, 4, 5

So what do we tie this cuteness together with?? Accessories? Check out that little Branch bracelet! Seriously adorable.

1, 2, 3, 4, 5, 6, 7

Last up – we can’t forget the most important part of any outfit – your shoes!!
I am determined to get brown boots this year that I love! And how cute are those little booties with the bow!

1, 2, 3, 4, 5, 6, 7

So what do you think - some pretty cute finds right?

Are you on the hunt for anything for Fall?