I have been itching to make something out of pallet wood for quite a while now – and since I’m redoing the family room I thought this would be the perfect time to get to work!
This huge Stencilled Pallet Clock was so fun and easy to do – and I love how it turned out!
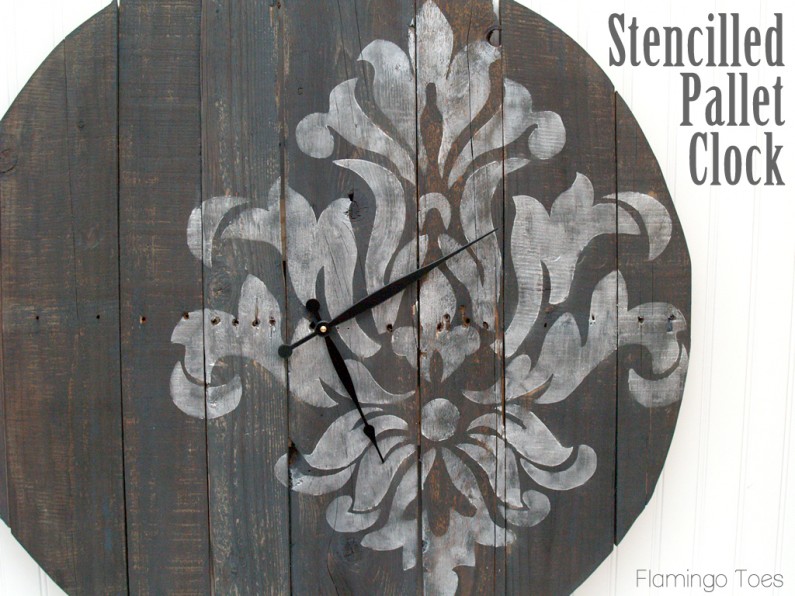
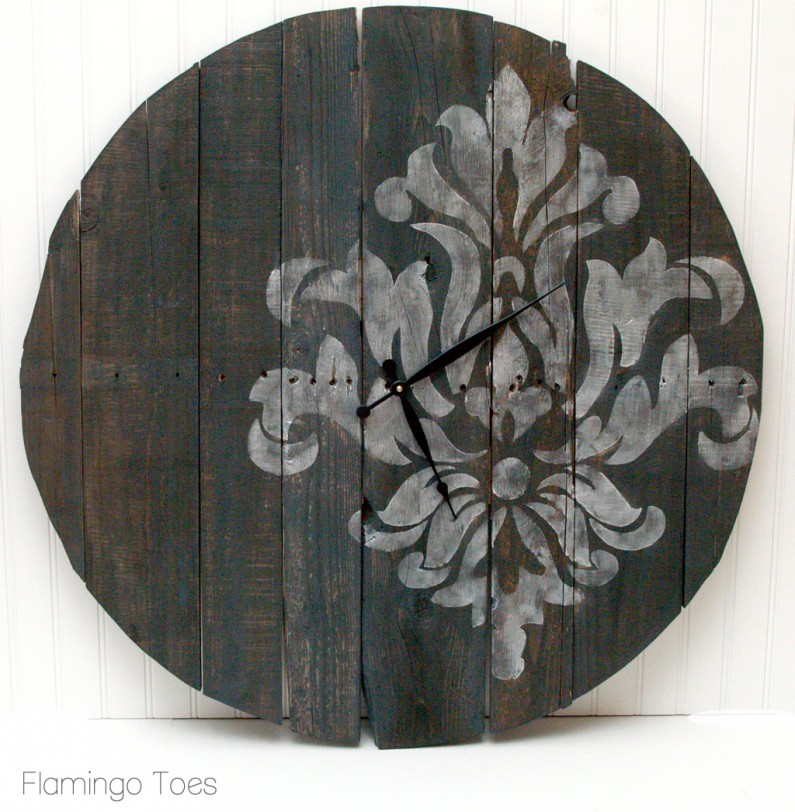
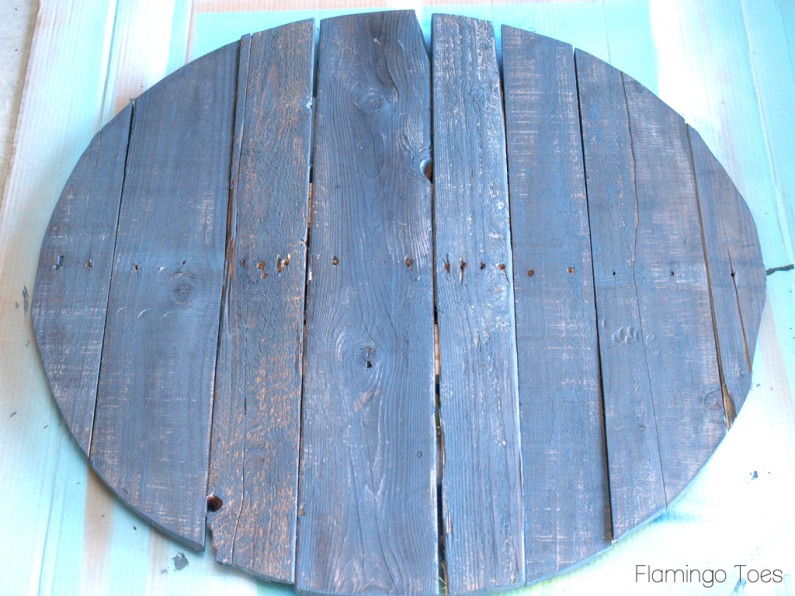
This is BIG. The clock is a 31″ circle – so it’s really huge and fun! It’s stencilled with a Damask design set off-center – so it looks like an old piece of painted barn wood or something.
Isn’t it rustic and cool?
Here’s your Materials List to make your own!
- Pallet pieces – enough to measure the diameter of the circle you’d like. (This one is 31″)
- Two 1 x 4 pieces for braces on the back
- Clock Hardware – mine came from this website
- Paint for Stencil
- Large Stencil (or materials to make one)
- Tools and hardware – Saw, Drill, Screws
So let’s get started!
I ADORE crafting with friends! It makes it all so much more fun. I often craft with Aimee from SmallAnchors.com and this project started out at her house! In fact her sweet husband cut out and assembled the clock for me. Isn’t that awesome?
Here’s what he did:
I layed out the pallet pieces in the order that I wanted them. He screwed two 1 x 4’s into the center of the panel pieces with a screw in each board to hold them all together. After marking the center of the pieces, he drew the large circle onto the boards with chalk. Then he used a jigsaw to cut out the circle.
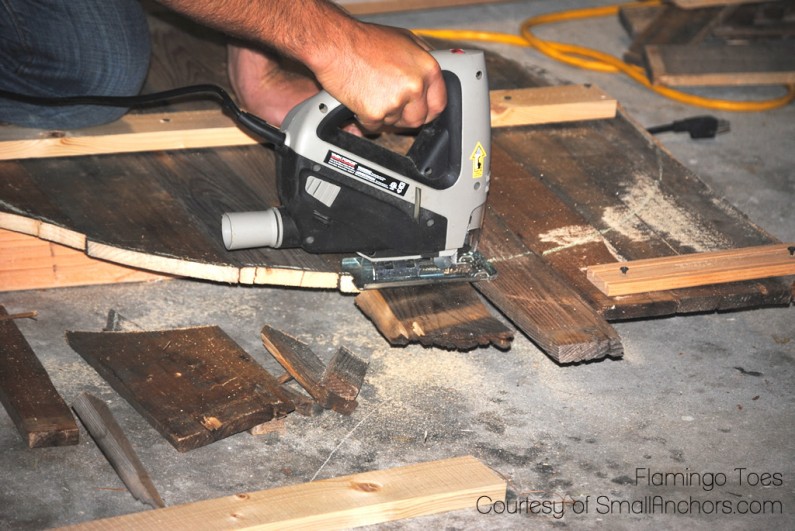
I wanted the cut to be pretty rough, so that it would look more rustic, like we had just put some random boards together. We left the boards on the back to hold the pieces in a circle and added more screws for support.
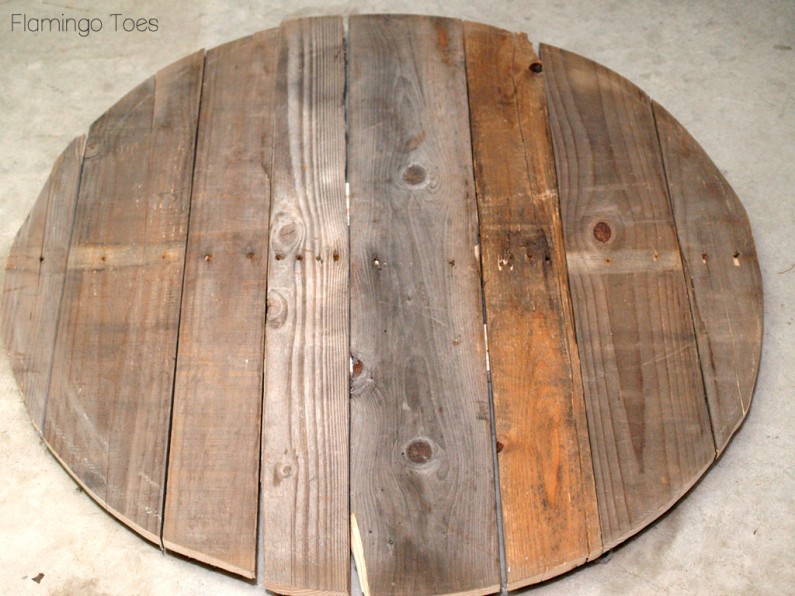
If you want to cover up those raw edges of the circle, stain the pallet. I used the gray stain I used with my new Entertainment Center – I just did a light coat on the sides on top. I wanted it to still show the differences in the wood colors a little.
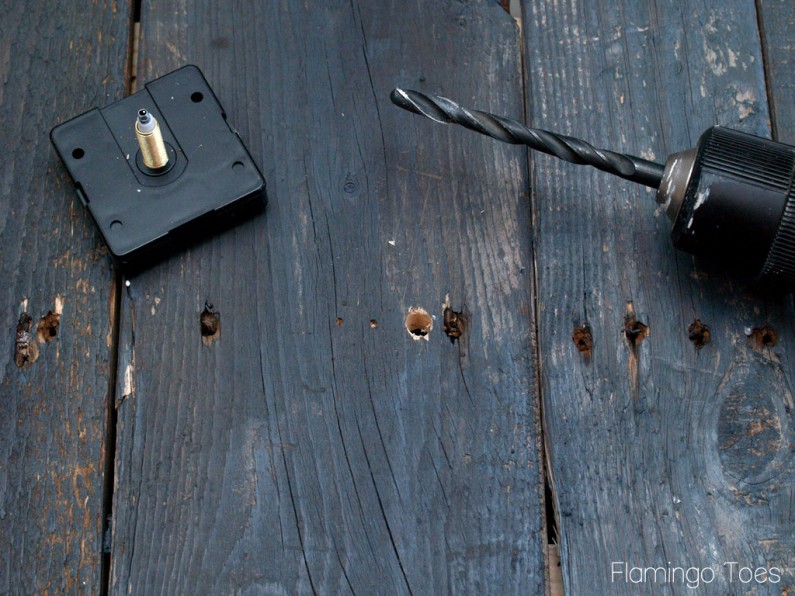
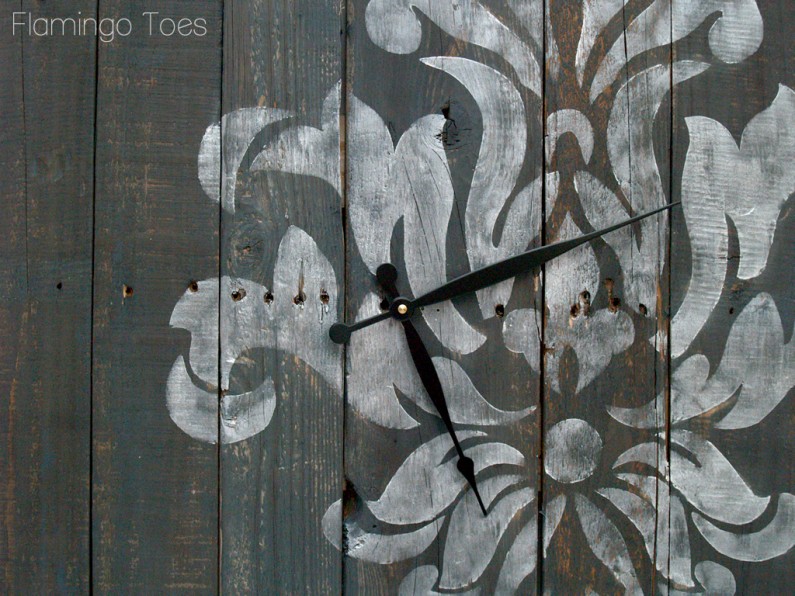
Mark the center of the circle and drill the hole for your clock hardware. You want it just a teeny bit bigger than the center piece of the hardware.
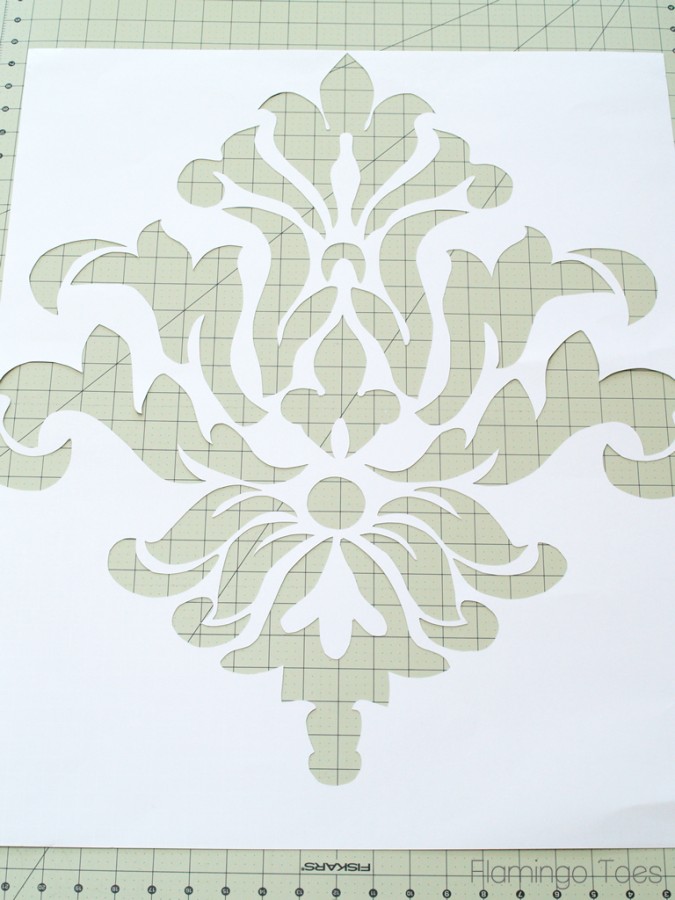
Now it’s time for the giant stencil!
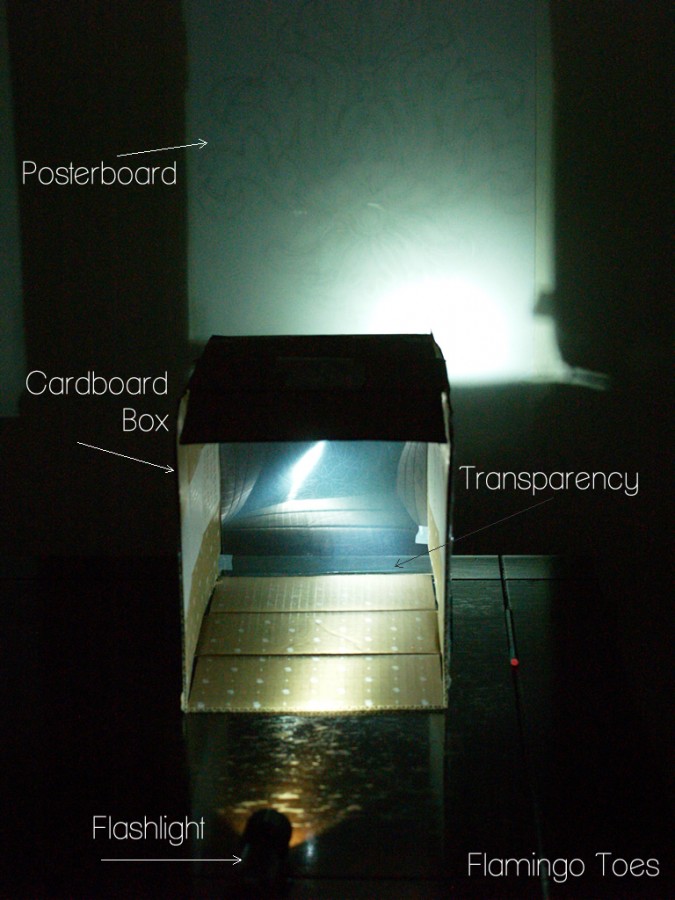
In the past I’ve used an overhead projector to trace large images – but I don’t have access to one anymore. But I found this awesome tutorial for projecting an image without one!
Without going through the whole thing, you basically create your own projector with a box, a flashlight and printed transparency film. Some tips – Set up your box in a dark room. If you’re having trouble getting a clear image, try different flashlights. I found some worked better than others for a nice crisp image. For sizing, try moving your flashlight and box closer or farther apart.
Once your image is traced, place your posterboard or whatever you’re using onto a cutting board. I used my big quilting mat. Cut the image out with a sharp exacto knife, using long smooth cuts.
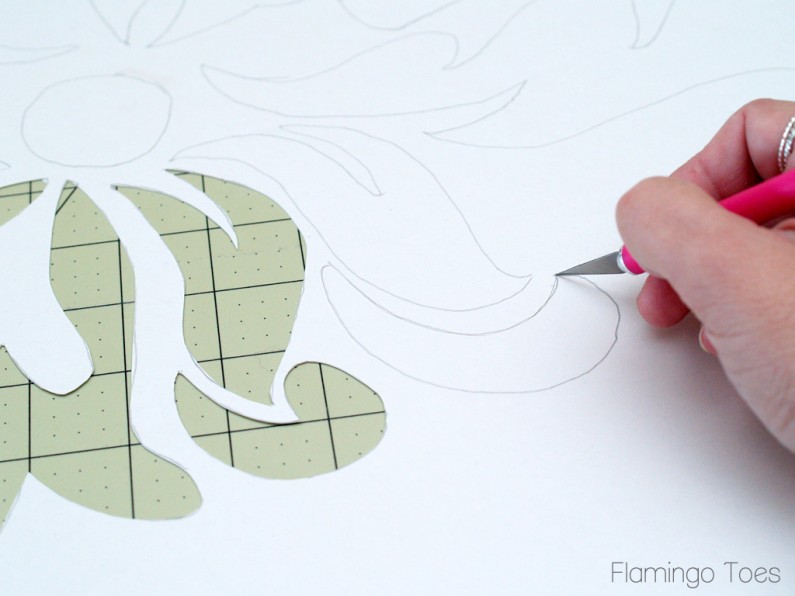
Here’s the stencil all cut out! This only took about a half hour – not too bad at all!
Place the stencil onto the pallet and tape down the sides. Begin stencilling in the center and work your way out to the edges.
I used the Pearl Martha Stewart paint – which is pretty much my favorite color of all paints ever. If I was stranded on a desert island and could only have one color of craft paint (for all my desert island crafting) I would pick this color.

If you stencil has small pieces you might need to hold them down while you stencil around them so they don’t shift. As an added bonus, you end up with this gorgeous color as nail polish. Score.

You don’t want to completely cover the wood with paint – it will look more rustic if it’s kind of patchy.
Once you’ve finished take off the stencil and check for anything you need to clean up. I call it stencil ooze. Those not-cool dribbles of paint that ooze under the stencil, despite your best efforts to prevent it.
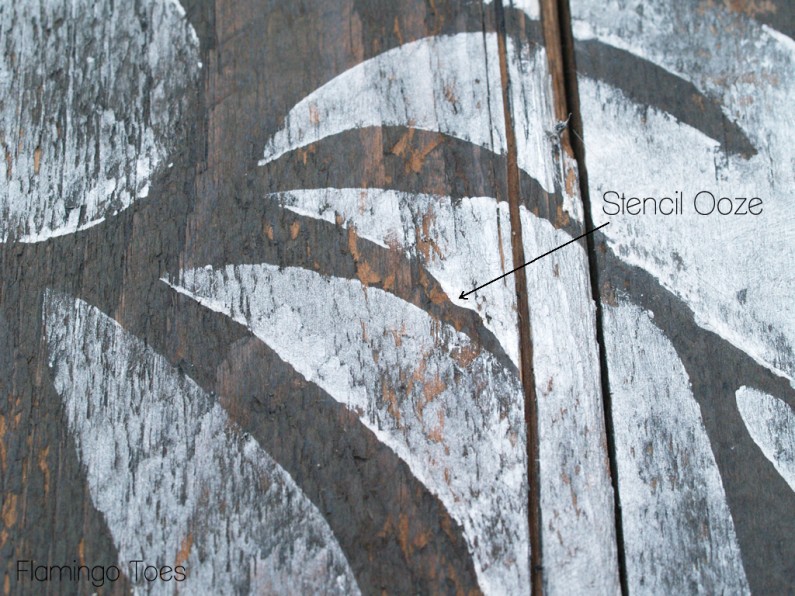
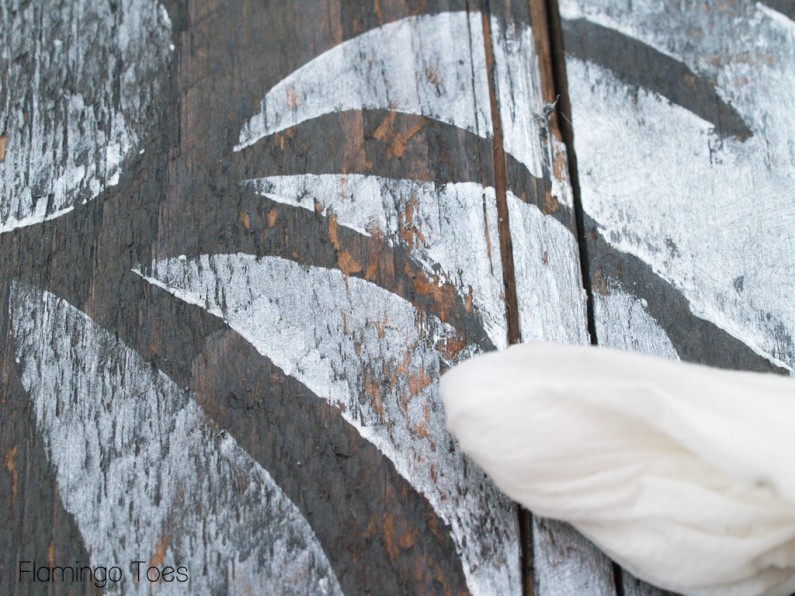
Wet a paper towel lightly and wrap it around your finger. Rub the spot lightly with your fingernail and you can clean up that ooze super easy!
Now the clock is all stencilled and ready to be assembled!

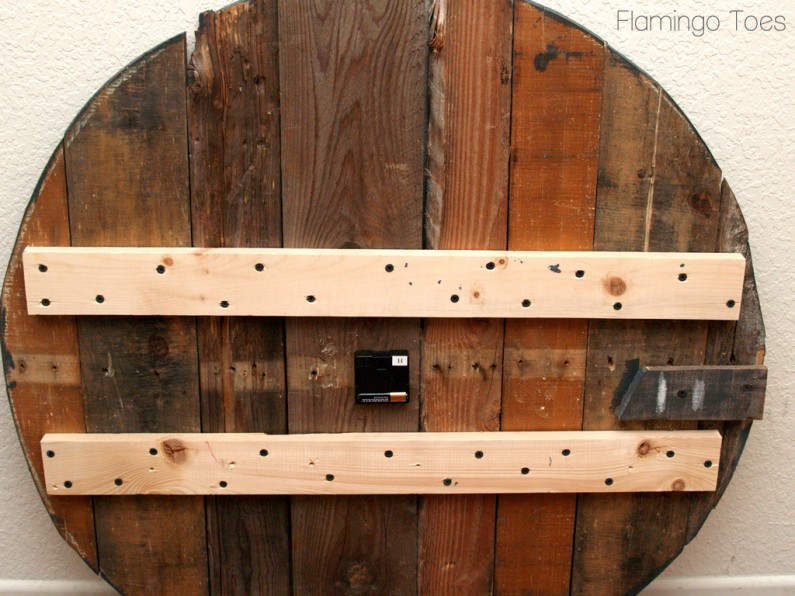
Assemble your clock hardware according to the instructions. This is super easy – just stick the back through the hole you drilled and add the hands. Here’s a shot of the back of the clock.
Now your clock is all finished and ready to hang!
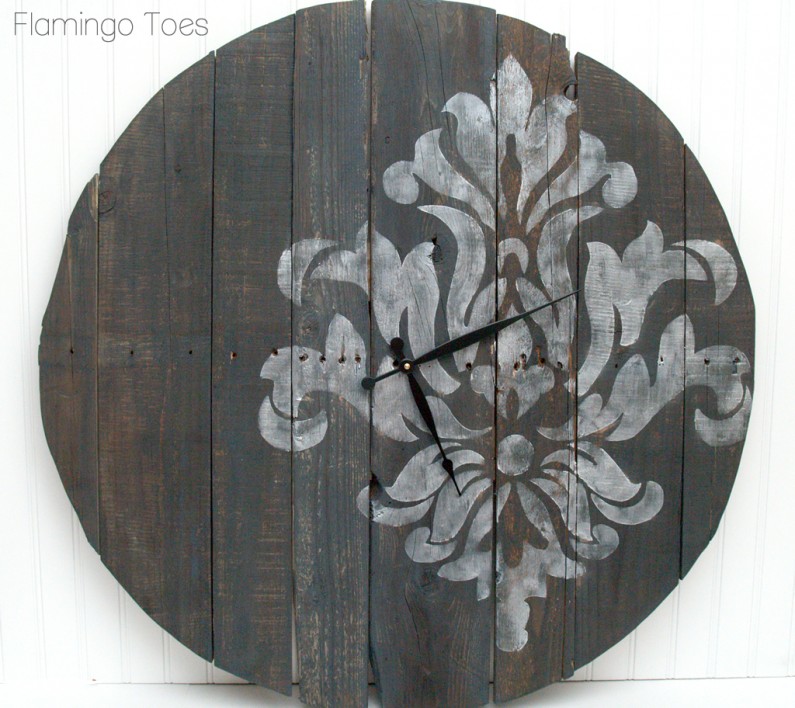
I love how the stencil turned out! It’s such a great contrast with the stained wood.
I love it! What do you think?
Linking up at Sunday Scoop, Today’s Creative Blog, Met Monday, Tutorials & Tips Tuesday, Shabby Creek Cottage, My Repurposed Life, 504 Main, and the other fabulous parties on the party page – make sure you check them out!


This is a great project…Absolutely LOVE It!
I love this SO much! You totally hit this one out of the park. Just a beautiful piece!
Take care,
Trish
WOW Bev, this is so beautiful! I had a pallet that I gave away because I never figured out what I wanted to do with it, and now I’m seriously regretting it after seeing this today. What a great statement piece!
I LOVE this Bev! The rustic wood is perfect, and I love the off-center stencil. I have some parts laying around that I think could recreate something like this! Thank you so much for the inspiration!
Liz
Lookspretty cool to me!
Bev, too cool for words! I so want to make a man cave version for my hubby’s shop. Great project!
This.is.AWESOME! You did an amazing job, Bev! I have a soft spot for pallet art, and I just adore this clock. Your stencil turned out great!
Love this! I love how you made this rustic and the off center stencil really looks nice. How long did it take you? Great job!
~ Caren Smith, Owner
http://www.MyScrapbookStudio.net
This turned out amazing!!! The stencil you mentioned before wasnt perfect…Looks pristine! Thanks so much for sharing!
This is pretty damn awesome, Bev! I remember seeing over the weekend that you made a make-shift projector for a stencling project… makes a lot of sense now! Love this.
This is awesome!
What a beautifully made, artful and functional piece, Bev! And I’m awed by your DIY lightbox too. You’re amazing, ya know?
xx,
Jenn
Absolutely Love it!! It is such a beautiful unique clock. You’re awesome!!
Way cool! Great project and the instructions for making an overhead projector are awesome! Love the whole thing! Thanks for sharing! Hugs, Leena
You are just so creative! What a beautiful clock and thank you for sharing you how made it. Megan
I love it Bev!!!!! What a great addition to your family room along with your gorgeous entertainment center!!!
I love this! Stopping by from Home Stories AtoZ. I’m your newest follower!
Danielle @ Retail DIYet
Wonderful clock! I love it’s rustic look and your large stencil is just beautiful. Thank you so much for the tutorial!
What a great idea – very nice – gives me some ideas, too
You are really very creative!!!!!
This clock is amazing!!! I love everything about it, from the recycled pallet wood to the destressed stenciling. Thanks for sharing!
What a great idea for a custom clock! Your stencil is so gorgeous! Thanks for sharing! Have a great day!
wow! this is gorgeous.,,,now to find some pallets!
Love your clock!! Awesome tutorial too! Come link up to Centerpiece Wed and share this post with us.
Karin
Wow that is a gorgeous clock! This would be great with old fence palings as well!
I love it! I’m obsessed with pallet projects so when I saw this over on the Someday Crafts Link Party I knew I had to swing by. This project is definitely unique!
YOU ARE AWESOME! That project turned out so cute. Way to repurpose that pallet wood! We just made a pallet backsplash for our kitchen and we have a lot of spare slats left. This would be a great project.
Thanks for sharing on Snap Creativity!
Kristina
chappelofloveblog.com
What an amazing job you did on this!!!!
I did a John Denver tribute art piece on Pallet wood – maybe I should turn it into a clock!
I just love this –
Definitely your newest follower!
Hugs,
Suzan
Love it! I really like the off-center stencilling. Putting this on my project list.
Absolutely beautiful and a great tute to boot!
I love everything about this. Distressed, awesome! Damask, a favorite! I love your tutorial for creating the damask. Keep up the great work.
I love this! Such and incredible idea. Thanks for the inspiration.
Jen @ Noting Grace
Wow Bev this is SO cool and that projector box idea is really neat too. It turned out beautiful.
This is awesome Bev. Wanted to let you know I featured it as part of my link party wrap up today!
Your clock turned out awesome! Love everything about it!!
Love it!
Oh this is beautful! You have given me a great idea for my living room! I would love to have you come share on my weekly linky party Show Me Your Plaid Mondays!http://www.pandpkitchen.com/2013/02/17/show-me-your-plaid-mondays-10-2/
oh bev! You’ve outdone yourself! I LOVE clocks and yours is awesome! great tutorial with super tips! thanks for sharing, catching you!
gail
Love this clock – so creative and fun! Just wanted to let you know I featured it in my roundup of clock re-dos and makeovers here. Feel free to check it out if you want and hope you like it! : )
-Mel the Crafty Scientist
Oh I have just found this and I am in love with it!! I love the stencil, makes a great combination of rustic & elegance. How on earth tho do you hang such a big clock? Pleeeeaase let me know coz I am going to make this, but I don’t want to leave it leaning on the wall ;-) Thank you!
Love the clock but I have a question. What length of clock arms did you use? Thanks : )
I love this! Quick question. Is the clock excessively heavy? I want to make one but the last time I worked with pallet wood my finished product was so heavy!
Thanks!
Ok. How did you get the stem of the clock to reach through the wood far enough to allow the hands of the clock to attach? On the clock kit I bought from hobby lobby, the stem was really short and didn’t reach through far enough to allow the hands tip move freely.
Hi! Where did you get the damask image to make the pattern??
This is really awesome and definitely worth trying out
Love this Large Stencilled Pallet Clock Tutorial, tutorials really helps a lot. I make a gapped patterns stripped clock Will love to share , thanks for sharing with us