So I’m trying to get a little more organized this year.
This is not a skill I was born with.
I apparently create just fine in chaos.
Unfortunately for my family – most of my chaos happens on the dining room table.
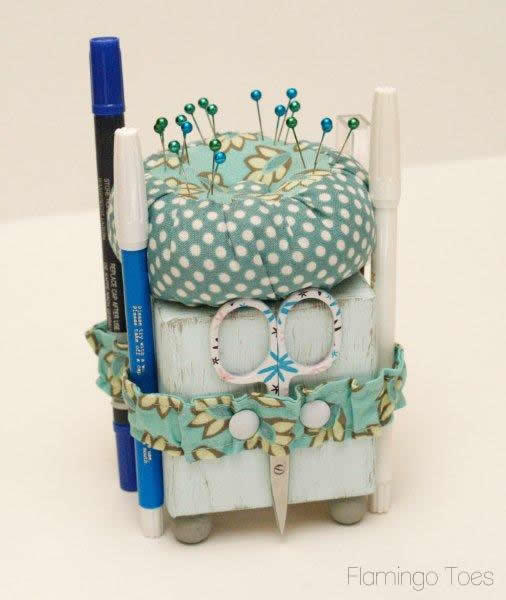
So in order to try and speed up the clean up process – I created a cute little Sewing Tool Caddy.
Here’s hoping that if I have a cute place I can slip my most-used supplies – I will actually… Put. Them. Away.
I can dream right?
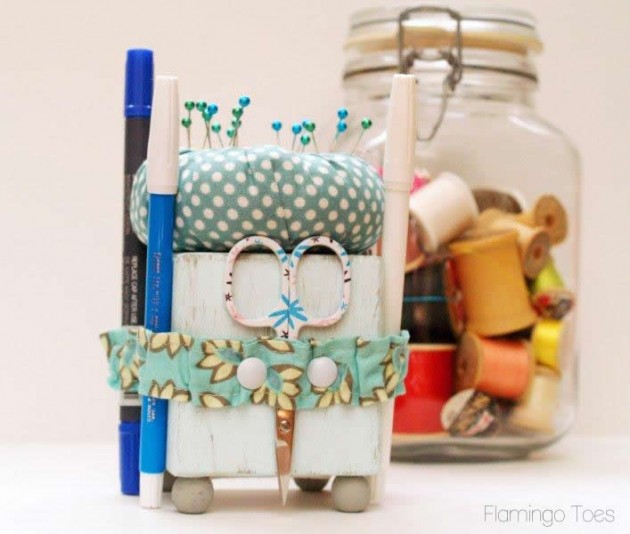
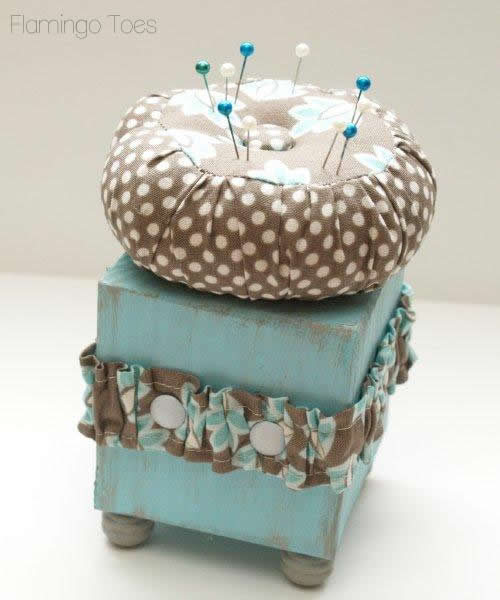
Seriously – isn’t it the cutest?? I’m hoping the cute factor will inspire me to tidyness too!
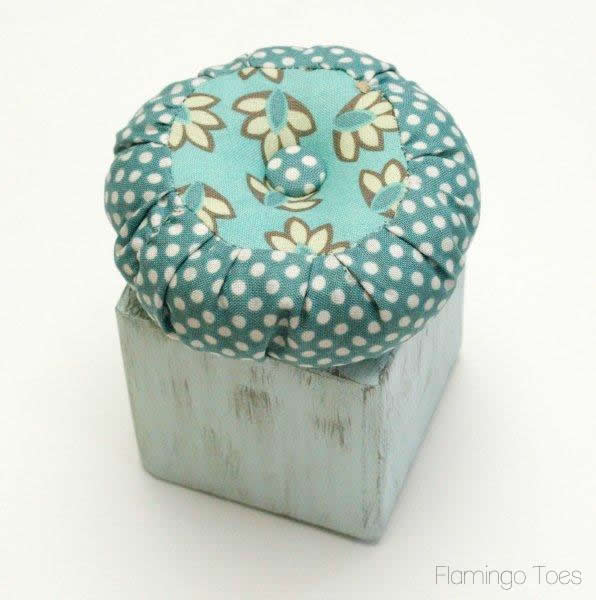
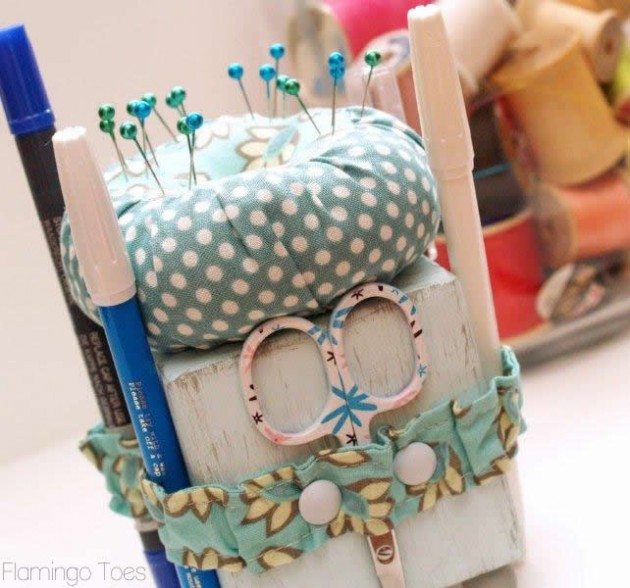
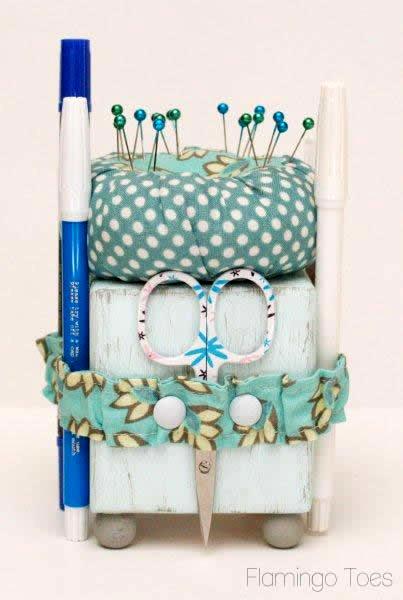
The caddy has a sweet little pincushion on top, and an elastic ruffle around the block to hold your marking pens, little scissors and seam ripper!
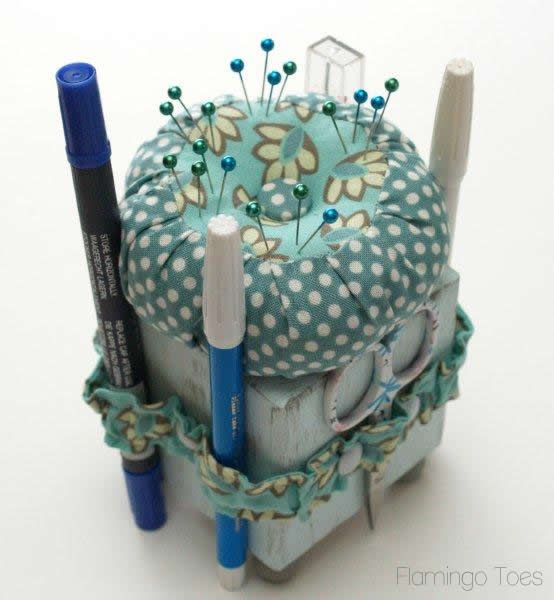
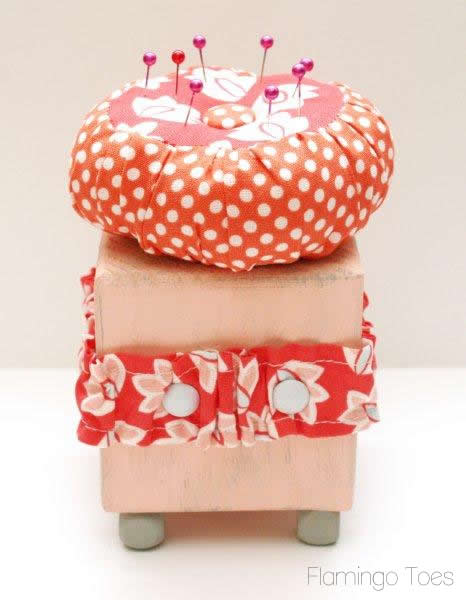
I used fabulous wood blocks and Riley Blake Verona fabric from Oh My Crafts for these cuties. The 3 x 3 blocks were perfect size for the caddy’s and the fabrics looked so cute and coordinated together.

Ready to get started? These are really fun to do!
You’ll need:
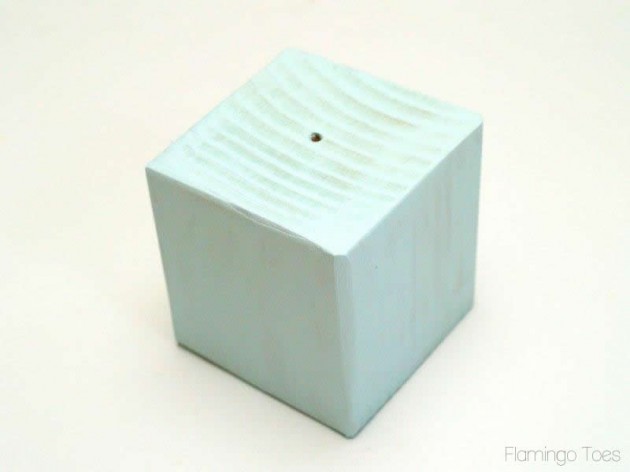
3 x 3 Wooden Block
Two Coordinating fabrics
Covered Button
Stuffing
Small Wooden Beads (about 3/4″)
Paint – 2 colors to coordinate with fabrics
1/4″ elastic
Upholstery tacks
There are two ways to attach the pincushion to the block. In the tutorial I’ll show you the drilled method, and then at the end I’ll show you a quicker way! :)
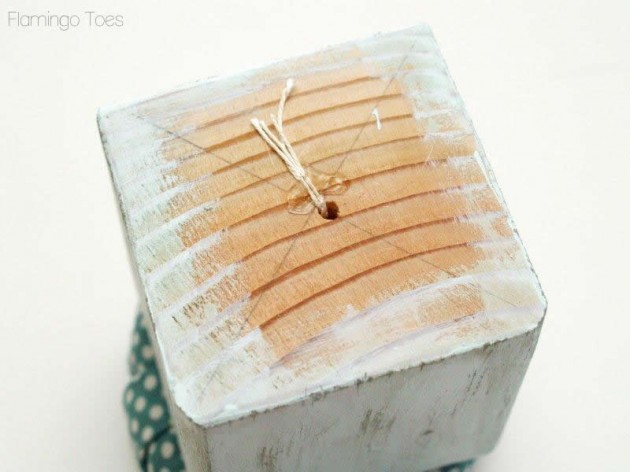
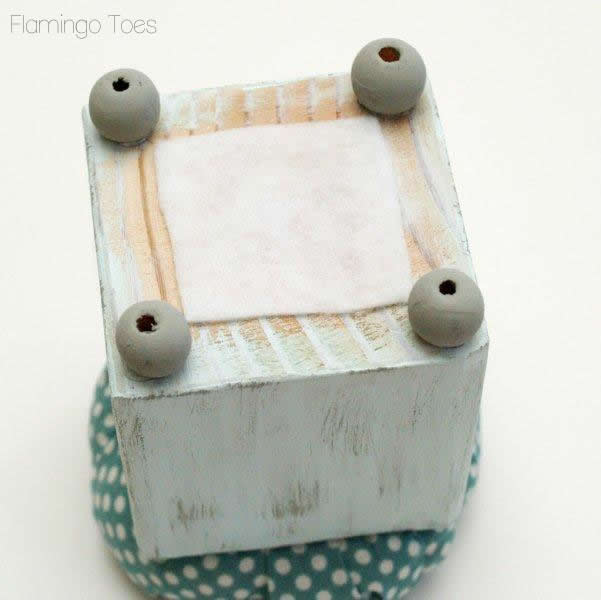
Begin by drilling a small hole through the center of the block. Paint the block the main color you’d like it to be.
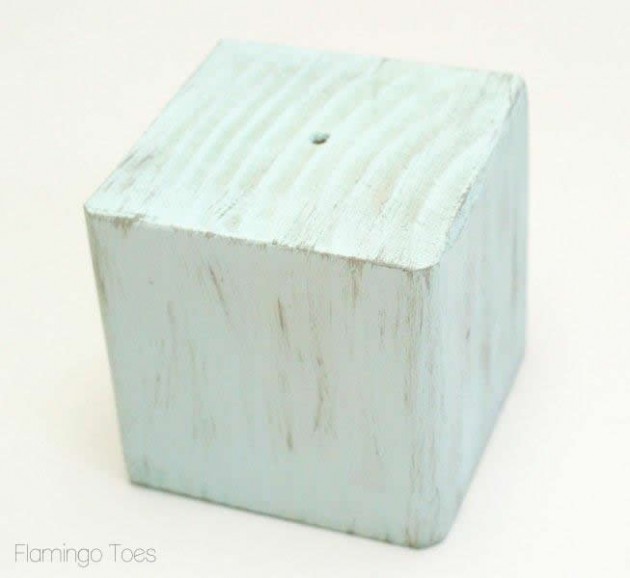
When the block is dry, add some distressing by dry brushing some gray paint over the block. Just add a little paint to a stiff paintbrush, then blot most of the paint off.
Brush the paintbrush over the block lightly, making sure to get the edges and corners a little extra.
Now we’re going to work on our pincushion. Out of one of the fabrics, cut two 3 1/2″ circles. Out of a contrasting fabric, cut an 11 1/2″ x 3″ rectangle.

Fold the rectangle in half and sew the short raw edges together to make a tube.
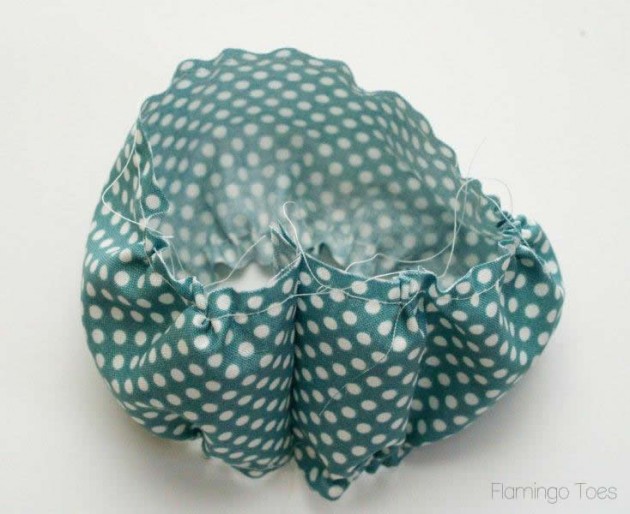
Pin and sew one of the round circles to one side of the tube, right sides together.
Sew the other round circle to the other side of the tube, right sides together. Use your seam ripper and open up the straight seam in the tube just a little.
Turn the circle right side out and fill the little cushion with stuffing.
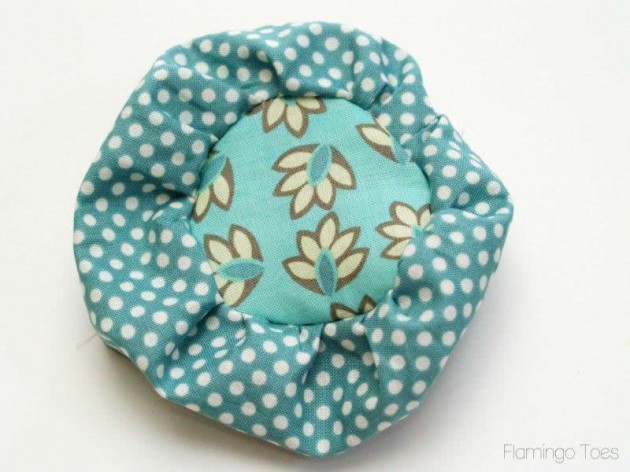
Sew the opening in the side up by hand.
Cover a button with the same fabric from the side of your pincushion.
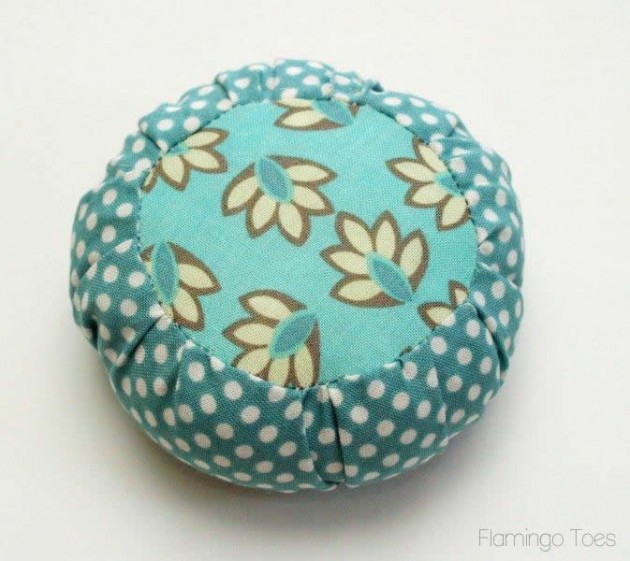
To add your pincushion to the block, thread a long doll needle with a long piece of thick thread.
Feed the needle through the block, then through the center of the pincushion, then through the covered button.
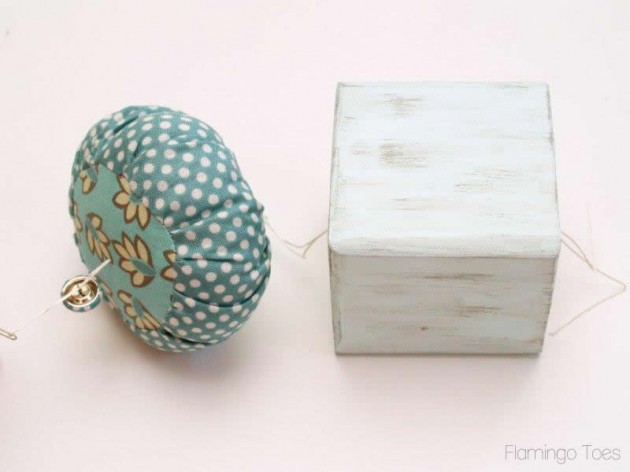
Feed the needle back through the cushion and block. Pull the thread tight and knot it at the base of the block.
Glue the ends of the thread and knot to the bottom of the block.
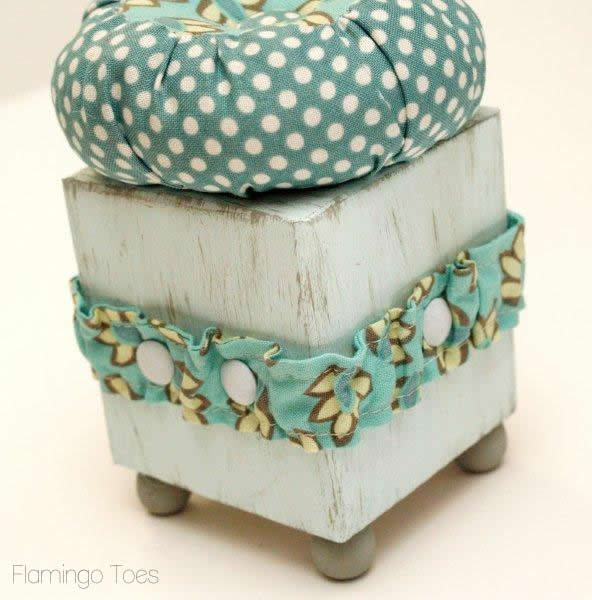
Now our block has a cute little pincushion on top!
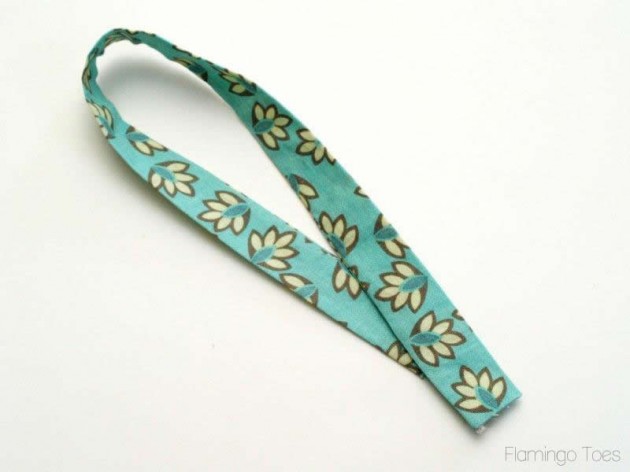
Cut another rectangle of fabric 2 1/2″ x 18″.
Turn one short end of the rectangle back 1/4″. Fold the long rectangle in half and sew the long, raw edges right sides together. Turn right side out and press.
One short end should now be folded in 1/4″.
Cut an 11 1/2″ piece of elastic. Thread it through the fabric tube and when the elastic is completely in the tube, sew the elastic down by sewing across the end of the tube that isn’t folded in.
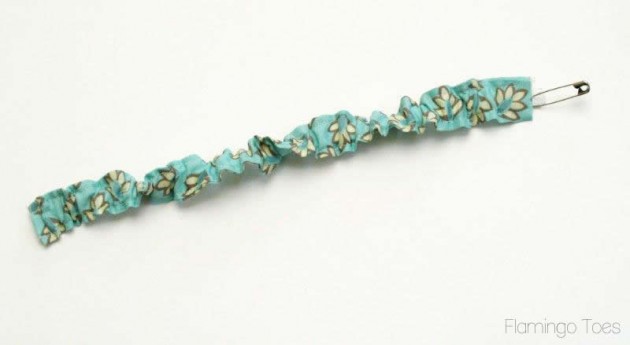
Continue pulling the elastic through the tube, gathering the fabric as you go. Sew the other end of the elastic into the tube about 1/2″ from the folded end.
Tuck the other end into the folded end to make a circle. Sew across the tube.
Paint your wooden beads with gray paint.
Glue the wooden beads to the base of the block at the four corners.
(You can cover the thread with a felt square and glue down so everything looks a little tidier)
Slip the elastic tube onto the block. To help hold the different items, place upholstery tacks through the gathered piece into the wood.
I used a mallet to hammer them in, so the tacks wouldn’t dent or chip.
And you’re all done with your little Caddy – You can add in all your pins and tools!
(Coordinating your pins to your fabric is optional – but highly recommended for cuteness.)
For the quicker non-drilling method – you can sew your covered button to the pincushion, then glue the pincushion to the top of the block.
This works great if you don’t want to use any power tools!
I made up these for me, my mom and my sis – since we’re all sewers. Sewists? Seamstresses. Whatever.
Though they are much better at organizing than me. I missed out on that gene somehow.
Wouldn’t these be fun to make up as gifts or for a sewing group?
I’d love to know what you think!
I’m linking to Sunday Scoop, Today’s Creative Blog, Met Monday, Skip to my Lou, Tutorials & Tips Tuesday, Shabby Creek Cottage, and the other fabulous parties on the party page – make sure you check them out!

Disclosure: I was provided with blocks and fabric from Oh My Crafts. All opinions and project ideas are mine. :)


that really is the cutest Bev! Would look great in anyone’s sewing nook :), the perfect present!
What a genius idea!!!!!! I so want to make one!!!
Really cute idea! Thanks for sharing!
Bev!!! These are BEYOND cute!!! Adding these to my “pincushions I have to have” list. ;)
OMG, how cute and clever is this? You are a superstar, Beverly, these are so stinkin’ awesome. Love your idea and the different combos. Pinning you right now.
I like ’em!
I love this! Now I won’t have to search for my marking pens and scissors when I’m sewing.
I am SO going to make these!!! I love them! Will keep me organized too! :) Thanks for sharing!
Great idea! Super cute too!
Great idea, Bev!
Thanks for sharing.
Those are adorable, what a cute gift idea! I would love for you to share this (and any other creations) at Pin It and Win It Wednesday @ http://www.cheapcraftymama.com– where you can win free ad-space on my blog!
These are really cute! A fun gift idea for sewing friends!
To cute….sorry, that is one talent I did not get….sewing. My mom had it but somehow it past me by. But that is cute.
What a great idea! My table where I cut my fabric is so organized but the spot where I actually sew is not. My scissors and such are just sort of laying there. This would be great to get me organized! I am having my first linky party on my blog, http://www.firehousecrafts.com, and I would really love it if you would link up your apron. The party is at http://www.firehousecrafts.com/whats-hot-in-the-firehouse-linky-party-1/. Hope to see you there!
How Cute! It looks quite simple as well!
I absolutely LOVE them! They are perfect!
wow, i love these so much! they are so useful, and so cute! and i love the colors.
i’m having a creativity party on my blog today, i would love it if you came over and linked up this or any other amazing project you might have! http://letbirdzfly.blogspot.com/2012/05/exodus-35-creativity-party-30.html
thanks for sharing!
OMG.. these are so cute… great idea. Thanks for sharing
This is so cute! I love the pincusion on top. I would love for you to link this up to “I Made This” at Grits & Giggles! http://gritsandgiggles.blogspot.com/2012/05/i-made-this-5.html
These are sew cute. lol You should sell them. If you sell them how much? Katharine
Gotta love this project, what an incredible idea and so cute, handy, awesome. Great tutorial too. Good one Bev. You really scored a big star with alot of sewers. This is something I’m gonna make to give as a gift for myself and daughter.
So loving these cutest ever pincushions. Thanks for the tutorial…. I’m going to try and put one together this weekend. I’m following on Facebook too.
I’d love for you to consider sharing this post on ‘Shabbilicious Friday’ link party ~ http://shabbyartboutique.blogspot.com.au/2012/05/shabbilicious-friday-link-party-2.html
So darling, what an awesome project! Going to pin this one for later!
I so this over at I Heart Naptime link party. This is a really great project. I am pinning it.
So cute!!! I am a very messy crafter but this is incentive to clean up my act!
Just wanted to let you know I featured this as part of my link party wrap up! Feel free to grab a featured button from my sidebar if you like!
I pride myself on being a tough critic when it comes to crafty ideas, but this one is by far the most original, adorable sewing kits I’ve ever seen. It is SEW SEW clever. I am printing out your tutorial NOW. Also love the fabric you used.
This is a fantastic idea! I have a messy basket of all of my basic sewing supplies, and this is a great solution. It would also look so cute next to my sewing machine. Thanks for sharing!
Wow!! these are fantastic!!!! pinning them!!!
Natasha @ http://www.serenityyou.blogspot.com
That is really cute! I love it!
Sorry to be a party pooper but it seems you did something else instead of cleaning up. Now don’t get me wrong it is adorable. But you did spend your time making 3 (?) instead of picking up.
Adorable! This would make a great gift for my mom! Thanks for sharing!
This is exactly what I need – and it’s so cute too! Thanks for the tutorial! I’d love for you to share this tutorial on my new link party: http://naptimedelights.blogspot.ca/2012/05/document.html
Thanks!
Sarah @ http://www.naptimedelights.blogspot.com
Hi! I’m visiting from the Tips and Tutorial party at Home Stories A to Z. Super cute idea! You could sell these! I’m looking forward to seeing more of your creativity as a new follower.
Sharon @ mrs. hines class
How cute is this?!?! Gosh I would LOVE to have one…. or maybe a dozen?!? hehe :)
Christine
thediydreamer.blogspot.com
omg! i love it!
yes, i am always carrying around a box where ever i end up crafting/sewing for the day.
this is so clever. because us mom, have to play musical chairs to get our craft on!
hope you are well, sweet girl!
xo
kellie
I can’t wait to try this out and make some up for my friends and myself.
I LOVE this sewing caddy! Hi my name is Melissa and I’m the editor for FaveCrafts.com. I’d love to publish this project on our site…I think our readers would love it! You can contact me at [email protected] for more information! I look forward to hearing from you :)
Do you sell these organizers? I have so many projects for the grand kids to make, I don’t see aging ime to make it myself. :)
Thx,
Cindy
Sooo.. cute! I’m going to try to make some with my teen daughters. P.S. would it be ok to make some to sell at our family crat/yard sale.
I love the caddies, is it alright if I make them for my craft show? I think the quilters and sewers in my town would love them. Jan
Darling !!!
Where can you purchase the little scissors?
Greetings, thanks for sharing this lovely project. I think al make it very soon. Thanks again.
These are so adorable! I like the handiness of being able to attach the scissors and seam ripper. Just grab it and go!
Thanks for sharing.
Cindy
Gostei é maravilhosa e pratica o projeto e lindo.
This is so cute. I think I will make a couple for next to my mothers and my sewing machines and easy chairs. Will make a great Christmas gift for the person with everything, my Mother. Thank you for sharing.
Love it! I’m going to make it very soon. Organization can be very cute :)
This is so cute! I love it and plan to make a few for my friends and myself.
Thank you! I am making 3 tomorrow! (If hubby can find the wood for me.) One for aquilting friend who is doing me a favor, one for my daughter and one for me.
What an adorable caddy!!! It will make the perfect gift for a new young lady who is starting to sew!!! Thank you!
Thank you so much for this brilliant idea and tutorial! Merry Christmas.
This is just what I needed to make for our church baazar next year.
Just what I need for our church bazaar next year. Thanks
WOW,thanks for the too cute idea I will be making these after christmas.thanks again.
This is adorable! Thank you for sharing! I am so happy to be able to make and share these with my sewing-buddies. =)
Very clear instructions…and THANK YOU for the puictures–they really help! Merry Christmas to you and yours!!
I just finished four of these cuties! One as a thank you to a friend who delivered my Christmas gifts; another to a friend; one for a June birthday gift and one for me. My husband had to cut and glue wood together to make the blocks and he painted them for me. They turned out cute.
Just made one for my sewing room. Love it!!!
Thank you so much for putting this idea up, I love, love, love small, cute things for sewing helpers. If it would be okay I’d like to try a 3 x 3 box with a lid, to hold spools or bobbins of thread. Would that be okay by you, I love your pattern, what fun to do.
Brilliant… thank you! Will go and look for some wooden blocks now
I was wondering how you made the button on top of the pincushion to match the fabric. I love the whole idea and will be making these for my daughters. Thank you for great idea
Great idea – inspires many variations on a theme, e.g. variation in size, wider pocket spaces etc
Wonderful tutorial. I made it today for a pincushion exchange at our quilt guild. Loved it and didn’t want to give it away. I used little wooden spools wrapped with embroidery floss instead of the beads. I also painted the block with a crackle paint. Thanks so much for the tutorial.
Thank You!!! I just love it. But a question: Did you top-stitch the elastic casing? Looks like it in the photos. Now, I was in too much of a hurry to get my 3×3 cube, so I made one by gluing two pieces of wood together. (The nice Home Depot guy gave them to me for free.) I painted a base color and dabbed on a contrasting (lighter) color. It looks a little like sponge-on, sponge-off. I can’t wait to finish it. This will make for really adorable gifts.
Did you do some gathering of the 3 x 11.5 tube before sewing the circle sections?
For those of us who work with plastic canvas, the block could be made from plastic canvas and made just a little bit taller to accommodate different sizes of scissors and pinking shears. This way, the button (not necessarily a covered button but a lovely ornamental one will do), can be sewn through the pin cushion directly to the top of the box where the pin cushion has already been glued (and dried). Then after the strap is made, similar decorative buttons separating the compartments could also be sewn to the sides of the plastic canvas box. Then attach a bottom piece of plastic canvas, the same size as the top and use scrap felt so it will have something solid to sit on.
This is really cute and very organized if I could just remember to put everything back. I think I share your problem. It’s hard to be neat when you are creative
I absolutely adore your idea! The pin cushion on top is a fantastic touch. Instead of the block I think a box or even a jar would work beautifully using the same concept and would allow for additional storage.
I love your idea, very practical & pretty. There are loads of ways to change this idea around to suit individual needs but someone has to come up with the idea first. Congratulations, you did a great job. I intend to make some of these for myself & my sewing friends.
Thank You.
UNIQUE :)
I think your idea is great, and super cute! I can’t wait to try it out.
very cute idea, I purchased a basket about 4″by7″, with a lid, very unique, had no idea what I was going to use it for, Now I do. Will use it instead of block and I can keep my crochet hooks inside of basket. Thx for sharing, love love love it. Bye for now, gotta go find my basket lol
I love these! I have to try to make one…or many! :)
These will be great for pincushion swaps. crystalbluern at onlineok dot com
Oh my goodness this is just too cute! I struggle every year for gifts for my small group but this will be the hit I am sure! Thank you so much!!!!
Coucou!! je suis entrain de le faire puis je poster la photo? je le finis demain! mercii beaucoup pour le partage bize Nathye.
It’s really adorable, thanks for the tutorial
OMG!! so cute! I need to make several: one for my pins, one for my sewing pins, and one for my sewing machine needles