Ok – so this is really more of an “inspiration” than a “knockoff”.
What’s the difference you ask?
Well – let me ‘splain.
No there is too much.
Let me sum up.
(10 points for the movie reference)
To me – a knockoff is as close to the original as you can make it. You want that same color chain, the same fabric or design, you wish you could afford the real thing but you can’t – so you made it yourself.
An inspiration is more of a “hey – I like the idea behind that. But not so much the color and way they did it – so I’m going to make it my way”.
These are just my thoughts and obviously are subject to change depending on mood or crafting budget.
So all that rambling is to say – I liked the Anthro Fori Bracelet – but I wanted mine to look a little different!
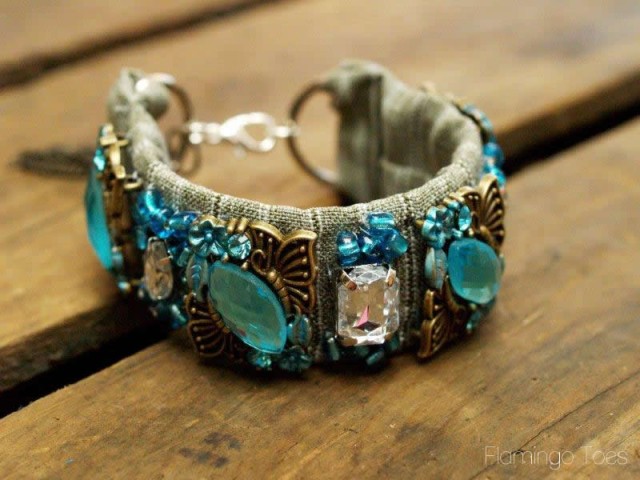
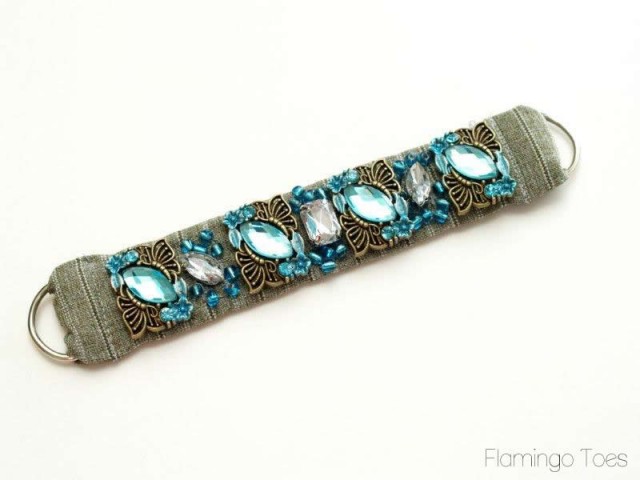
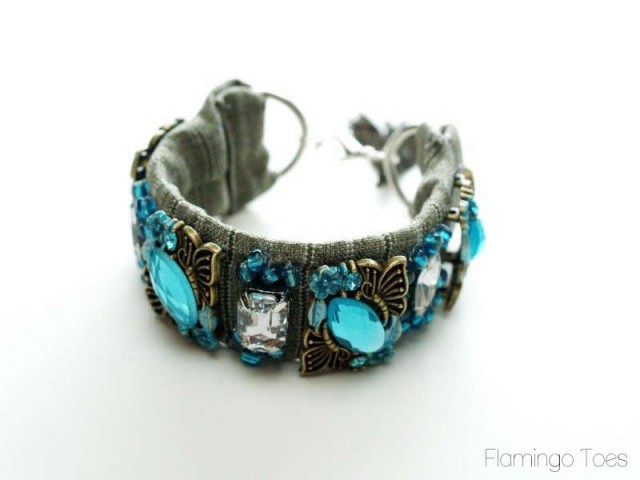
Here’s my version of the Anthropologie Fori Bracelet:
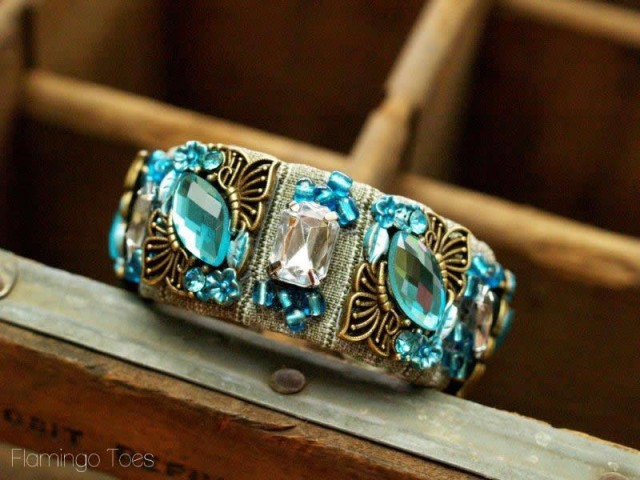
I love how it turned out! It’s kind of fun and vintage-y looking!
And here’s Anthro’s version – valued at $118!!:
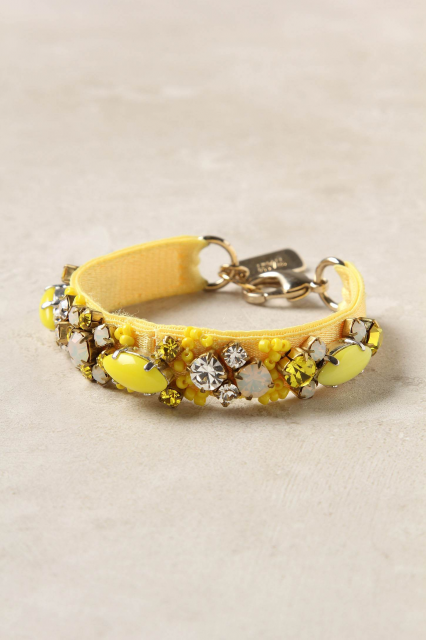
So here’s the inspiration part. I wanted to use fabric instead of the nylon webbing they used. That’s the beauty of a making your own though – you get to make it the way you want it!!
Ready to get started?
This is quick and easy!
(And would make a fab Mother’s Day gift – it’s just around the corner!!)
Materials:
9″ x 3″ piece of fabric
Piece of webbing/belt/stabilizer – 5″ x 1″
2 small D rings
Lobster Closure
2 jump rings
Beads and rhinestones for decoration
Optional charm for decoration
Start by sewing your fabric in half, long ways, right sides together.
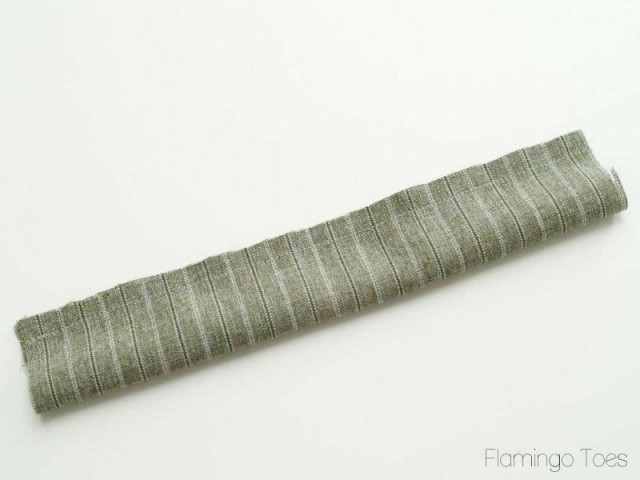
Turn the fabric tube right side out. Press the seam open and in the center of the tube.
Cut a piece of webbing or stabilizer and slip it into the fabric tube. I used a piece of an old belt of my sons.

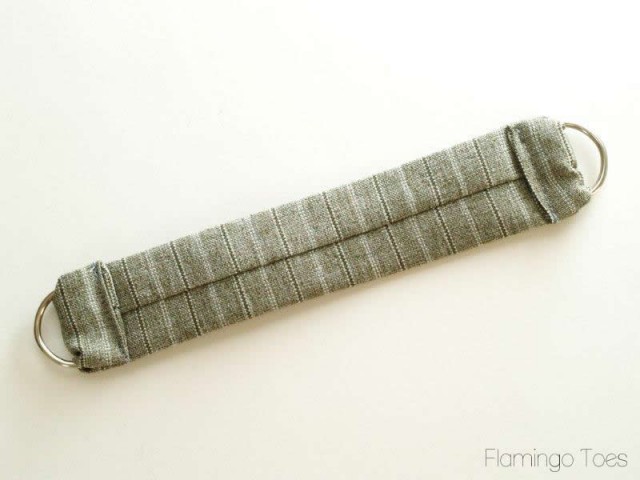
Center the webbing in the fabric tube. Tuck the open ends of the fabric in, then slip each end through a D ring.
Fold the fabric to the back side, with the seam, and sew across each opening. Your fabric piece should measure about 6″ without the D rings.
This will fit an average size wrist. Check your measurement before you sew on your wrist and adjust the folded sections larger or smaller if you need to.
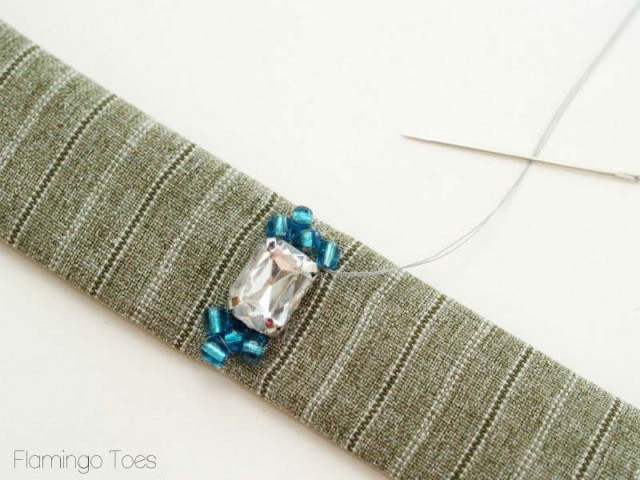
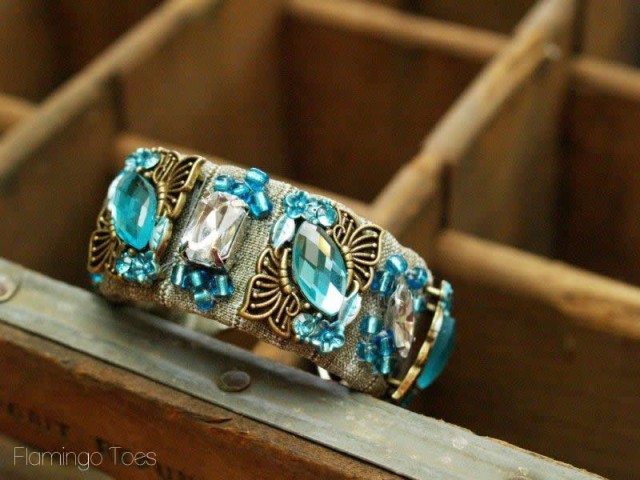
Decide the layout of your beads and stones. (All of mine came from Michael’s) Begin with the center and start sewing on your beads.
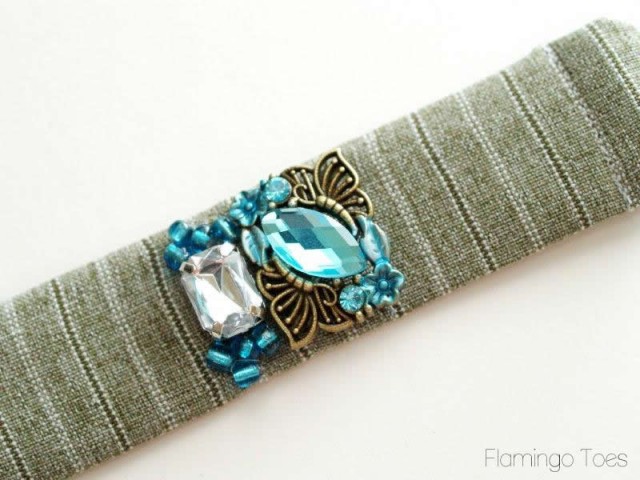
Continue sewing on your pieces, working to one side of the center until you have half the bracelet covered.
Sew on the rest of your beads to finish out the bracelet top.
Add your bracelet closure to the D Rings. You can also add a pretty charm or bead to the closure for a little fun.
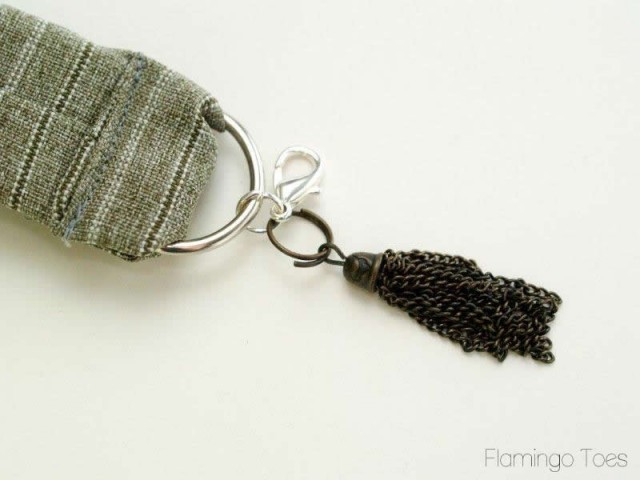
(If you don’t want to do the lobster closure thing, you could tie the D Rings closed around your wrist with a pretty length of ribbon or lace too!)
And your bracelet is finished!!
It’s lightweight and will go with pretty much any outfit – dressy or casual!


I hope you like it!
I’m linking to Sunday Scoop, Today’s Creative Blog, Met Monday, Skip to my Lou, Quilt Story, Tutorials & Tips Tuesday, Shabby Creek Cottage, and the other fabulous parties on the party page – make sure you check them out!
(This was originally a guest post at Oopsey Daisy)


This bracelet is just stunning! You really are crazy talented with making jewelry! Have a great week!
Take care,
Trish
I like!
Love it! Love the closure. So cute! And I would recognize a line from The Princess Bride anywhere! Thanks for sharing.
~Laura
http://www.hayestone.blogspot.com
Bev,
Scenario: I’m in a rush only a few minutes to clogup (catch up on blogs), I scroll fast and furious and see this incredibly neat bracelet. errrrrr, page up. I see the words Anthro and think, “ok never mind I don’t have an Anthro wallet to buy that” and then continue to scroll through the rest of your post. Wait a minute, back up the bus (page) that is not the Anthro $$ bracelet THAT is Bev’s version!!!! Seriously, no joking your version I would pay (if I had it) $118.
I actually like yours better! Super cute and awesome colors!
Sooo cute! I like your version much better then Anthro’s! Awesome colors! :)
love your bracelet better – the style, size, and colors!
Wow!! I love this, you’ve inspired me. I off to get all my jewellery making bits out.
i LOVE LOVE your version — so much more than the one for $118 — wow! lovely, beautiful — and even with jeans?!! so sweet.
You know I love this, Bev!! Love the colors! So happy to have seen this piece in person. ;)
I like your version better than the Anthro version!
This is adorable! Love your’s more than the inspiration! Great job!
I love this!! You have inspired me to make my own!!
You did a great job on the bracelet! I like it better than the Anthro version. Thanks for the instructions!!!
This is so clever! Using webbing as your base opens a new world. I have used cuffs but I love the flexibility of the webbing. Thank you so much for the instructions!
This is a great project! The bracelet is really beautiful! Would you consider linking this up at my Pinworthy Projects Party?
Swoon… that bracelet is totally amazing! Thanks so much for sharing your creativity! :)
I love it. I like your version better than the Antro one.
Very, very cute and way better than the inspiration, at a better price I am sure!
This is a wonderful project! Love the colors and your tute is great. Pinning this to my Making This board right now. My Lordy, woman, is there no limit to your cleverness?
I really, really LOVE yours. It is SO much better than the original. I am in awe of your talent. Thanks for the tutorials!!
I L.O.V.E. this! It is so vintage I think I have to say it is “groovy”!
Kim
FEZZIK FROM THE PRINCESS BRIIIIIIIDDDDDDEEE!!
Haha, I saw that and just scrolled to the comments before reading this just to reply….
Best movie ever!!
“Fezzik, are there rocks ahead?”
“If there are, we’ll all be dead!!”
“Stop rhyming and I mean it!”
“Anybody want a peanut??”
=]
I love your version! I am a sucker all shades of blue. And, yep, I got the Princess Bride reference too -what a great movie!
Seriously–one of my all time fav’s!!!
I LOVE the colors you chose for this! Great bracelet, and great tute!
That looks fabulous! Love it! I would love for you to share this (and any other creations) at Pin It and Win It Wednesday at http://www.cheapcraftymama.com– where you can win free ad-space on my blog!
That is just so pretty! I do like your version quite a bit, and that is a fabulous idea to use webbing. Lovely job!
Totally gorgeous! I’d love for you to add it on my link party at: http://printabelle.com/?p=3188 Thanks!
Ack! You are amazing Bev!!!
Wow Bev, this is really impressive. I actually like it MORE than the inspiration bracelet! It’s so gorgeous. I copied an Anthro bracelet also but I like yours more. Here’s the link if you want to see it: http://michellelunt.blogspot.com/2010/10/antropologie-inspired-cuff-bracelet.html
Warmly, Michelle
this is beautiful! i like your version better than the inspiration piece!!
So so so so cute Bev! You’re going to make me sew yet!
These are soooo cute!!! Love them!!
I saw this bracelet on Anthro, and I knew someone could knock it off, and you did, and it looks GREAT!!!
what???? I am totally floored!!! Love it BEv! I’ll be sharing on FB and twitter! thanks for linking up to Make it Monday! :)
Love the COMPLETE awesomeness of these project!!!! Way surpasses the Antro whoever knock-off ;)
Consider this baby pinned & loved.
Very nice and I love it. Thanks alot for giving your tutoriall for us to follow. Glad I found your blog.
The aquamarine gems and grey fabric are stunning. This is definitely one of my favorites. Pinning and spotlighting on Facebook.
I am in awe over this bracelet! How beautiful it is! You make it look so easy- easy enough for me to give it a whirl! I would absolutely love for you to stop by and add this to my link party – http://www.tiarasandbowties.blogspot.com/2012/05/hello-lovelies-in-case-you-havent-heard.html if you so choose! I am your newest follower!
Kim
That is stunning!!! What fun bracelet to recreate!!! Thank for the easy to follow tutorial!!
I like your version MUCH better! Great bracelet!
Love that bracelet and the Princess Bride reference. “Stop that rhyming, I mean it. Anybody want a peanut?”
Bev, this is a truly GORGEOUS bracelet! I like your inspired piece MUCH better than the piece you got your inspiration from! :) Wow! Definitely want to try this – adding to my never-ending list on Pinterest! :)
I have to agree with Dawn; I like your version much better. Very nice and it inspired me to go off on yet another tangent/style….no hope for my ADD!
Love yours better than the anthropologie version!
I love this. Thanks for the great tutorial. I’ll be sure to link you if I ever make this.
love the blue (your version)! thank you for sharing the tut.
Hello,
you’re bracelet is absolutely stunning and much more beautiful than the original! Thanks for sharing. I’ll import your idea to Germany …
Love it. I think yours is better than the original. I would probably not wear the Anthro version, but would definitely wear yours. Soooo, I guess I know what I’m doing this weekend. :)
Humperdink is marry Buttercup in little less than haf’ an hour
So all we haf’ to do is…
this is an amazing friend project! cant wait to do it :)
BTW, The Princess Bride
This is so much prettier than the Anthro bracelet that inspired it. Well done!
Very beautiful, thank you so much for sharing!
Wow. I love this! Actually I like your inspired version Way Better than the original.
Yay!!
You got me thinking about the that I ready and putting them to a good use
Also yours is much more put together than the other one
The bracelet you created is a lot prettier & detailed then the Anthro bracelet..Great job!
Perfect!
“Buttercup is marry Humperdinck in little less than half an hour.”
Love this bracelet! Yours is much nicer than the Anthro original.
Bahahaha. Love the Princess Bride reference. I love the Fire Swamp Quote. Buttercup-“We’ll never survive!”. Westley-“Nonsense, you only say never because no one ever has!”. Thanks for the cute bracelet idea!
I like your version much, much better. I have to try this.. love, love, love this..!!!
Your bracelet is GORGEOUS. I love it! In fact, I was inspired by your buttons-on-a-fabric-band idea and made my own version. It didn’t come out exactly as I had planned, but not bad for a first attempt! I’d like to post pictures of my bracelet on my own little blog, and I plan on including a link back to this post when I do. Thanks for the tutorial and happy crafting! :)
THAT is quite spectacular! I wish I could do that… Do you sell these?
Marvelous idea! Easy to make, and I could crank out several for different outfits. Thanks for the clear instructions.
$118!? AYFKM… their pricing dept really has some cojones. Your version is so much prettier, too.
Like yours way better!!! Can’t wait to try something similar. thanks!
Youre version is more pretty. Thanks for share. I do some bracelets myself but never try the belt thing. Thanks because its an excellent idea. God bless
Love it! I like it better than the anthro one.
love this!! I have all this vintage barkcloth from the 50’s with great designs i am going to try this with broken pieces of vintage jewerly ive picked up too!!
I love this bracelet!!! It’s so much better than the Anthro one. Great tutorial as well. Pure genius using the old belt to stiffen it!
Thanks for sharing this!
Saw this on Pinterest…Wonderful! You did a great job and the bracelet is so fun!
Thank you for sharing it!
Thanks for the how-to! I think yours is much prettier than the original.
I actually like your version better, and would rather do it up the way you have presented it ;-) Kudo’s
A couple of years ago, I followed some instructions from a Woman’s World magazine to make a bracelet that looks a bit like your bracelet. It uses a metal cuff (online web site for this). You wind satin ribbon or I used wide bias tape around the cuff – glued the beginning and end to the cuff. I glued a little bit as I went to keep the ribbon/tape from sliding or shifting. I started with just an off white and then branched out buying pastel colored tape. Then I bought some interesting beads and things from Michael’s or Joann’s and I found some cool lacey cotton stuff that comes on a roll so you purchase it by the yard. I’m sorry I can’t remember what it’s called right now. They are flowers or lace circle – things that people use on wedding dresses and etc. I cut them apart into smaller pieces and then died them different colors. I used the Rit dye in small pyrex bowls (don’t use plastic as it will absorb the dye) – you only need about a 16th of a teaspoon or a little more – follow the directions on the package. I used purple, pink, blue, – any colors that you want. Let then dry overnight before you glue them to your cuff. I alternated the cotton flowers with some of the beads and accessories. I also used flat back rhinestones in multiple colors (about 4-6mm). When you have glued on as much as you like – you have a lovely cuff. I do sell my crafts at craft shows and figured out that I could sell these for $20 and still make a profit. The designer cuff this was patterned after cost $89. If you want to try this and need better instructions, just ask me.
This sounds absolutely great and interesting. Do you have any viewable instructions or videos? Would like to view, you seem very creative and resourceful. Looking forward to hearing from you. Thanks!
MaElena
I do not have a blog or tutorial for the cuff bracelet. I don’t know how to do either – all these “newfangled” things have kinda passed me by – I used to be at the forefront of computer stuff but disability/retirement came along and since I don’t work, I don’t keep up.
I can send you via email some pictures and write up something for you. I actually have a picture of these on my facebook page, just scroll down a ways to see it. And if you want some instruction on how to – just let me know and I can write up something.
If you go to my Facebook page, scroll down to January 23, 2013 which is where a couple of pictures of the bracelets are located.
Do you still have instructions? I love this!
Me encanta.
Quisiera hacer uno similar, pero no se dónde conseguir beads y rhinestone similares.
Me podéis ayudar
Irenor, no se en acual pais estas, pero puedes mandar traer un catalago de “FIRE MOUNTAIN”, ellos tienen cantidad de cosas, cuentas, etc. Espero que esto te habra ayudado, si no, avisame.
Cordialmente,
MaElena
I was going to add a picture of my cuff bracelets but I can’t figure out how to do that
Bonnie,
You can’t post pictures of your own on the blog. If you have something you want to share you can post a photo or link on my Facebook wall though!
Bev
Yours is a LOT better!!!
Yes, Ms. “Bev”, this is another great “inspiration” of yours, and you’re right, it really seems easy to do, and I will certainly try it. As for the “…splain” comment, I don’t know of a movie, but the little word instantly brought to mind “Ricky Ricardo” of the “I Love Lucy” series, am I right? Thanks for sharing this tutorial of such a beautiful cuff bracelet!
MaElena
Yes, inspiration is great & the reference is to Princess Bride, spoken by Inigo Montoya! Love your bracelet & blog. Thanks
Yes a video would be awesome! :)
Love it, soo prefer yours :)
Your bracelet is gorgeous, but I wouldn’t pay $18 much less $118 for that other one. It’s not even pretty and I normally love yellow.
I’m going on the hunt for the supplies to make this bracelet. I live in the middle of the jungle in Costa Rica and the nearest place that might, I repeat might, have the supplies is about a four hour drive so I must gas up the car.
I have to tell you that your bracelet is gorgeous and thanks for sharing how to make it. If I were shown pictures of the two bracelets I would guess the yellow one as being the knockoff and a cheap looking one, at that.
I haven’t been to your sight before but I will be back. Thanks again.
Hi Bev! Love this bracelet, and would like to know if the brassy pieces you used, are they filigree or were they pieces of jewelry that you cut apart? I love anything with filigree, and was just curious where you found these pieces or if you remember where you found them.
Thanks so much,
Zonda
Hi Zonda – this bracelet is great – never thought to use like this – these sliders, as they are called, come with 3-4 pieces on card in jewelry aisles at craft stores – just picked up similar pieces last week at Michael’s craft store – wait till sales at 40% off – also sell at ACMoore – good luck
Why how awesome u are for making that.. Ill give it my best!!! Novice beader!!!
Clarification of recent mssg: ” I ” am a novice beader that will attempt such a intricate beautiful piece of jewelry!!
That is so pretty. Did you sew the beads and jewels only on the top layer of fabric – and if so – how did you hide the knots? I can’t wait to make one of these!!!!
Oh my goodness I totally love yours WAY BETTER!!!! Marvelous job!!!
I love yours so much more than the Anthro one!
“You keep ausing that word. I do not think it ameans what you athink it ameans.”
Great tutorial. Awesome work.
Douglas
It’s unanimous. Your version is much cuter. So sad–I’m too lazy to attempt it, but it’s gorgeous. Good for you!