When I was asked to be the Guest this month in the Pinterest Challenge – I spent days going through my boards trying to decide what to do.
(Yes. I have no life.)
Did I want to make something Grand? Something fun? Clothes? Something for the house? There were so many choices.
But I kept going back to a little Felt Embroidered Bookmark that has been lurking in my Embroidery Board for 16 weeks.
I just loved the pretty daisy stitches on the wool felt – it’s an adorable bookmark that makes you feel like you are reading Austen and Dickens and Bronte.
Even if it’s a cheesy mystery novel about an Elvis look-alike and a stolen Cadillac.
Yep. Read that.
So here is my version of the sweet little Felt Embroidered Bookmark.
Well – my first version.

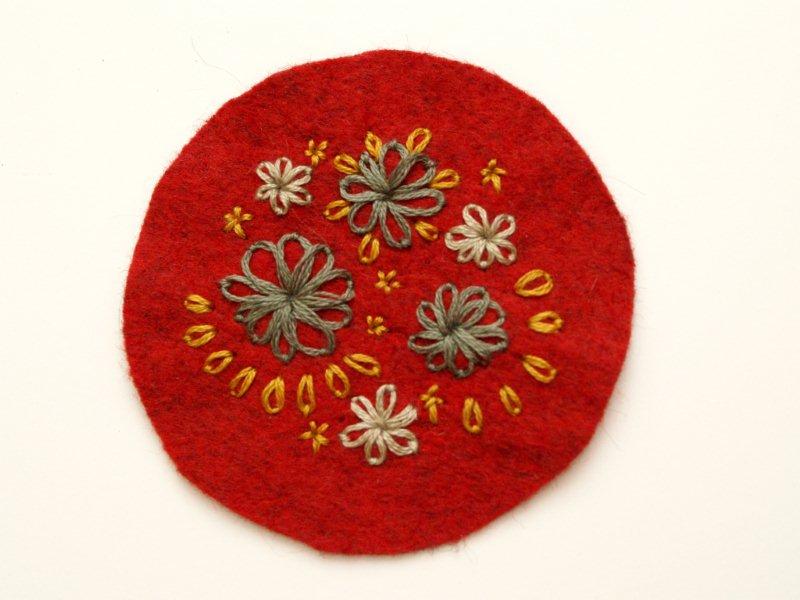
Here’s the Inspiration Pin –

Unfortunately when I tried to find the source of the pin I went on a bit of a wild goose chase. This is from a Tumblr site. So of course trying to find it is like trying to navigate down Alice’s tunnel to Wonderland.
I also tried general searches but no luck. So if you know of the original maker, let me know – I’d love to link to it!
UPDATE: Thanks for all the links – you guys are awesome! We have the source of the pin – it’s an adorable Etsy shop called love, maude. She makes these as headbands but she also has cuffs and necklaces. So pretty!!
Make sure you check out her shop! I don’t normally post knockoff’s from Etsy shops so I double checked with Sandie from love, maude. She was super sweet and said she had no problem with me leaving the tutorial up. Yay Sandie! Thank you!!
So here we go then –
This is pretty easy to put together – here’s what you’ll need:
Wool Felt (lasts much longer than regular felt. Promise)
embroidery floss in colors of choice
small circle of super heavyweight interfacing
elastic headband
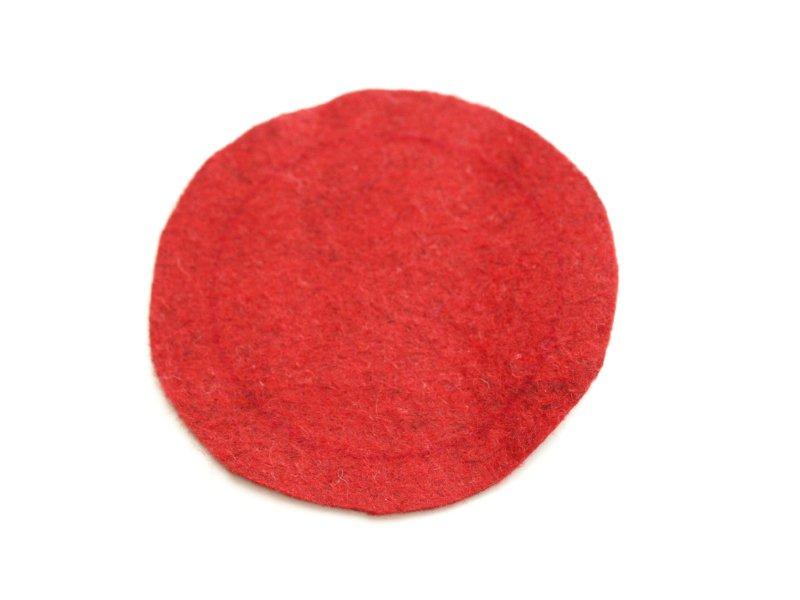
Begin by cutting 2 three-inch circles of wool felt. I used a canning jar lid as a pattern.
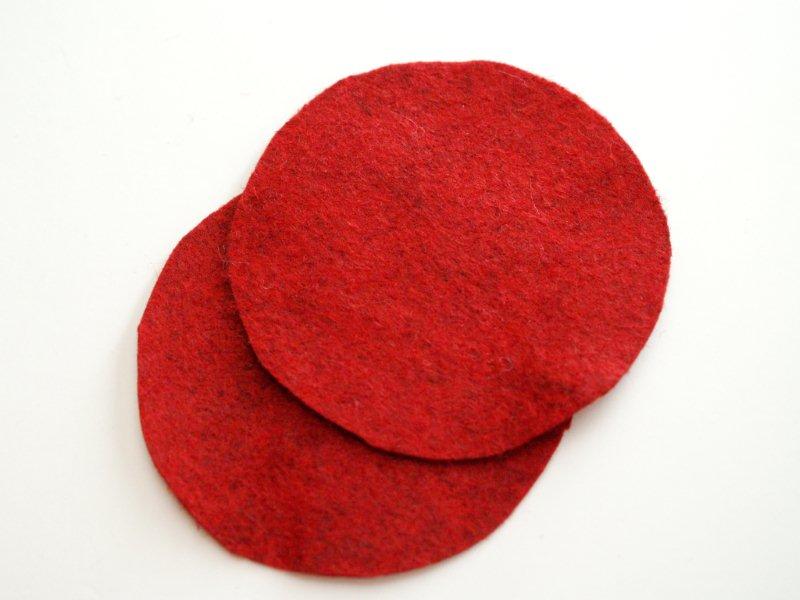
Trace the inside of the canning jar lid onto one of the circles. This will be your stitching line when you put it all together. You want to use it as a guide for your embroidery so you don’t go over it.
The inspiration piece uses mostly Lazy Daisy embroidery to decorate the front so that’s what we’ll do for this first bookmark.
The lazy daisy is a simple stitch – and it doesn’t have to be perfect. No one is going to inspect your embroidery.
And if they do you can snap them with the elastic of the headband.
The “petals of each flower on the bookmark are a single lazy daisy stitch. Here’s how you make it.
Decide where you want the first petal.
Insert your needle at the bottom of the petal – that will be point “A”.
Bring your needle out at the top of the petal but don’t pull it all the way through. That’s point “B”.
Wrap the thread around the tip of the needle from left to right.
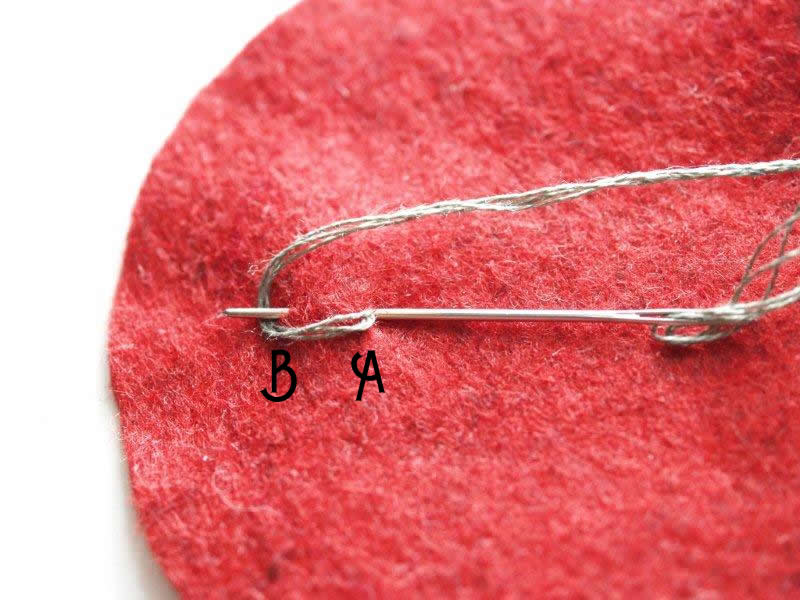
Pull the needle through, keeping it above the wrapped thread. Don’t pull too tight or you’ll have a line instead of a petal.
Here’s what it should look like.
Now, keeping the petal loose, insert your needle on the outside of the petal at the top. In the diagram below – point “C”.
Bring the needle back up again at point “A”.
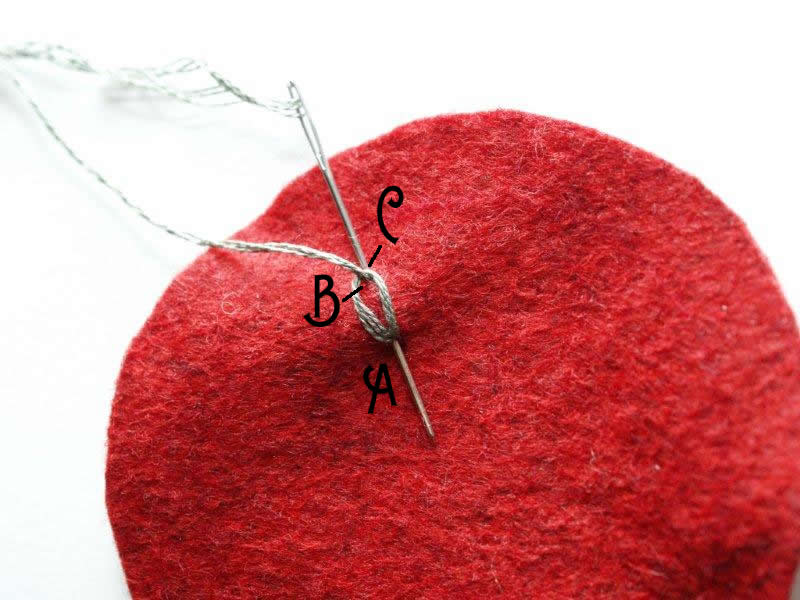
Pull the needle through. This will make a tiny little stitch at the top of the petal and hold it in place.
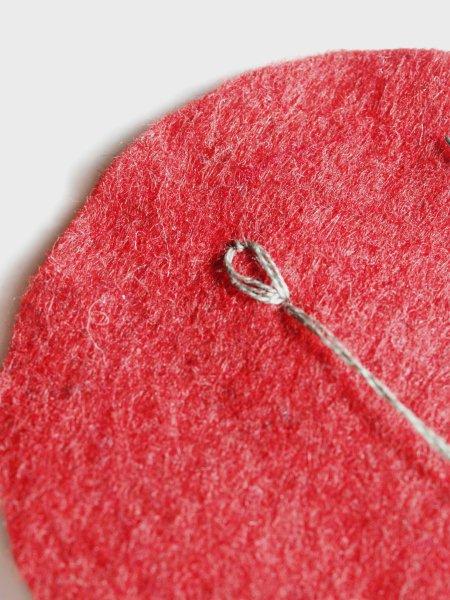
Aww. That’s nice.
Now continue making petals with the bottom points touching to make a flower.
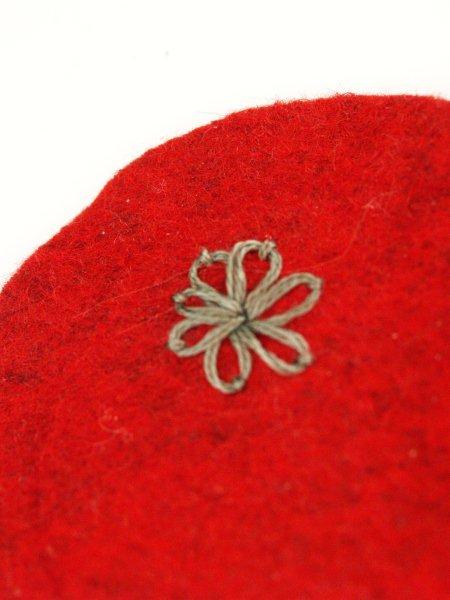
See? Not perfect. But still cute. :)
Continue to make flowers on the circle. I made three with this color.
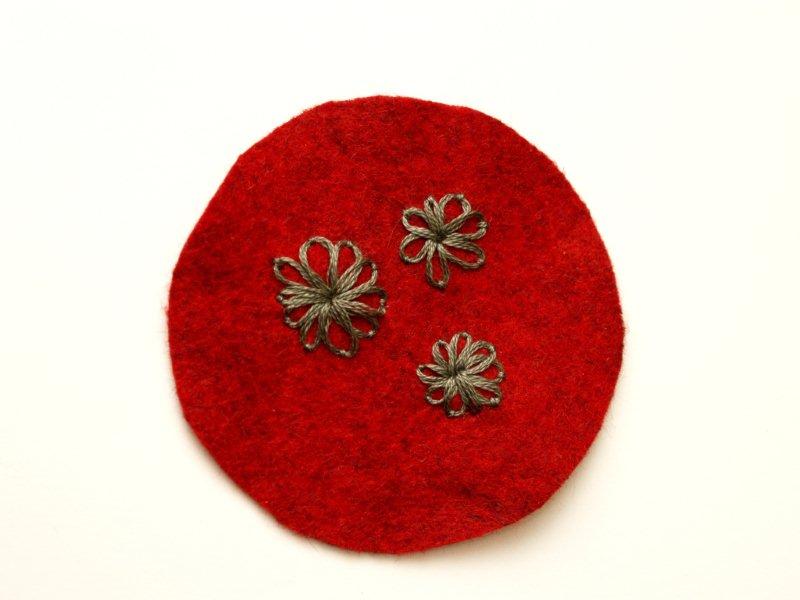
Now add a few more flowers and other details to fill it in. I added three more small flowers in a contrasting color. Then I added some gold lazy daisy stitches in the open area around the larger flowers.
I also made some little star shapes to help fill it in. These were just tiny lines going out to 5 points.
Once you have the top of the bookmark stitched, layer together your other pieces.
Cut a smaller piece of heavy weight interfacing. I used the inside edge of the canning jar lid as my pattern.
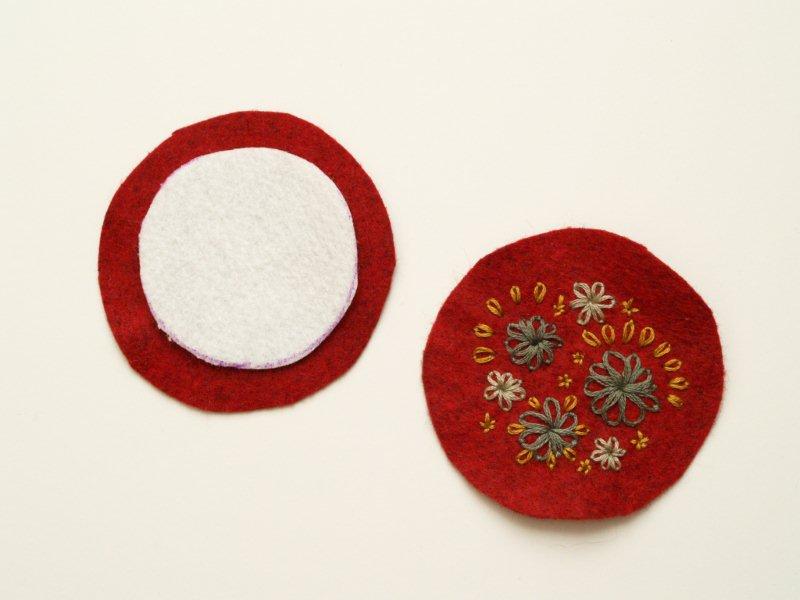
Place your elastic headband under this interfacing piece, but on top of the back felt piece. Add your embroidered circle to the top.
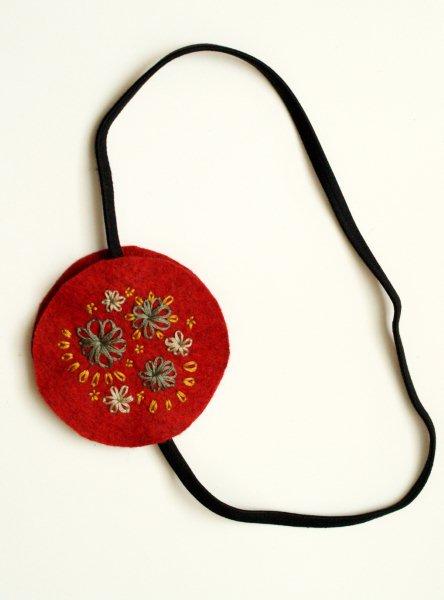
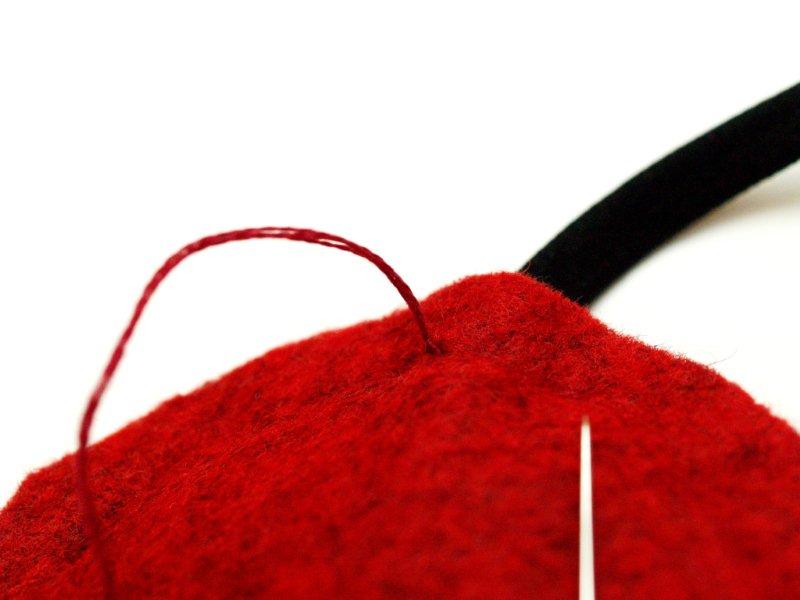
Sew all the layers together with matching embroidery floss using a Running Stitch. Make sure you sew through the elastic headband in place too.
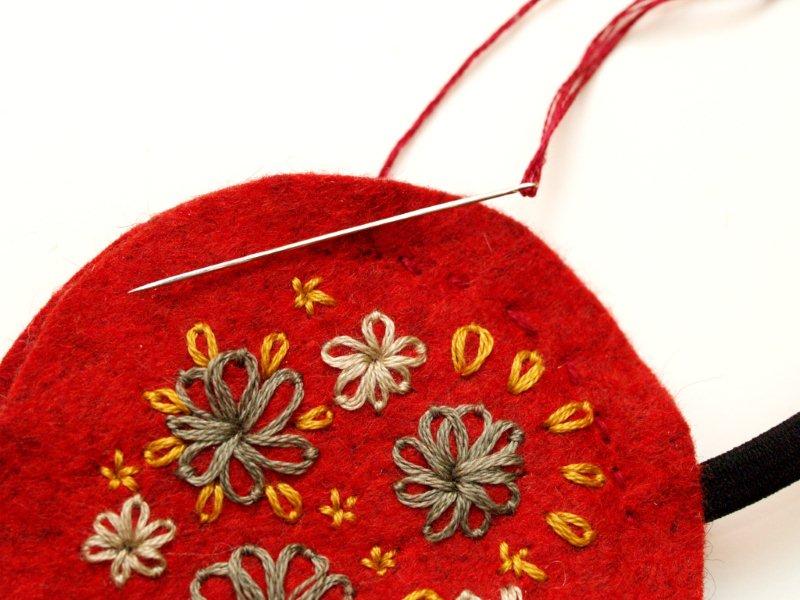
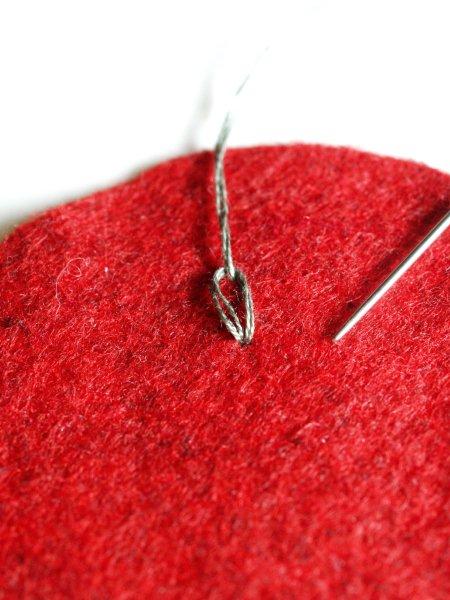
When you have sewn all the way around the circle, knot your thread on the back of the circles.
Here’s a tip to prevent the little tail of the knot from showing after you snip the thread.
After you tie the knot, make a stitch beginning right at the point of the knot and coming out about an inch or two away on the back.
(Don’t sew all the way through to the front of the bookmark)
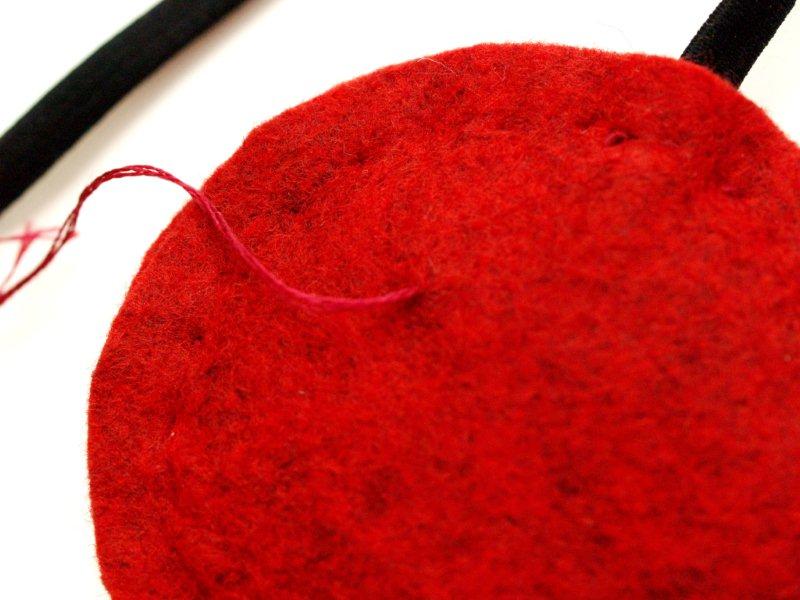
Pull very slightly on this thread and then cut the thread close to the felt.
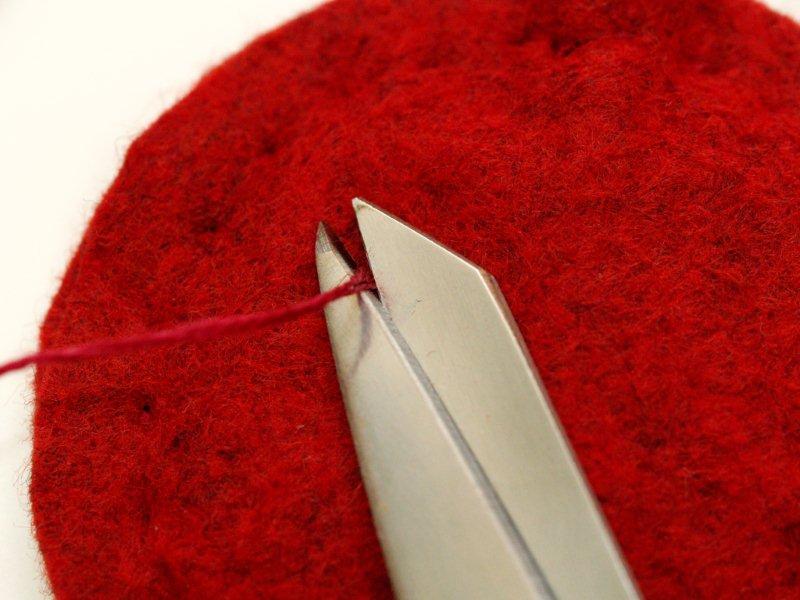
Once you cut the thread, it should disappear back into the felt and that saves you from having a little loose knot tail.
The knot lays nice and flat.
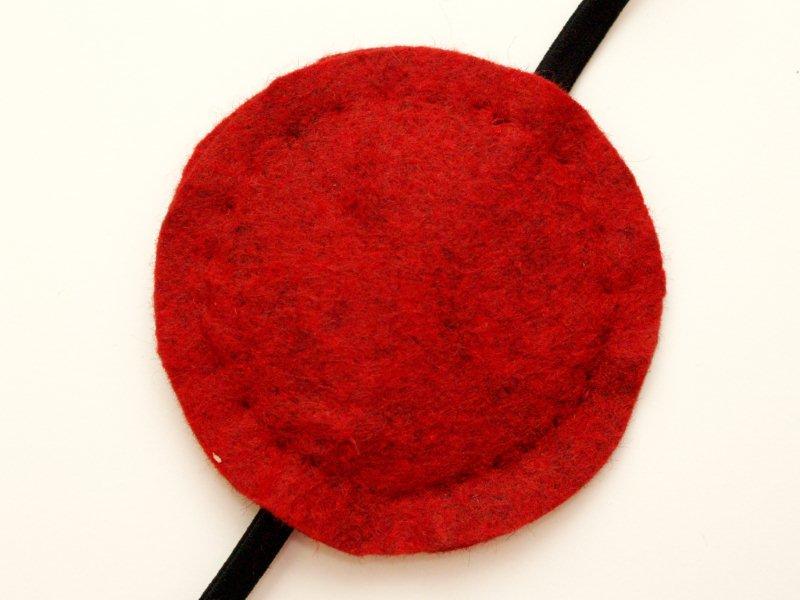
Now you have a cute little bookmark! Slip it on your book and admire your awesomeness.
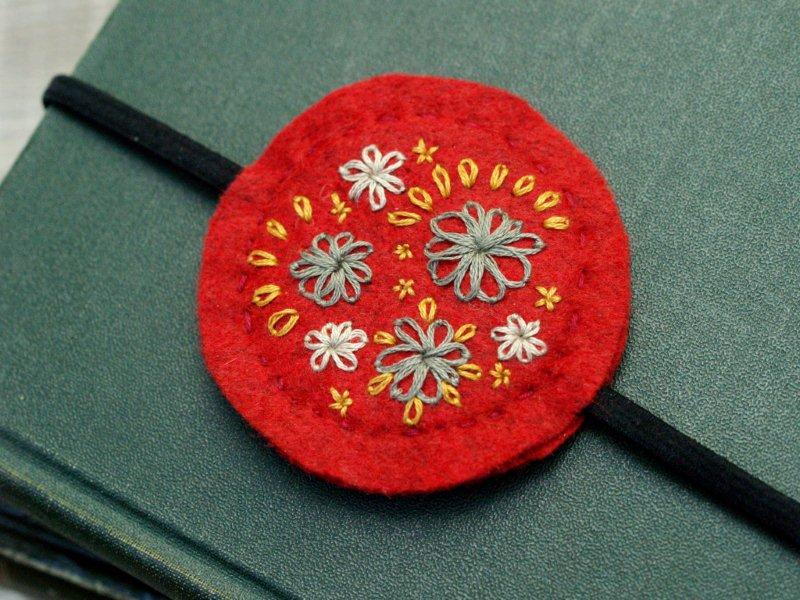
So sweet right? I love it.
It does have one drawback though. It works best on larger books. On a smaller book, the elastic is too loose and flops a bit.
Flopping is bad.
So I decided to make a version 2.0 and try to come up with something a little more adjustable. I thought a ribbon tie would work great.
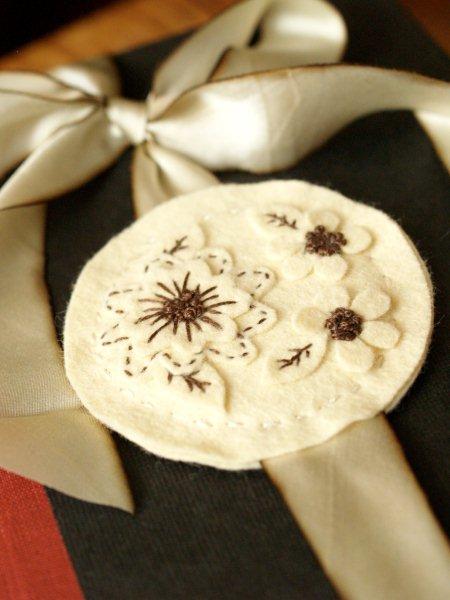
Here’s the second Bookmark!
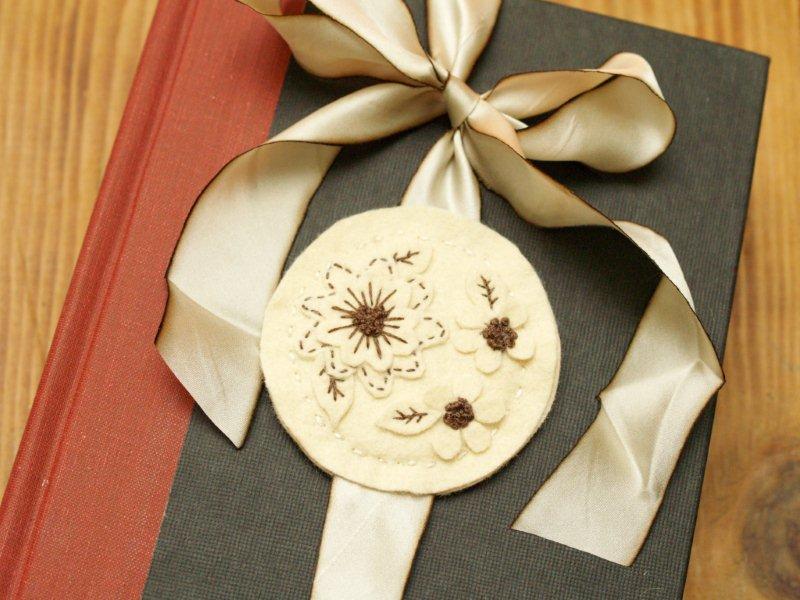
The ribbon unties, then you can just re-tie it depending on the where you are in the book – or if you need to use it on a smaller book it will just have a larger bow!
I realllllly like this one.
The steps for this version were pretty much the same except I made a more 3-d look. I cut out several flowers, petals and leaves out of the same wool felt as the top.
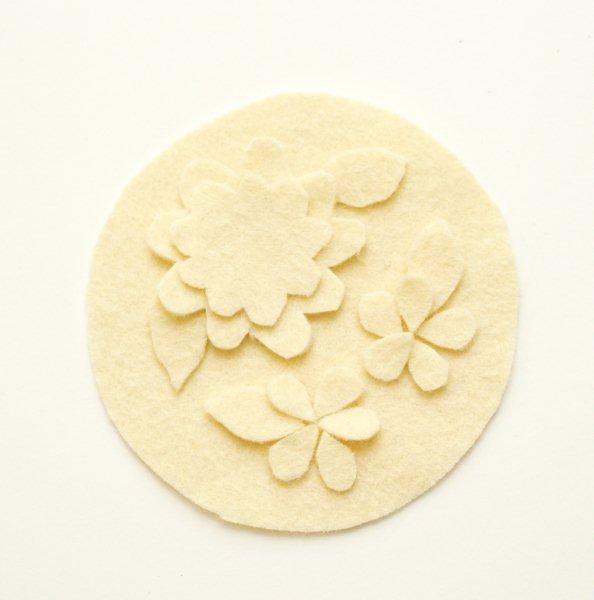
I sewed them on with running and straight stitches. The centers of the flowers are French Knots.
Instead of sewing it to an elastic headband, I cut a length of ribbon and sewed it to the felt circles closer to one end of the ribbon. That way I can pass the long end of the ribbon through the book around the top, then tie the two ends in a bow.
(My ribbon is 43″ long and the felt circles are sewed 14″ from one end.)
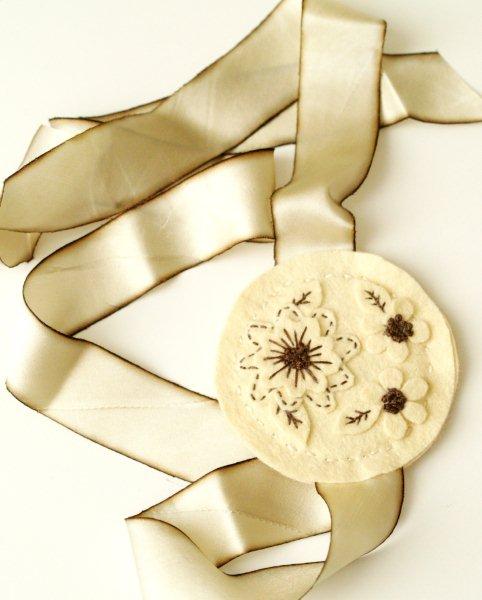
(How gorgeous is this silk dyed ribbon? It’s from M&J Trimming.
I think the dimensional flowers on this one are fun –

And it looks so pretty against the bow of the ribbon.
What do you think? Do you have a favorite?
I think these would be fun gifts too!! Don’t forget – Easter and Mother’s Day are right around the corner!
I’m linking to Sunday Scoop, Today’s Creative Blog, Met Monday, Skip to my Lou, Tutorials & Tips Tuesday, Funky Junk Interiors, Quilt Story and the other fabulous parties on the sidebar – make sure you check them out!


Hey Bev!! I also have this on my embroidery pin board, I probably pinned it from you :) I love your versions!! The white with the ribbon is beautiful. I made one too for my bff although it isn’t nearly as awesome as yours. You can take a look here on her blog if you want :)
http://primitiveandproper.blogspot.com/2012/01/i-o-thank-us-fabulous-new-etsy-shop.html
have a great day!!
Well Done Bev..Awesome :)
Beverly,
What a wonderful tutorial, especially for newbies that may have never tried to embroider.
Both of the bookmarks are wonderful, and the one with the ribbon is elegant.
Thank you for sharing.
Teddie
Both are great but the first is my fav!
You did an amazing job! The bookmarks are so pretty!
~Mrs. Delightful
ourdelightfulhome.blogspot.com
These are beautiful! And you details, pictures, and instructions make the project seem very doable! I cant wait to try one :) THanks for the great resource.
It’s by Lovemaude on Etsy! Here’s her linky to a very similar item…you’ll know it’s her when you see her shop!
http://www.etsy.com/listing/80042945/felt-headband-hand-embroidered-grey-felt?ref=sr_gallery_31&sref=&ga_search_submit=&ga_search_query=embroidered+felt+headband&ga_view_type=gallery&ga_ship_to=US&ga_search_type=handmade&ga_facet=handmade
This made me laugh…beverly sees only the bookmark…and thinks in terms of needing a smaller one (the ribbon one) for smaller books…and on the Etsy shop it’s sold as a HEADBAND! the book is only for display. I love items that can be used in more than one way, and am actually more excited about this as a headband than a bookmark!
They are both so gorgeous that I can’t choose! Thank you for sharing this and with your tutorial, I think perhaps I can do this!
seriously darling – love it….bookmark or headband combo – ack – adding to my to do list!
Oh my goodness…these are beautiful!! Just came across the interest challenge, I’ll be joining in…what a great motivator to try out all those pins:)
Congratulations on a job well done!
Jenny
Thank you for this sweet post. My sister and I will be making these for gifts. So easy and cute too. Smiles to you,Susie(She Junks)
Another gorgeous bit of work, Bev! I adore the cream one- that ribbon really makes it special. I need to make a few of these for headbands and bookmarks (and brooches!), but until I master the lazy daisy, mine will have some other kind of stitching on them :P
hugs,
H
Bev,
As usual I am blown away by your creativity. Absolutely love both bookmarks but Adore the one with ribbon. Reading is one of the joys in my life. I have had to unsubscribe myself from tons of sites. I was spending hours looking and not Doing!!
Of course I will always follow you.
Have a Great Day!!!!!!!
Cathe
I love them! Wouldn’t that red one make a pretty headband?
I think the bookmark is from a shop called LoveMaude on Etsy!
I love the ribbon tie one!
Love this Bev! And LOVE having you as a Guest Pinhead :) You’re a natural!
I love them both! But if I was going to use one as a bookmark I would probably make the headband one. Something about tying the ribbon each time seems like a lot of work. :) Did you use an adult size headband? Maybe a child size one would help with the floppiness? Or maybe it would be good with elastic and then you could make whatever size you want? I definitely want to make some!
Hi there!
It’s me…love, maude (my name is actually Sandie). I love that you used my headband as a bookmark! I never would have thought about that. How cute and clever! Great choice of colors too! Loving this!! :) Stitch on!
Gorgeous! I think they look like they’re right from Anthropologie!
Wow love them, especially the cream colored one! It’s so pretty!
Natalie
http://www.projectdowhatyoulove.wordpress.com
I just love these! Your description of the books they adorn made me laugh. :-)
This is so adorable! I love everything about it and the original pin. How sweet of you to try and track down the seller and how sweet of here to let you leave it up…see for people like me who actually know how to embroider but will never get to it…I will head over there and peruse her store! I want to live by you so I can pay you to take all of my photos too, OK?
I’m pretty sure I have this pinned, too! Probably from you. :)
These are both seriously breathtaking. I *really* want to try this embroidery technique!! Thanks for the tute, Bev! Pinning!
And I’ve totally hearted that Etsy shop. Her work is AMAZING! :)
These are beautiful!
YAY!!! So glad you made these! They are simply gorgeous (of course)!! These would make the greatest gifts!
Super SUPER cute! I totally want to make some!
liZ
Both look beautiful…but when it comes to bookmarks I just dont have the patience to tie a ribbon up ;)
That is so cute! Your stitching is adorable. These would make wonderful gifts. Thank you so much for sharing!
this is gorgeous and I love that if your bangs are bugging you while you’re reading you can use it as a headband I would love you to add this and any other posts you want to show off to my What We Wore and Made party over at http://raegunwear.blogspot.com/search/label/WWWMW
Your book mark is very nice! This might be a good small project for me to learn embroidery! I have no clue how to sew those flowers you made. It is very pretty!
These are so cute. I am loving embroidery lately and just mastered my own lazy daisy recently (although they do look different from yours).
Oh Bev these are just precious and genius. I love the idea of using a headband! So so cute!
very very nice….I have the original on my pin board also….but i reaaaallly love the white one
These are so pretty!!! I can always use new bookmarks.
Rachel
adventuresofadiymom.blogspot.com
This is beautiful. You have a great eye for detail and the talent to match!
Lou
Wow these are both so so cute! Your designs were both so beautiful & it was a great idea from love maude that you tried out. Nice job!
Oh Bev! How I wish I had your sewing/embroidering skills! You always make me smile–I can now “spot” a Flamingo Toes project! Thanks for sharing at oopsey daisy!
Bev, these are a “must make” for me. They’re so beautiful. Totally coveting your vintage book collection too!
Pinning your project and featuring on my FB page today.
Have a wonderful weekend!
Jenn
What a lovely gift for a keen reader. They would be cute headbands but I think they are so much more useful as a bookmark that won’t fall out if you drop the book. Excellent tutorial – and thanks to Sandie too for being so generous.
je prefere le blanc bisesssssssssssssssss
Boa tarde, Lindos marca páginas. Já fiz alguns mas os seus estão lindos, o branco parece um doce de côco. Abraços Marta.
Boa tarde. LIndos marca páginas. Já fiz alguns mas os seus estão lindos, o branco parece um doce de côco. Abraços. Marta
These are awesome! Thanks for the tutorial!
This is where that bookmark came from – http://www.etsy.com/listing/80042945/felt-headband-hand-embroidered-grey-felt?ref=usr_faveitems
Beautiful book marks. I’ve never seen anything like these. The white ribbon bookmark is a great modification. Thanks for sharing.
First of all, be sure to examine the structure of the bikini in comparison to your body shape.
We simply love HardX. Therefore, you will have a clear idea on the subject of your purchase.
Hard X now, Previously engaged to NASCAR driver Ricky Hendrick, who was killed in
a 2004 Martinsville plane crash, Maynard knows a thing
or two about keeping up with the sports world.
Oh wow the cream one gorgeous. Like the red one and I just so happen to have red wool felt. Busy weekend coming up. Might get my grand daughter hooked too.
Adorei!! Achei os trabalhos belíssimos, vou tentar fazer algum.
Parabéns.