Ready for a little Valentine’s fun? Me too!!
I have been super fortunate with a new friend that has moved close to me, Aimee from byAimee.com and Fancy Little Things! We have been crafting up a storm together. It’s been so fun to have someone close that loves to make things, and blog, and eat yummy food. :)
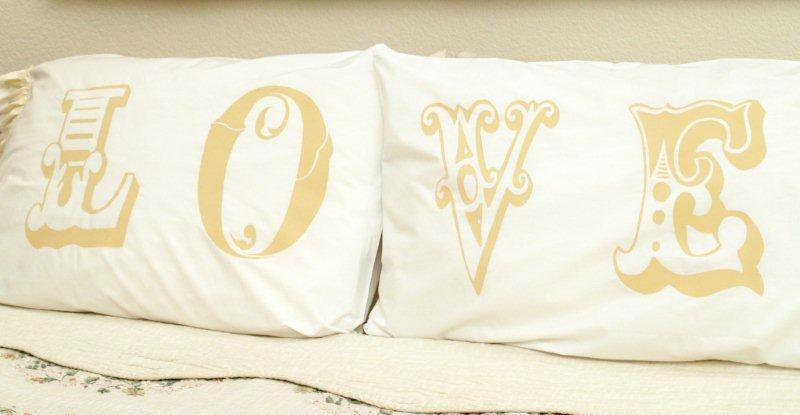
We got together last week and made some fun pillowcases for Valentine’s Day!
Here are mine!

These are a knockoff (kind of) of these cute pillowcases from Lush Designs.

Mine have some fun, shabby ruffles on the ends – just to dress them up a bit.

Ready for a quick tutorial?
You’ll need:
Freezer Paper
Silhouette (or exacto knife)
Paint
Fabric Medium (to add to the paint to make it washable)
2 Pillowcases
Ruffles for fabric – about 24″ x 45″ of one color and 12″ x 45″ of another color
We started out by choosing some decorative fonts, a different one for each letter. (If you’d like the Silhouette files, throw me an email and I’ll send them to you)
We enlarged each letter to fill the page and cut them out of freezer paper with the Silhouette. If you have the Cameo you’ll be able to make them even wider, closer to the original pillowcases.
The letter is reversed because I found the Silhouette cuts out the freezer paper better with the shiny side up.

(Please excuse my fuzzy little mat – I use the protective plastic but this thing attracts dust and stuff like crazy.)
Iron the freezer paper letters onto the pillowcase – 2 on each case. Make sure that you face them the right way.
Cover the open section of the stencils with paint mixed with fabric medium.
It works best to brush the paint from the outside of the stencil, in – so you are cutting down on the amount of paint that could get pushed under the stencil.

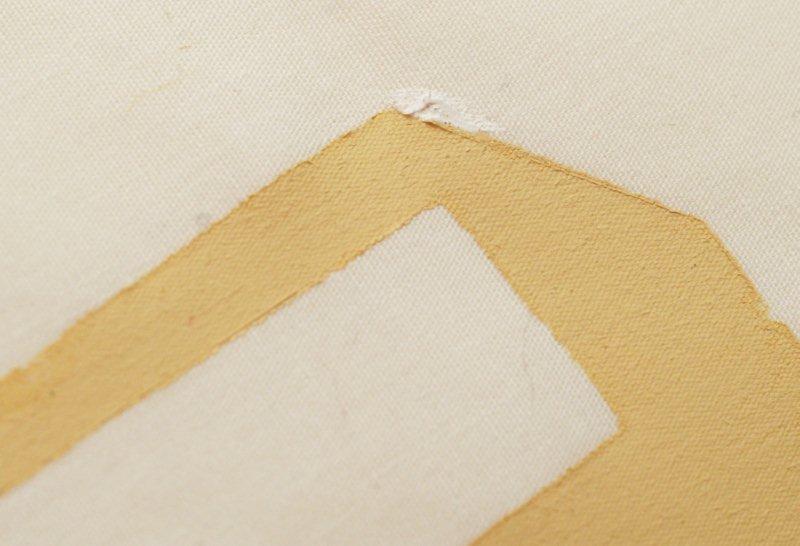
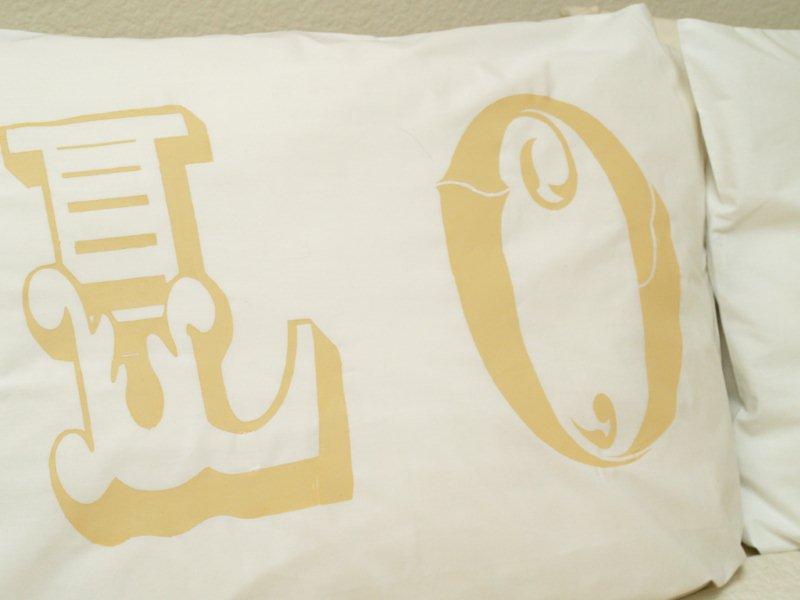
Once the paint is completely dry, remove the stencil.

It’s pretty fun to pull off that freezer paper and see cute painted letters underneath. :)
I had a few little places that the paint had seeped under the freezer paper. The white pillowcases came in handy here – I just painted over them with white fabric paint. You have to look pretty close to see them.
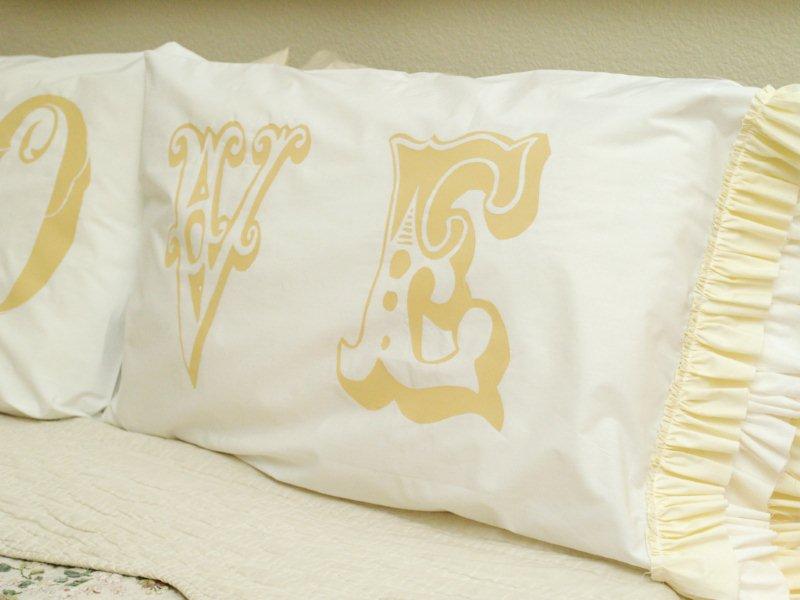
Once all the letters were painted on, I added some ruffles to the hem of each pillow case. I wanted these to be a little shabby and frayed looking – so I left them unhemmed.
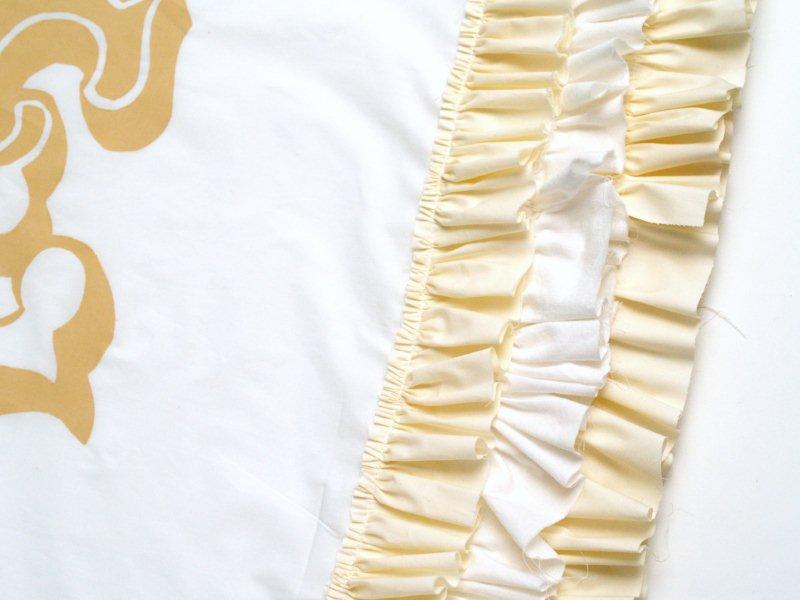
I cut the fabric into strips that were 3″ x 45″. I cut 4 strips of the cream for each case and 2 strips of white.
Normally I would sew 2 of each of the strips together – to make 3 long ruffles. This time I wanted a little more of a frayed edge showing, so I ruffled each piece separately, then overlapped them in each row on the pillowcase.

I hope that makes sense.
Starting with two of the cream ruffles, pin them to the top edge of the pillowcase. Overlap the ruffles just a bit where they meet on the pillowcase.
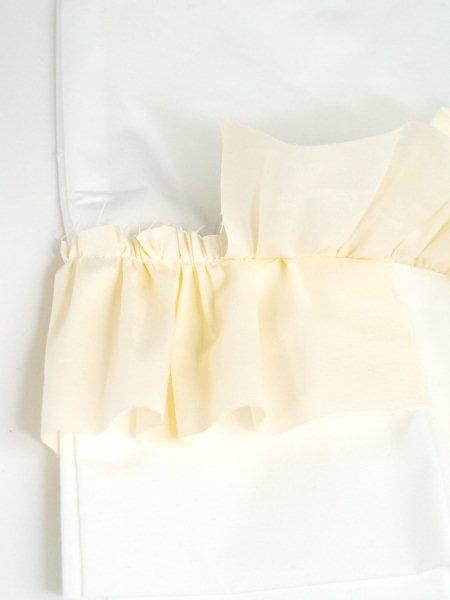
Sew the top row on.
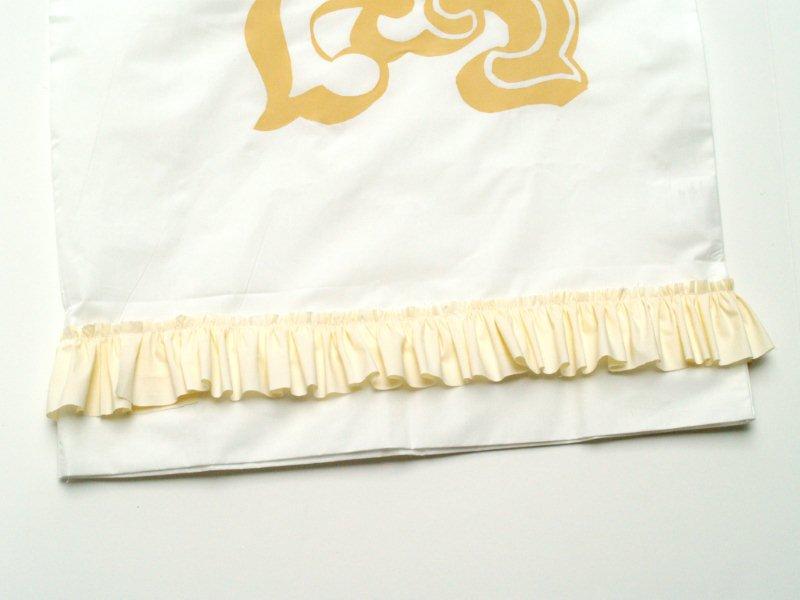
Repeat for the other two ruffles, overlapping them at different points on the pillowcase. Mine are about 1 1/2″ apart down the hem.
Repeat for the other pillowcase – and you’re all done! Now you have a sweet, stylish way to dress up your room for Valentine’s Day!
Or anytime really – how cute would these make as a wedding or shower gift??
Aimee hasn’t posted hers yet but I’ll let you know when she does. She used a gorgeous gray color for the letters – it is so pretty!
What do you think?
I almost asked you if you LOVE them. But I refrained.
I’m linking to Sunday Scoop, Today’s Creative Blog, Met Monday, Skip to my Lou, Tutorials & Tips Tuesday, Funky Junk Interiors, and the other fabulous parties on the sidebar – make sure you check them out!
UPDATE – Several of you have asked for the fonts I used on the letters so I thought I’d add it here too. They are:
L – Cast Iron
O – Ornatique
V – Tropicana
E – Circus
Thanks!


Those are darling! And so are you and Aimee! Can’t wait for our pinterest party!
what is a pinterest party? (Other than spending a whole day on pinterest) Sounds fun! :)
The pillowcases are aDORable.
gorgeous! thanks for sharing
Really really cute BEV! I L-O-V-E them!!
i LOVE these..heehee! I would love your Silhouette files if you have a minute……or at least the measurements of each letter! Thank you so much!!
oh these are fabulous – I LOVE the ruffles you added! YUM!
http://northerncottage.blogspot.com/2012/01/northern-cottage-party-time-tuesday2.html
I adore them! The shabby ruffles and the vintage feel of the font is a perfect match (you know I will have to pin them). This really is a good idea for a wedding present not to mention adding a little “love” to your bed linens. Thanks so much for sharing this great project idea! AJ@queenofmynest
Those are GREAT!!!! :-)
Very, very pretty!!
How fun to have Aimee there to craft with!!
Off to check out the links, thanks for sharing!!
Seriously? Those are stunning!!!
Oh Bev, forgive the pun but I LOVE these!!!! The font, the color, everything. And now that I’m a Silhouette owner, would LOVE you to email me the files!!!
Oh my word! Bev, I LOVE these pillows!! And the ruffles are the perfect touch! As always, you amaze em!!
*me! :)
Absolutely adorable! Great job with the freezer paper. I find it tricky to get off the mat intact. lol! Love your addition of ruffles. Can’t wait to see Aimee’s version!
But I do LOVE them! The ruffle is perfection and that font s gorgeous…and I so want to move so I can craft with you and Aimee!
I love them, and would love the Silhouette files. I have yet to make anything in this New Year and this would kick it off. Thanks 3osterbergs@gmaildotcom
These are adorable! And I’m one of those spoiled brats that has a screen print machine, and I think this would be a fun project to attempt! Thanks for the inspiration!
Oh my gosh!! These pillow cases are absolutely beautiful!! I love everything about them! That ruffle is divine!! I just love the font you used!! Gorgeous!! :)
Absolutely georgious! I love these pillows – the letters, and ruffles as well. I would like to kindly ask you for the files. Jana
love these!would love to have the files so I can try this out myself with my silhouette.thanks so much. [email protected]
LOVE this!! Just pinned it:)
i love it when people create their own versions of things they see! you are too crafty!
would love these letters. where can i download them? thanks
Hi! I just got a Silhouette for Christmas and would love to know to files you used. I really appreciate you wanting to share. And Ive been so intimated by my Cameo that I think this project will help me break the ice. Thank you for that.
I LOVE them ;) I love the font, colors, & shabby ruffles. What a fun & easy project. Don’t you just love freezer paper stencils?! I just finished making Luci a valentines day shirt using stencils & it turned out so cute. Now I just need to find the time to blog about it ;) Great job Miss Beverly!! :)
I L O V E these!! What a great knockoff, I’m going to make some for gifts! Thanks for the inspiration!!
xoxo
twentyfour7
Love them! What font or fonts did you use? Would love the file and the name of the fonts.
Oh how cute. Could you send me the information files and the name of the fonts. Thanks
I L-O-V-E this! :) I’m going to pin it…
would love the Silhouette files! THANKS!! [email protected]
Gorgeous! Love the fonts & color you choose.
ooh ooh… the ruffles are DARLING!!!! so so sweet. love hanging out eating & crafting with you!!!
I love your pillows, would love the Silhouette files.
thanks.
I like yours heaps better than the original, those ruffles are just adorable!
Gorgeous! I would love to have silhouette [email protected]
Thanks!
These are so cute. Would make a great wedding gift.
OMG so cute! Love them! I love the font you used to!
Natalie
http://www.projectdowhatyoulove.wordpress.com
First of all, I LOVE THEM! I was gonna ask about the font, but I didn’t realize you used 4 different ones. These is definitely a project I want to try. Great work, Bev!
These are adorable!!! I love!!! I’ve only made a handful of projs with my silhouette and they’ve only been done with paper! I can’t wait to try this! Thanks for the tutorial :) I just started following you!
~Jess
These are so stinkin’ cute Bev! I am in love!
Love these! ;) Thanks for linking up, pinned them cuz they’re ADORABLE!! Great color combo!
Awesome!!! I LOVE this!!!
–Katie
@ Creatively Living
I adore these pillows! The ruffled edges, and bright, cheerful colors make them totally crush-worthy! I’d be thrilled if you’d come and share your post at the Head to Head Showdown, going on right now at http://www.icantstopcrafting.blogspot.com ~Jen
Great font. Would you mind sharing your silhouette files? I’m totally new to this kind of crafting and am still trying to figure out the possibilities of the Cameo.
These are so pretty! I love how you took it to the next level and added ruffles – gorgeous!
I looping these pillow cases!! I would love the silhouette files! Thanks. [email protected]
I would love the silhouette’s. If you would email to me Beautiful. Making some for my girls!!!!
Email [email protected]
LOVE LOVE !!!!!! Yes send me the files I need to do this!!!!!
Wow! They turned out fantastic!
These are so amazing! Love the idea and thanks for sharing!
OH I should have known this project was yours! :) “LOVE” it!
featured it on the brassy apple FB wall and on twitter!
thanks for linking up to Make it mOnday!
The ruffles are the perfect touch! Love the pillows! Or should I say {{{ LOVE }}} the pillows (I added some {{{ ruffles }}} too!).
I LOVE your love pillows. So well done! These would be just so darn cute on the bed on Valentine’s day.
Best,
Jen from JustAddWaterSilly.com, hopping from Craftastic Mondays.
Just wanted to let you know that I featured this as part of my link party wrap up! Please feel free to grab a featured button from my sidebar if you like.
Perfect!! I LOVE it all……love the freezer paper too for me it’s easier to use than my Silhouette…LOL
I would love the Sillhouette file. I just bought mine and have only used it once because I have been super busy. This would be a fun project to start with I LOVE them.
These are adorable. I love the addition of the ruffles. It adds a nice touch that the originals don’t have. Thank you for sharing them and the technique.
lI would love to have the Sillhouette file.
I agree, the ruffles is really a nice touch.
Would love to get the silhouette file. Can’t wait to start making these!
Bev I adore your pillows. I really need to make a set or two I love them!!!! Thanks for linking up at So Very Creative, I featured them today!
http://soverycreative.blogspot.com/2012/01/love-pillows.html
These are adorable! I would love the Silhouette file. Thank you so much!
I AM an oopsy daisy reader. I found your pillows. through her blog. I love them. I intend on making these for wedding and anniversary gifts. Would you please send the template . Thank you for offering . [email protected] thanks again
I would love to get the files for these letters! Can’t wait to get started on this project….thanks for the great idea. Please email the files if possible :)
Oh wow Bev these are simply gorgeous! Nicely done :)
xoxo
Those are pretty much…awesome! Love your new look too!
~Gay~
itsahodgepodgelife.blogspot.com
bev- these are AWESOME!!!!! i need to try this out!!!!!!
Wow these are stunning thank you for sharing them, do you sell them? So nice to meet you just found your beautiful blog and so happy I did. I have enjoyed looking around and I’m now following you, wonderful to meet new friends. Hope you find a spare minute to visit me sometime follow back if you like. I’m looking forward to keeping in touch in 2012.
Always Wendy
TOO CUTE!!! I can’t wait to make these in time for Valentines Day!! Could you email me the Silhouette files. Thanks so much!!
I just got a cameo for Christmas and have yet to turn it on. I would love to have the files that you so generously offered! Your pillows will be my first cuts!
Thanks you!
Those pillows are absolutely adorable! I would love to have the files and I can’t wait to make them.
Thanks so much!
I would love to have the files to make these adorable pillows! Thanks so much! :)
I LOVE them! My mom has a Silhouette I’d love to try out. What a perfect opportunity and create a unique gift. Please email me the template files.
Would love to make the “Love” pillowcases. My daughter’s last name is Love. Please send me the template files for the stencils. Thanks so much!
WOULD APPRECIATE YOU SENDING THE PATTERNS FOR LOVE. MY GREAT GRANDAUGHTER IS GETTING MARRIED IN THE SPRING, AND I THINK IT WOULD MAKE A GREAT SHOWER GIFT.
LOOKING FORWARD TO DOING THIS.
These are beautiful, would love to make for wedding presents. Please send me the file for the letter templates. Thanks, ner
These are lovely, thank you for sharing your talent!
Any chance on getting the silhouette files emailed to me please? I love this easy way of sprucing up my room with this idea.
This is great…..
Thank you.
ljt
would love the patterns for the letters…thanks!! love these gonna make a house warming gift!!
I love the love pillow cases. Can I still get the pattern from you for stencils? Thank you and p.s. I just found you site. Love it!
Love the pillow cases. I will be making a set for my anniversary…I will make one adjustment since my man has asthma I will find a way to use machine embroidery instead of fabric paint. This is very nice set. Love your site too.
Love the pillow cases. Would love your pattern to makes some with the Love on them. Thanks for all you do to make our sewing and emb. worthwhile. Mary
What a great idea! Please send me the stencils for the letters.
Love the “LOVE” pillowcases. They would make wonderful Valentines Day gifts. Please E-Mail the pattern for the letters. Thanks for the idea. Shirley
HI These pillowcases are just great.
thankyou for letting us see them please will you E-Mail the pattern for the letters for me.
kind regards
carter
I like these pillow cases! Please email the Silhouette files .
Thanks
joyce
Please e-mail me the patter to the letter. LOVE this, I can barely sew…but I think could do this. Book marking your web/blog! Thanks for your generous creativity. Beth
The pillowcases are a great gift for a bridal shower could you please e-mail the fonts for the letters I am thinking of having a craft night soon.
Beautiful but I’m a little skidish about making the stencils wonder if I could buy them
Love this idea…please e-mail the fonts for the Love pillowcases
Thank you
I wanted a copy of the Love PC pattern. thank you.
what adorable pillows. i appreciate the talent god has given you. please provide me with the silhouette file.. thanks
PLEASE FORWARD YOUR FONTS. THANKS
These are gorgeous! Could you please email the fonts? Thanks :oD
Do you happen to still have the file for the letters? Please send my way!
Oh, what a beautiful project – expecting a grandbaby in April – PLEASE, can I get the silihouette file sent me – thanks so much
I finally made time to make these!! I used your fonts and made mine really big. Mine are 11 x 17 each. I used gold metallic fabric paint and want to find a gold fringe for the ends. Thanks for sharing.
Love them please send fonts thanks
Just read your tutorial on pillowcase ideas with word LOVE on them. Could you please send me the letter patterns! What a great gift idea. Thank you.
HOLA CARIÑO, ES SAHORY MERCEDES DE PANAMA, ME ENCANTARIA ME ENVIARAS LOS MOLDES PARA LAS ALMOHADAS LOVE.
MI CORREO: [email protected]
GRACIAS Y UN ABRAZO
Awesome! Could you pretty please email me the fonts!
OHHHH MY I WAS LOOKING for these they are very expensive and COULD make these MYSELF… PLEASE CAN YOU SHARE THE FONT FOR SILHOUETTE. THANK YOU VERY MUCH…
Would “LOVE” the pattern for the stencils. I adore this font!
can you please send the pattern for the LOVE pillowcases that you used? Thanks so so much!
Please email the letters–the project is wonderful!!
I just discovered your site. Love it!! Could I get these letters?
Thank you1
i would like a copy of the LOVE fonts thank you