I hope you are enjoying our little series of Handmade Accessories as gift ideas!
Isn’t there something special about a handmade gift? Even if it’s not amazing or expensive or the “latest” thing – you know that the person put their time and effort (and money) into making something for you.
I love it. I think when you make a handmade gift it’s like you’re giving a little bit of yourself.
Not literally. That’d be gross.
ok – I have another great gift idea for you. I fell in love with the original of this watch on Pinterest and just had to make it!!
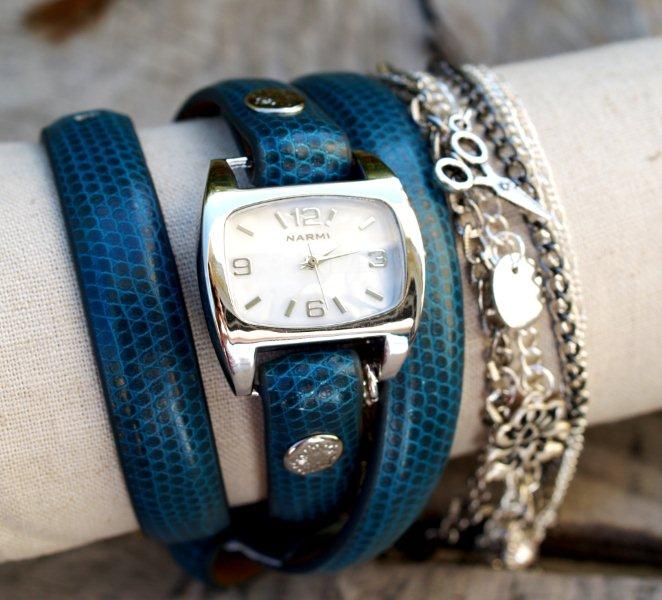
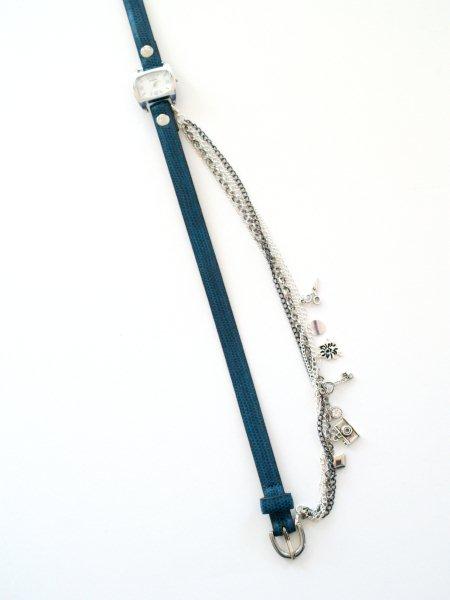
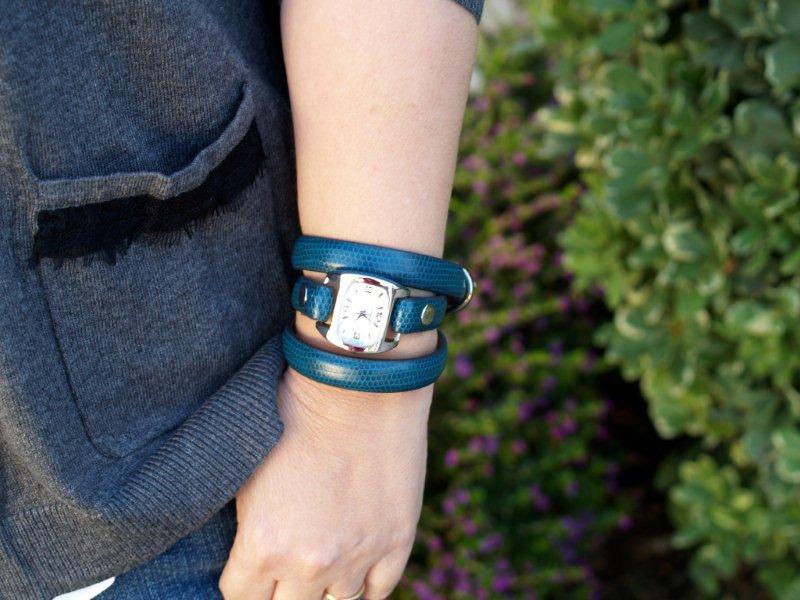
Here’s my version:
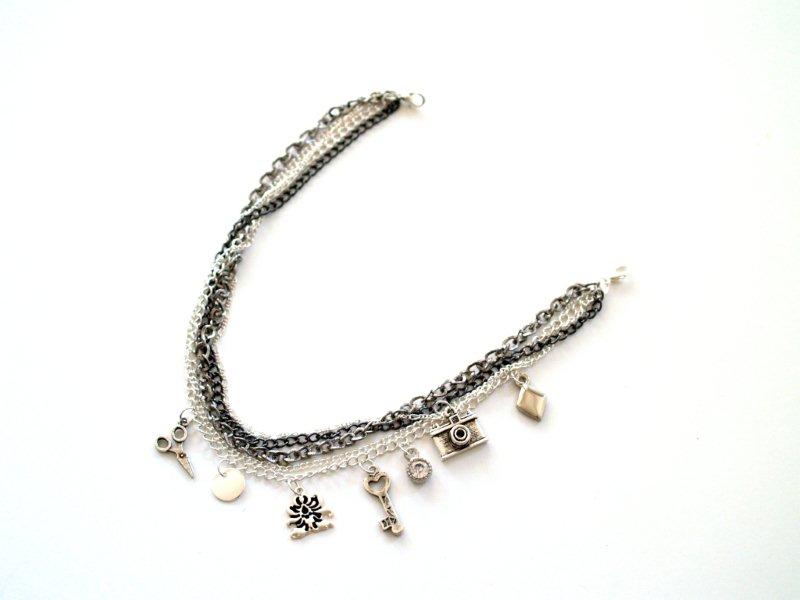
And here’s the original:

It’s listed as a La Mer Watch at a site called shopbop.com. Retail price is $165!!!
Here’s what you’ll need to make your own (and where I found the materials):
1 Watch face (I found mine at Joann’s)
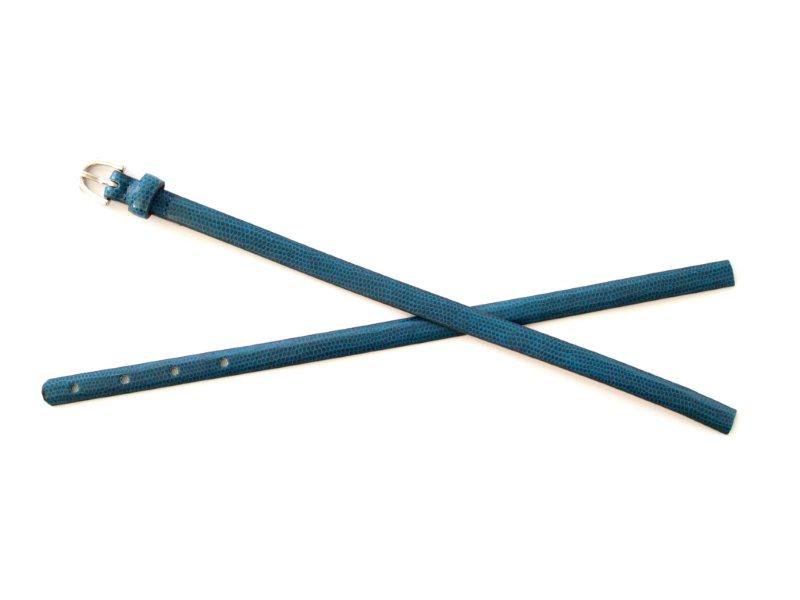
1 Skinny Belt (mine is Target clearance) – make sure the belt will fit through the bars on the watch
Rivets and tools (kit from Michael’s)
Hammer and 1/8 Punch (Mr. F.T. says the punch is available at any hardware store, this is a Craftsman)
assorted chains
jump rings and 2 lobster clasps
charms
Start by trimming off the end of your belt close to the last hole so the tip isn’t super long.
You don’t want to buckle the watch and have a piece of belt flapping around on your wrist.
If you need to, burn the ends of the belt just a bit to seal them.
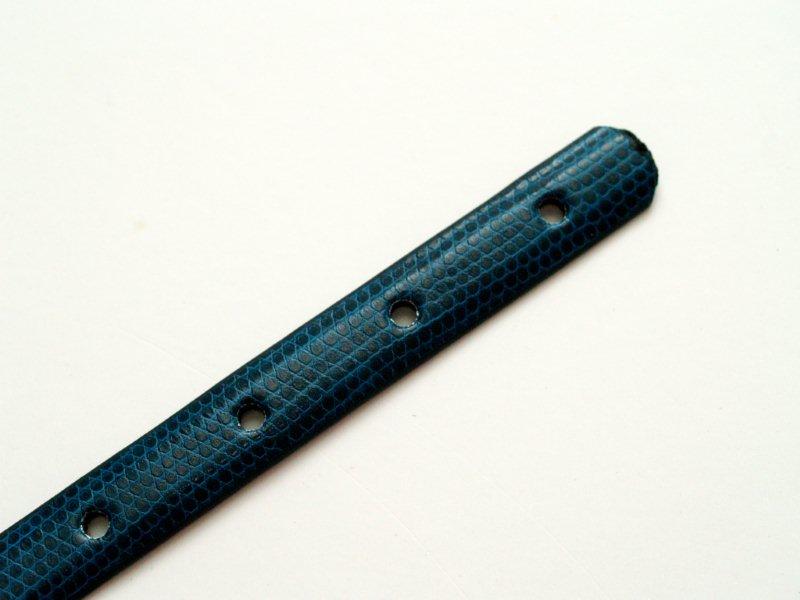
Cut 2 – 14″ pieces of the belt, from each end. (You want the buckle end and the other end with the holes.)
This fits my 7″ wrist – if your wrist is larger or smaller you may want to adjust your measurements.
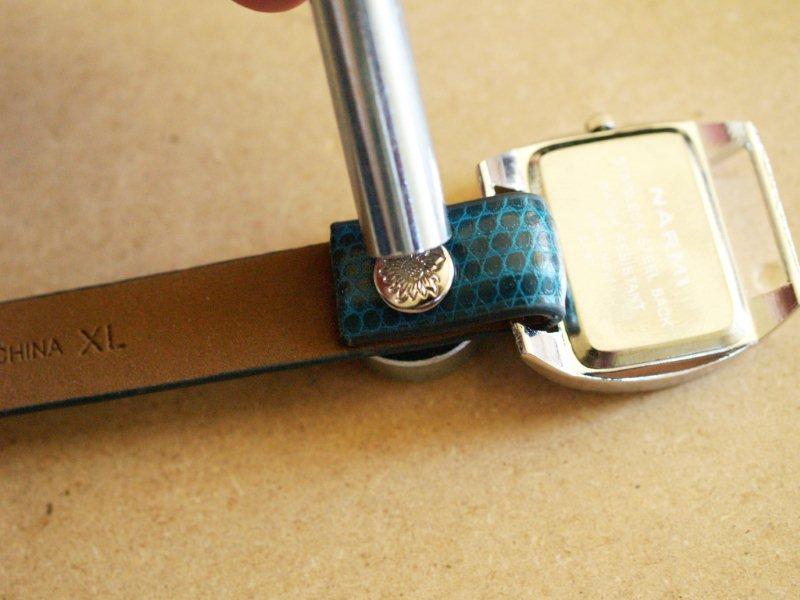
Slide the cut end of the buckle piece through the lower watch face bar and fold over the end. Measure where the rivet will go.
Use the punch and a hammer to make a hole in the belt. I found it easier to go from the front to the back.
Make sure you use a board or some other hard surface to protect your floor.
Punch divots in wood floors are not cool. I promise.
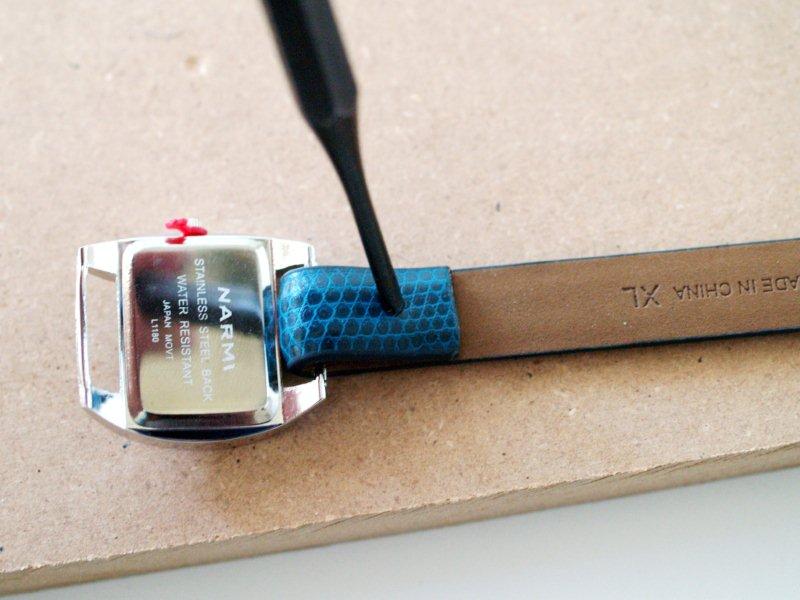
You’ll have to punch two holes – one on the folded piece and one on the front.
Use rivets that fit the thickness of the folded belt (this is an assortment pack).
You’ll need a top and bottom piece, as well as the tools that should come with the kit.
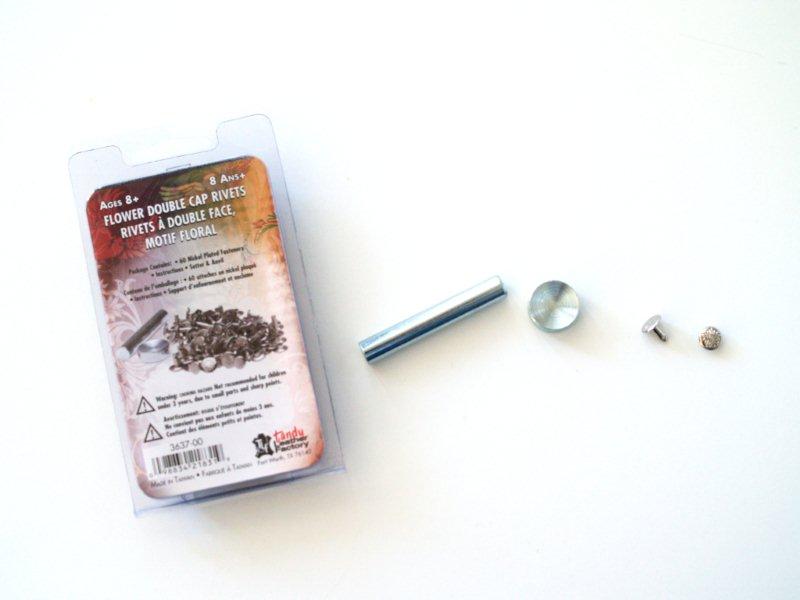
Push the rivet through the holes and add the capped end. The kit shows you how to set it up with the tools.
Hammer the rivet into place.
Ooh – look! A cute little rivet!
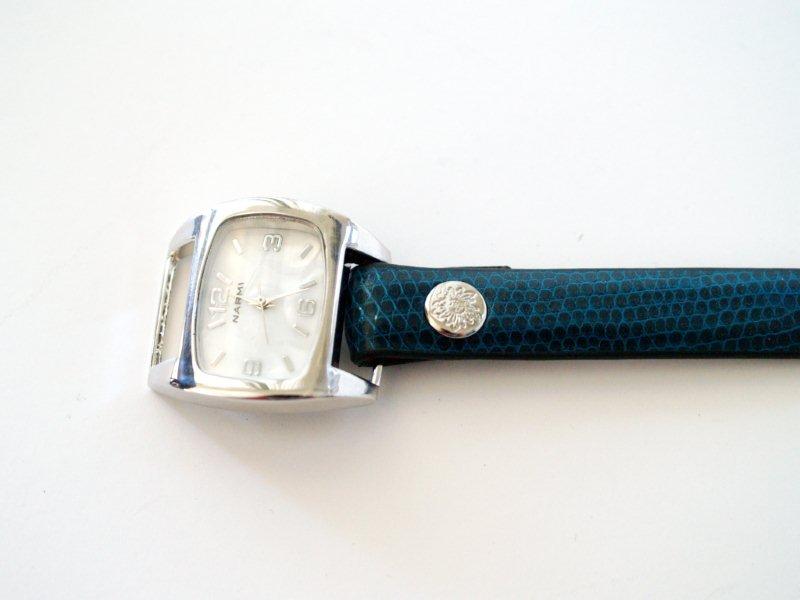
Repeat the process on the other side, adding the other end of the belt to the top of the watch.
Cut 5 pieces of assorted chain 15″ long.
Loop them together on one end with a jump ring. Add a lobster clasp to the ring.
(The original watch has the chains linked on permanently.
My daughter had the brilliant idea to make them removable. I think it is a lot more versatile that way!)
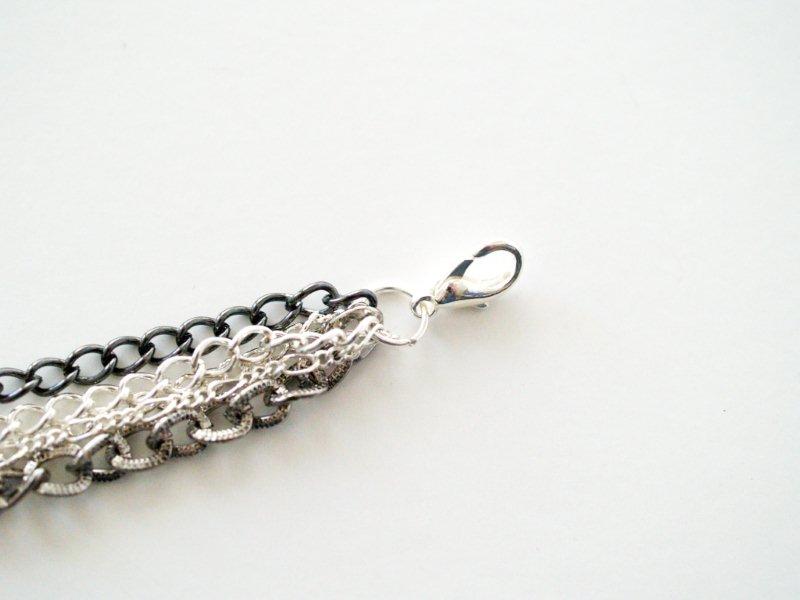
Repeat for the other end. Add some charms to the right end of one of the chains.
I just linked them on with small jump rings
(That way they’ll show up when wrapped around your wrist)
Clip your chains to the side of the watch face and the buckle – and you’re all done!
The watch should wrap around your wrist three times and buckle in the back.
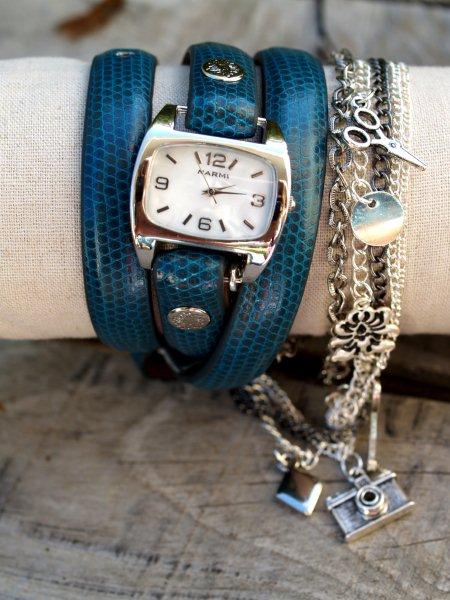
Isn’t it fun?? I am leaving this teal blue paired with gray right now –
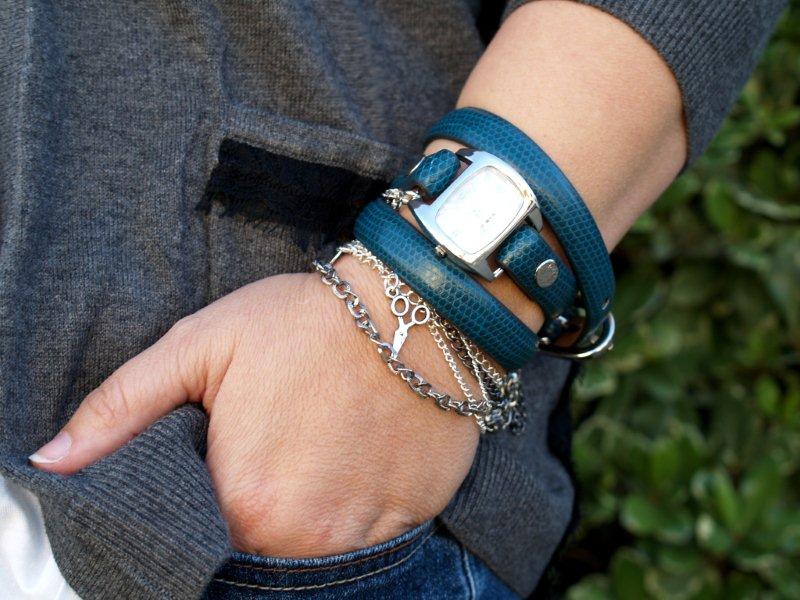
And it looks pretty without the chains too!
I think it would be a fun Christmas gift to make up this year – I’ll definitely be on the hunt for more belts now! :)
This was originally posted as a guest post at Positively Splendid. :)
Donatella from Inspiration & Realisation also did a tutorial for a wrap around watch – You’ll want to check it out – it’s fabulous too!!
Great minds think alike!! :)
I’m linking to Sunday Scoop, Today’s Creative Blog, Met Monday, Skip to my Lou, Tutorials & Tips Tuesday, Funky Junk Interiors, and the other fabulous parties on the sidebar – make sure you check them out!


Oh my!!! I’ve seen that watch and swooned over it! This is amazing!
Thank you so much for sharing! I’m sure I can’t afford to buy the watch, but I can make it now! Yay!
Wow! So cool! You. Are. A. Rockstar!! lol! Thanks again for sharing!
This is AMAZING! It looks even better then the originals. You go girl!
<3 gosh i love your blue one!!!
Love this, Bev! All the texture is just fantastic. And its cute to boot!!
This is outstanding Bev! Just fabulous and so trendy and “in”.
I just pinned one of those a few days ago with the intent of figuring out how to make it. You did the work for me! Thanks! :)
I like yours better than the original! Good job!
Hugs!
Another success! Its beautiful! Can’t wait to copy you ;-)
This is really cool, your ideas are always great. Thanx
The watch is beautiful. Love that you used the skinny belt!
Wonderful tutorial! Thank you!
” Charming.” I pinned this so all could see you clever idea.
And, one more thing, FT; how gracious to mention Donatella’s version. I wish more folks had such old-fashioned ways with generosity and courtesy towards one another. Lead on, sweet one.
I’ve had my eyes on a watch similar to this one. You are a genius!
that is SO FAB!!! btw I just said that your blog is my favorite crafting/quilting/sewing blog out there on the Riley Blake FB page! here is the link to check it out http://www.facebook.com/RileyBlakeDesigns
Beverly! I LOVE this. I’ve had my eye on these watches forever. So so cute. I love the color of yours, too. Thanks for sharing the tutorial. I think this might be the gift I make for Matt’s mom. yay.
What an insanely creative idea! LOVE this – and what a perfect gift idea too. Thanks for sharing!
Shelley
http://www.westermanfam.blogspot.com
omg I am going to be making this, I have several small belts that no longer fits.
Would luv for my readers to discover your blog, will you please join our weekly party at
http://www.passionatelyartistic.com/2011/11/thanksgiving-showcase-tutorial-with.html
have a great crafting week!
Maggie
http://passionatelyartistic.com
OOO so pretty and such a good idea… FYI I like yours better than the orginal
One of the greatest crafts I’ve seen–and that teal color is gorgeous! thanks for sharing!
WOW! This is so cool! Thanks for sharing!
the girl in Lady Antebellum was wearing this watch in black on the CMA awards last week!
I love this idea. I’ve never made jewelry before, but I’m going to try your designer watch tutorial.
Super cute!
So going to make this!
Wow another great tute!! Thanks so much! Again I like this better than the inspiration. New subscriber via email!
You’re amazing!
I LOVE this!! There is a Hermes watch I have always dreamed of owning that is a wrap around style. This is one of the best DIY ideas I have seen in a long time and will be making one for myself. Thanks for the excellent tute, too.
My best- Diane
i am going to add it to my DIY page on my blog. :)
Makes me want to wear a watch. :) Adorable as always!
I don’t know how I didn’t see this before. Now that I have, it’s pinned and waiting for me to make! Excellent, clear instructions! Thanks.
OMG! You are my hero, seriously!!!! I was just looking at the inspiration watch today on Pinterest and wondering how to make it and then here you are – with the perfect tutorial. Thank you so much for being so generous in sharing the how-to.
I love this! I just bought a belt at Forever 21 so that I could make one and then googled the how to… that brought me to Donna’s blog and then to you. So glad that I found your tutorial, it’s perfect! Thank you! t.xoxo
Hello! I ended up make a version of this and posted it on my blog where I gave you credit for the tutorial, just wanted to let you know that I love this bracelet! Thanks again!
I am currently obsessed into making one of my own!!! Thank you for this post, I hope you don’t mind if I link back to you for instructions!
Hi Beverly!
I want to say that I love your charm watch – so much more than the original. You’ve really made it your own! I’ve started a new feature on my blog – Triptych Fridays – and I just wanted to let you know that this tutorial is on of the three things I’ve really been digging this week! I’m planning on attempting this soon with my best friend :) Thank you so much!
~Katie
Can you make this watch for me?
I was totally inspired by your DIY and made my own version, which I blogged about here:
http://www.alaskannancy.blogspot.com
I have one more watch that needs a band and have ordered 5 watch faces, so will continue to play!
Thanks for the inspiration!
LOVE IT!! Thank you so much for sharing!