I recently particpated in the Holiday Bake, Craft and Sew Along over at Skip to My Lou.
For the Sew Along, I wanted to come up with a gift that was fun and easy to make – but that people don’t always remember to buy for themselves.
I thought that some cute Pot Holders would be just the thing! It’s more fun to cook and bake with cute pot holders don’t you think?
I have two versions for you today – here’s the first:

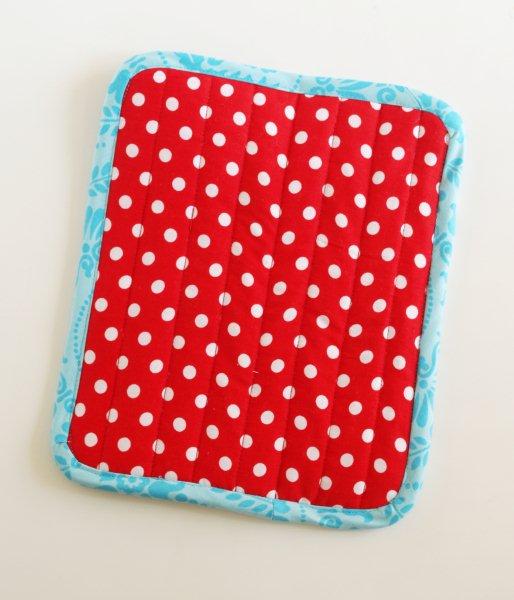
How can you not feel awesome when you’re taking muffins (or creme brulee) out of the oven with this snazzy potholder?
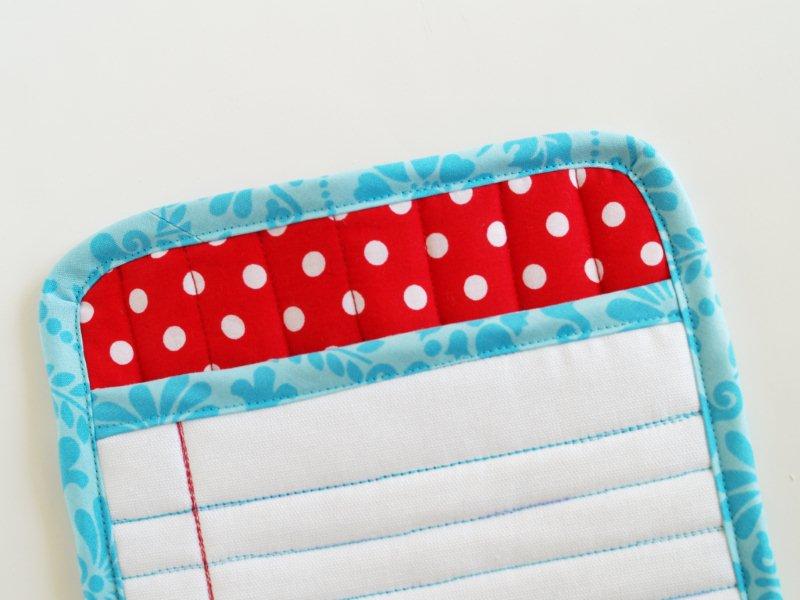
I have been loving all the “lined paper” projects around and I thought that the idea was perfect for a fun, ok . . . silly, pot holder.
Here’s what you’ll need to make your own:
For Front Piece of Potholder –
White Fabric – 2 pieces 8″ x 8 1/2″
Pellon Insul-fleece – 1 piece 8″ x 8 1/2″
Pellon lightweight batting – 1 piece 8″ x 8 1/2″
For Back Piece of Potholder –
Back Fabric – 2 pieces 10″ x 8 1/2″
Pellon Insul-fleece – 1 piece 10″ x 8 1/2″
Pellon Lightweight Batting – 1 Piece 8″ x 8 1/2″
For Binding –
1 piece cut on bias – 3″ x 42″
1 piece cut on bias – 3″ x 9″
To Make the Pot Holder –
Cut out your fabrics. Lay your pieces so that the small front pieces are together and the back pieces are together.

For the Front of the Pot Holder, make a sandwich with the two white pieces of fabric on the outsides, right sides out, and the Insul-fleece and batting inside.
Sew 1/4″ around all the sides to hold everything together.
Measure down from the top 1 1/2″ and draw a line across the rectangle with a disappearing marking pen. Mark the next line 3/4″ below that.
Continue marking lines down the rectangle until you reach the bottom.

With blue thread, sew across the marked lines. Go over the top line 4 times and the other lines 2 times.

Measure 1 1/2″ from the left side and mark a vertical line down the rectangle. Sew over this line with red thread 4 times.

With your marking pen, write out your clever phrase on the fabric. Embroider the letters with a simple stem stitch.

Fold the 9″ piece of binding in half, wrong sides together and press.
On the back side of the front piece, lay the raw edges along the top edge of the rectangle. Sew down with a 3/8″ seam allowance.

Fold the binding over to the front of the rectangle and sew it down just inside the folded edge.

For the back of the Pot Holder, make a sandwich with the fabric and fleeces just like you did with the front.
Sew 1/4″ around all the sides, then sew vertical lines down the rectangle 1″ apart.

Lay the front of the pot holder over the back with the bottom sides matching up. Trim off any excess and sew the sides and bottom together with a 1/4″ seam allowance.
Trim the corners so they are just a little bit rounded.

Bind the potholder around all four sides, just like you did for the top of the front piece.

Cute huh? And so quick! I love having the little pocket to slide my hand in.
I’m a bit of a klutz so the more protected my hands are when I stick them in the oven, the better!
The back is super cute too!
If you prefer something that is a little more “traditional” you can use the same steps as above. You can adjust the size easily too!
This version is a little smaller – 7 1/2″ x 9″ finished – and has rows of little embroidered running stitches over machine stitching on the front in the same colors as the cute retro fabric in the back.
I did the little running stitches over the machine stitching around the edge of the binding in front too.

I pretty much love them both. ;)
What do you think? Wouldn’t they make a fun gift?


Ahhh! This is SO cute!!
these are soooo cute. I am just learning to sew again, but I am certainly going to try these. Great gifts. Thanks for sharing
Oh these are so cute! Thanks for sharing!
These are so cute, thanks for sharing!
These turned out way too cute. Now you have me wanting to make potholders!
SUper !! merci beaucoup
SUPER CUTE! I could make a bunch of these and give to the women in my small group. What a great idea – thanks for the directions! LOVE!
So stinkin’ cute! I just love it!
That is adorable! LOVE it!
I’m glad this project is finally up here! Now I can pin and share and love on it all the more. :) I adore both of these potholders, Bev!
Okay Bev – that potholder totally made my day. I LOVE it. It would make a perfect gift, especially for a wedding shower! Thanks for all your inspiration dear!
Oh my, that is TOO cute! Thanks for the tutorial!
love love love, consider this project pinned! This is a fabulous Christmas gift idea…not to mention I’ll have to make one for myself!
this is so clever. i just love it!
Pretty clever Bev! Love them.
I’m in love! This is just to freaking cute. Now i have to go beg my SIL to borrow her sewing machine.
Thanks so much for sharing! Stopping by from Someday Crafts link up : )
Liz @ bon temps beignet
I love the “hot” ones. I also loved your curtains. I don’t think I commented yesterday. Like the teal you are using in your house.
Oh! I totally love these and want to make some for Christmas gifts! What a fun idea. Thank you for sharing!
liZ
Bev! You are so clever! Such a cute and whimsical potholder! LOVE it.
Freakin’ adorable!
Super cute idea. I am your newest follower. Feel free to check out my site and follow me back here: http://www.utahcountymom.com
Love this! The “you are so hot” is awesome!! :)
Lovin the notebook pot holder! I am putting this on my Christmas to make list!
This is hilarious!! I love it!! I’m pinning this:D
Bev these are so amazing. I just love the “paper” potholder. Thanks so much for linking up at this week’s BFF Open House.
I love these pot holders. I am planning on making some for gifts. Thanks for the ideas.
What a fabulous gift idea! Perfect for the cook in your life!
Love that lined paper!
That is the cutest litlte potholder! I love the lined paper idea how creative! Of course cooking would be so much fun with a cute pot holder to use:) Thanks for the easy tutorial as well!!
Oh I just love your pot holder! I hope you will add your lovely metamorphosis to my Fall in Love linky party on Wednesday.
Until then, stop by and see the under $20 makeover I gave an ugly brass light fixture.
Happy Monday!
Hey bev! This made me crack up! Awesome. I featured it today. Come grab check it out and grab a button!
http://kim-toomuchtimeonmyhands.blogspot.com/2011/09/good-morning-sunshine_26.html
So cute! I’m not so great at sewing, but this tutorial makes me want to whip up potholders for all my Christmas gifts!
So cute!! Would love it if you would link this post up at my turquoise lovin’ party going on right now!! http://www.sweetlittlegals.com/2011/09/turquoise-lovin-6.html
That is fantastic! Great job. Think I might have to give it a go myself too :) So thanks!
These are fab – must make one!
I was JUST thinking about making me a couple potholders today but didn’t know what I wanted to do. This is the most darling idea I have EVER seen! Thank you for the idea!! I am SO MAKING THIS and will be posting it on my pinterest as well as featuring it on my blog later this week for the September back-to-school wrap up I’m doing! Thank you so much for sharing!!
Such cute potholders! Of course I would love to receive a gift like this!
Oh my goodness. :o)
This is so stinking cute!!
oh my gosh! I wish I liked to sew! This is the cutest thing ever! Catching you this week bev!
gail
Too cute. It looks easy enough to make for gifts! Thanks for the tut!
Love this!!
Love it, like always! Featuring you again this week! Can’t help it, I try not to do it all the time, but sometimes it’s just too cute to not to!
Best Potholder EVER!!!!!!
Bev ~ First, YES, I am WAY, WAY behid in some of my emails. Ok got that out……Now, I have to tell you that I absolutely LOVE this pot holder. It is just to friggin cute! Thank you so much.
This cracked me up! A perfect hostess gift! pinning and stumbling it!
How NOT TO PRINT responses!!!!! Just want to print out pattern. SO FRUSTRATING…..
Sorry you’re frustrated Andrea!
If you highlight the text in the tutorial that you’d like to print, then right-click, you should have “Print” as an option. Then when you Print window opens, select Print Selected Text (or something similar). It will only print what you have highlighted.
Oh, to say I love these doesn’t even come close! They’re just awesome… Thank you for sharing! I’ve pinned both these potholders on Pinterest.
my daughter needs a potholder to protect the back of her hands and this will be great. i will add a hanging loop, these are perfect.
I wonder…would this work using the fabric that goes through the printer, and printing a favorite recipe on it for the front, then doing the lines like you did for the paper?? I thought of that before, but couldn’t figure out how to put it together. I love this with the embroidered saying on it – thanks for the easy to follow directions. Love it!
What a wonderful ider! I just love the potholder. I’m going to make some for my daughter-in-law for her birthday.mmmmm I’m going to put a heart on it and write on the heart- I love your cooking. Beverly, Thank-You for sharing!
This is the cutest idea. I would love to make and send them to my girlfriends as a fandom act of craftiness. Who wouldn’t giggle getting one of these in the mail. Sure hope I can master the embroidery part. So clever. Thanks for sharing.
This is SUPER cute!! I’m definitely going to make some as gifts.
This is a cute hot pad. The instructions stop short of being useful. I can’t figure out how to actually put the binding on. I have tried several ways and they all look terrible. If you open the bias tape strip up and sew it to the “sandwich”, when you turn it over to sew the other side, the seams all show and it is never even. Maybe sewing the bias tape on is something everyone else has mastered except me!
This is adorable!
These are so awesome, Beverly!!
I totally love this as a gift idea! I’m just starting to learn how to sew, and this would be a perfect project to do.
Visiting from Pretty Handy Girl’s DIY link up party. :)
Bev, this is ADORABLE!!! I love it and hope you won’t mind if I share it in my favorite of the DIY GIft Idea party post.
Which side of the insul-fleece faces the outside of the potholder? Shiny side out? And does the lightweight fleece go behind the insul-fleece (on the inside side of the potholder)? Have read the directions from manufacturer and am still confused. Thanks
Either side can be up, it makes no difference.
If you plan to use the Insul-Fleece in a project that will come in contact with any object over 400 degrees they recommend that you place a layer or two of cotton batting between the Insul-Fleece and the fabric that will come in contact with the hot object. This will help prevent the Polyester in the Insul-Fleece from melting.
omg…cute!!!!
Thank you so much for this tutorial! I made one using a “Swedish Vine” print for my husband’s great aunt for Christmas. She loved it!
I love this potholder, am in the process of making it right now, I’ll be making both versions and will send to two newlywed couples. I even have the retro fabric that you used on the second smaller potholder. I love that fabric.
Oh my goodness… I’m so glad I found you! Your work is outstanding!!! This is definitely another one to put on the To-Do-List… Bless you ♥ xoxo
I love everything you do also. You are so talented. All these great Ideas you share are so appreciated. I just decided to start sewing again after many years of not doing it other than mending. I have found several sites thru your links but you are still my favorite.
Absolutely adorable – can’t wait to try some myself. You are awesome to share your creativity!