I have discovered that I’m fairly picky about my headbands. Are you?
1.) They can’t be so tight that after an hour it feels like you have put your head in a giant pincher and will have indents on the sides of your head for the next 4-5 hours. I have a low tolerance for skull squishing.
2.) They can’t be too wide – apparently I have a smallish head and wide headbands tend to make me look like I’ve wrapped a dinner napkin around my head or some such thing.
3.) They can’t have too big of a flower/pouf/decoration – back to the smallish head thing. I don’t need to look like a large tropical plant has sprouted in my hair.
It’s a quandary.
So I decided to take matters into my own hands and come up with a skinny, girly headband that is crazy comfortable to wear while being super adorable.
As in, “I forgot I had a headband on until I caught a glimpse in the mirror – and man – is it cute!”
Or something like that. :)
Want to see? (After a build up like that – how could you not?)

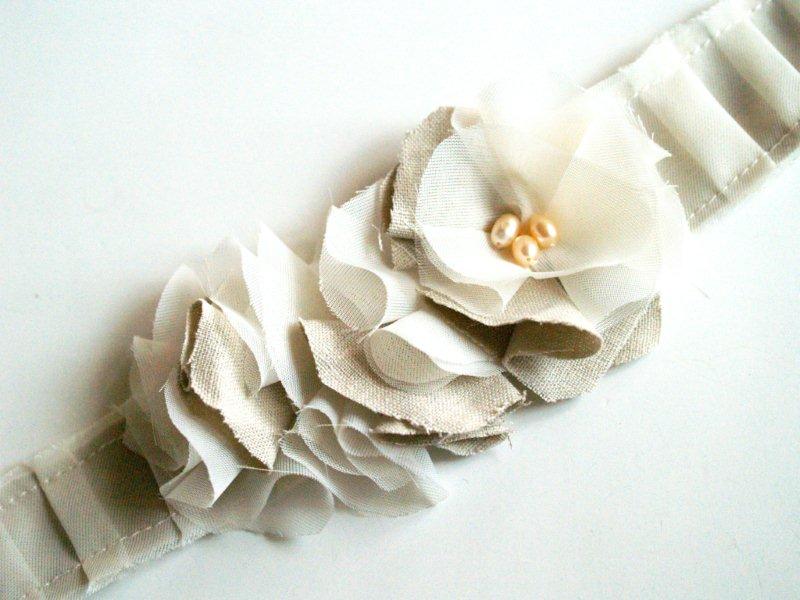
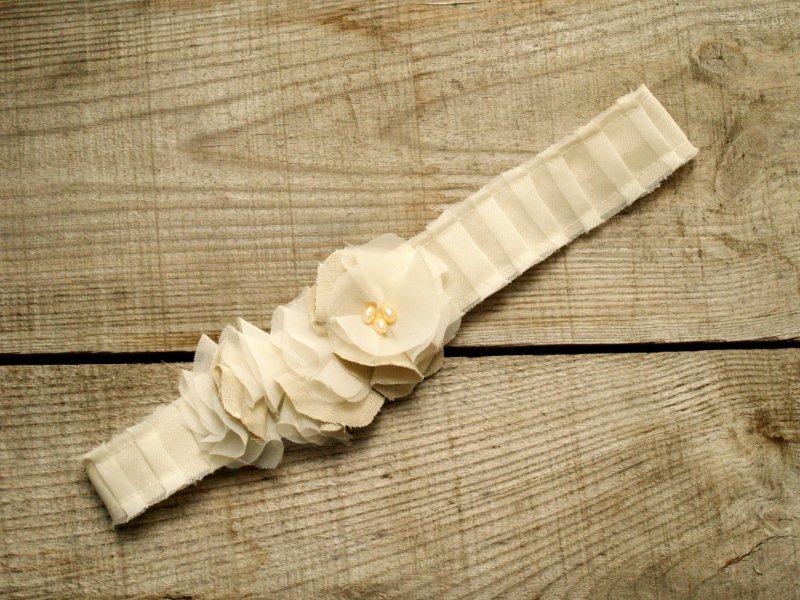
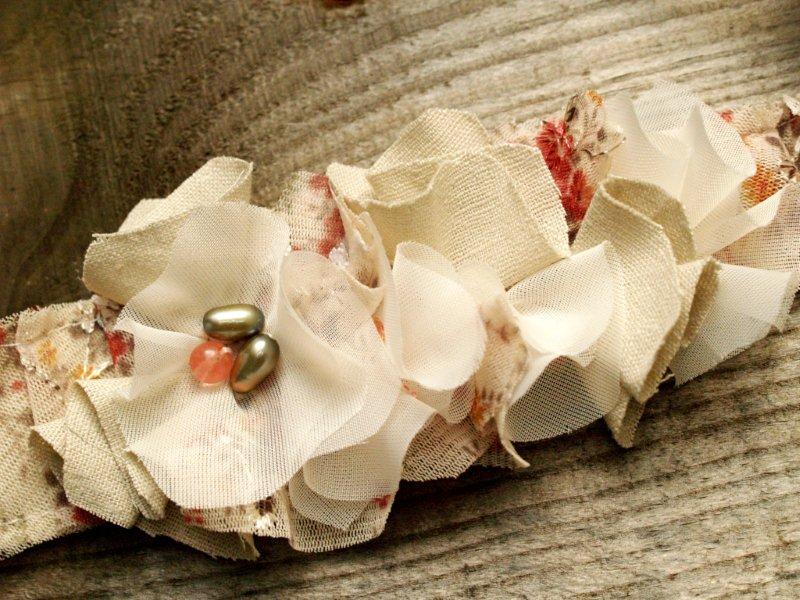
Aren’t they cute? And Ruffley?

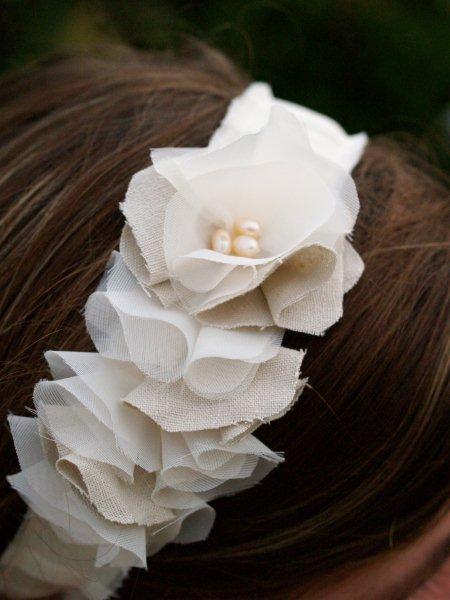
Here’s a shot on so you can see that they’re pretty thin – and not too poofy.

These are super simple and quick to make! Just a little straight machine sewing and a tiny bit of hand sewing.
Materials:
• Base Fabric: You want this a little heavier weight, like the linen or twill I used.
Cut out a rectangle that is 19″ long and is 3/4″ wide at the ends and 1 1/4″ wide in the middle.
You’ll also need some small pieces – cut 4 rounded 1 5/8″ squares
• Chiffon or other sheer fabric: Cut a piece twice as long as your rectangle and twice as wide.
You’ll also need about 8 rounded 1 5/8″ squares
• 2 Elastic Hair ties
• Small beads for center of top flower
Your base piece should be narrower at the ends than the middle. You can use a ruler to draw out a pattern based on the measurements above.
I cut both fabrics out on the bias (diagonal to the selvage) to cut down on excessive fraying. A little is good though.

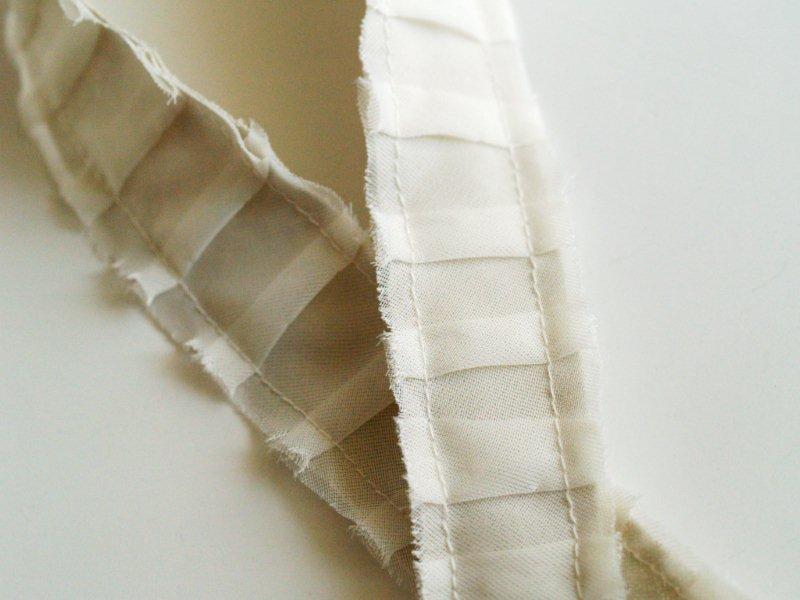
For this first headband, I wanted it to have a soft, pleated look. I didn’t really want the pleats to be perfect though, so I just eyed it.
Lay the chiffon centered over the base fabric. Begin pinning the pleats in place, the folds towards you.
When you get about 8″ up, flip the fabric so the unpleated end is towards you, then continue pleating with the folds down.
Leave about a 1″ section unpleated between the change of direction of the pleats.
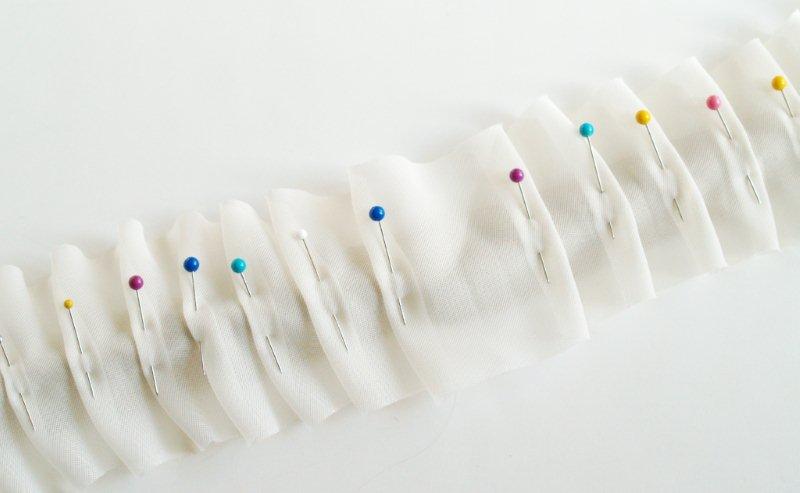
Keep pinning the pleats in place until the ends meet and all the chiffon is pinned down.
You might need to adjust your pleats if you don’t end up with the right amount of fabric, just make them larger or smaller as you need to so the two fabrics begin and end at the same point.
I ended up with about 1/4″ pleats and about 1/2″ between each pleat. Approximately.
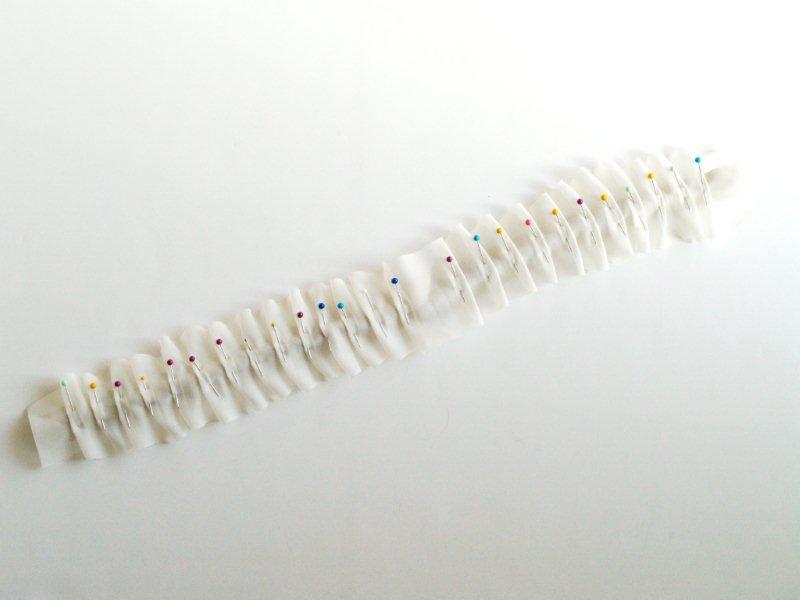
Sew down the pleats on one side, 1/4″ in from the base fabric underneath. It should show through the chiffon.
Repeat with the other side, 1/4″ away from the other edge.

Flip the fabric over so the base fabric side is up. Trim off the chiffon along the edge of the base fabric.
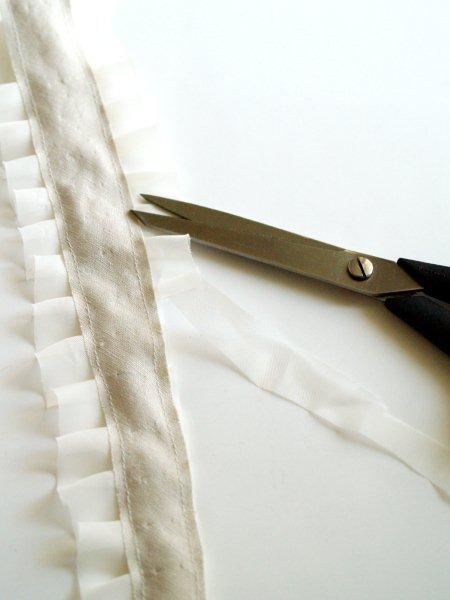
Trim up both sides.
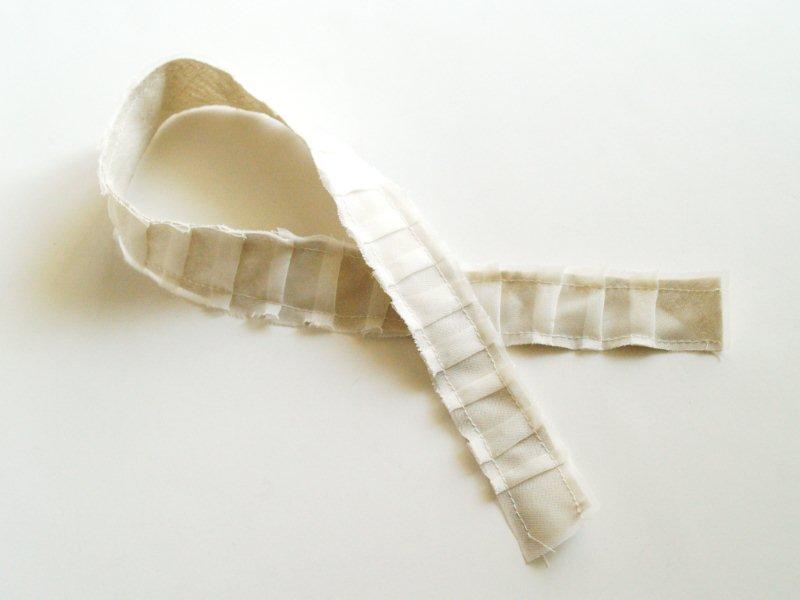
Run your fingers over the edges just a little to fray them up some.
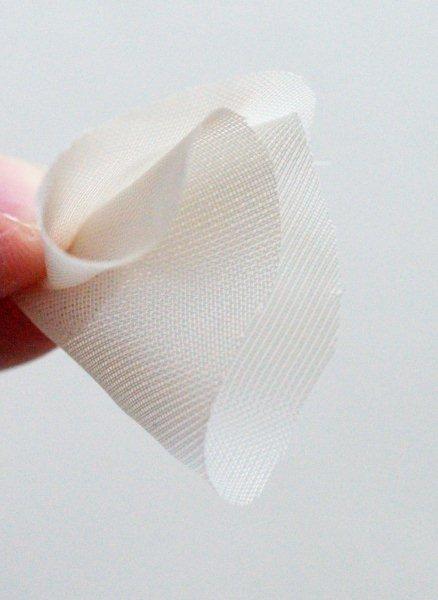
Now we’re going to sew on the flower piece. Take one of the rounded chiffon rectangles and pinch it together in the center.
Measure about 7″ up from the bottom towards the 1″ area where there are no pleats.
Tack the center folded section down, a little off center on the headband. Sea another little square piece next to it.
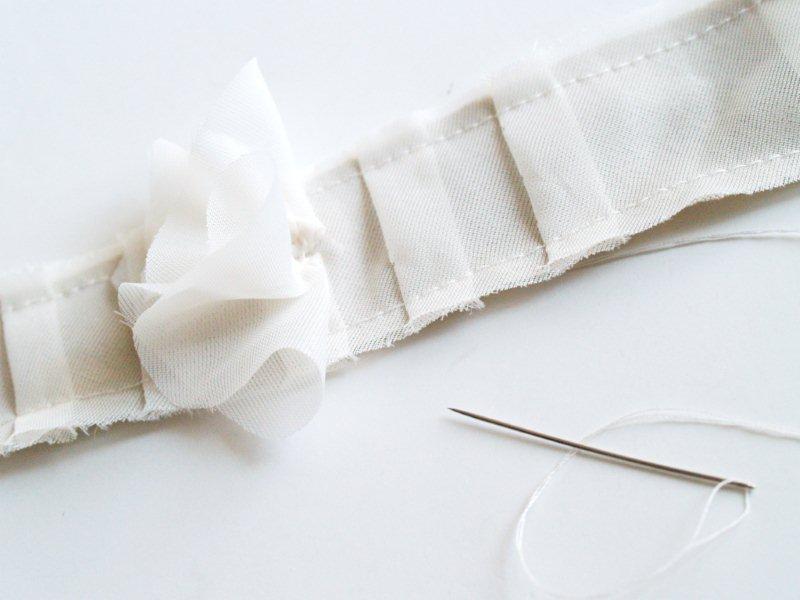
Continue working up from these petals, adding more as you go and alternating base fabric and chiffon, for about 3″. All these petals should be pointing about the same direction.
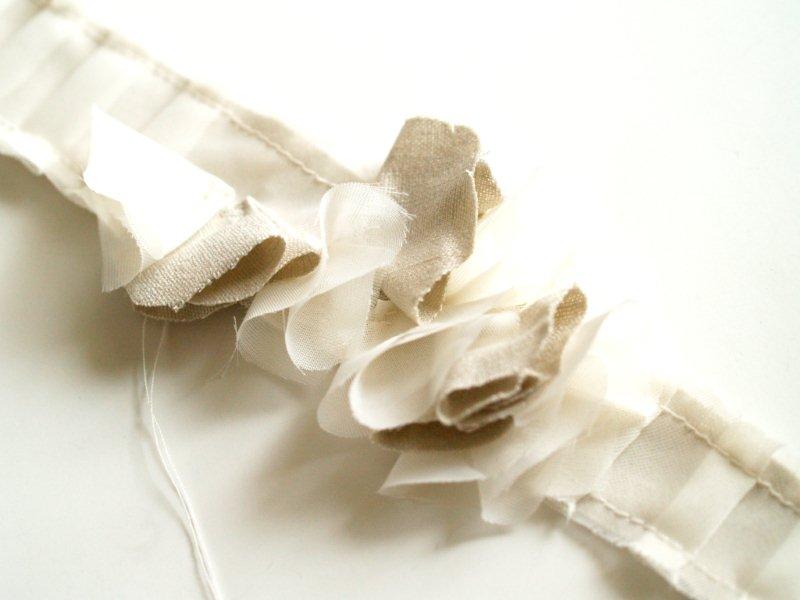
After you have 3″ of petals sewn on, sew two more about 1/4 – 1/2″ above that, pointing the other direction – up towards the center of the headband.
Sew a chiffon piece between these by tacking down the corner, then open up the square and sew a few more stitches so that it is gathered a little but stays open.
Sew three little beads in the center.
Follow these complicated pictorial instructions to knot your hair ties together.
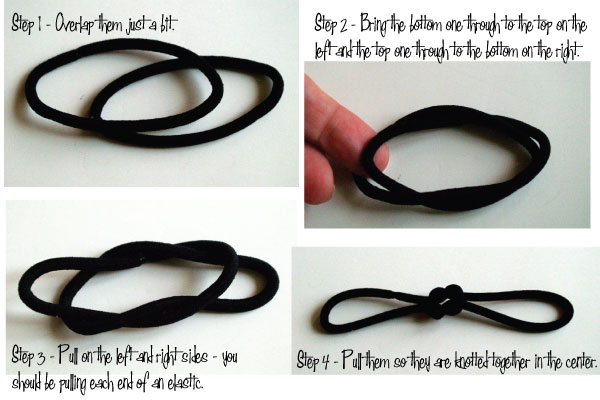
Ok – maybe not so complicated. :)
Fold one end of the headband around one end of the elastic. Make a 3/4″ hem and sew down.
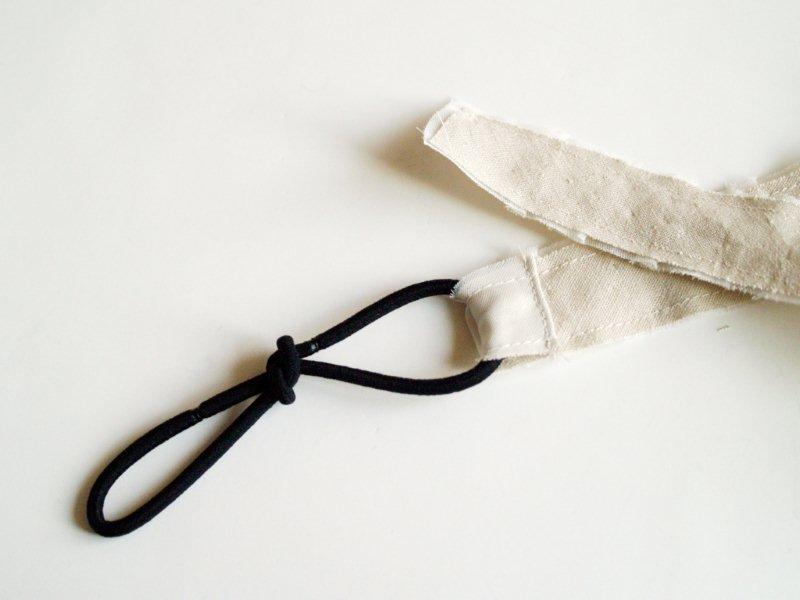
Repeat with the other end of the headband. (If you are worried about fit – try it on at this point and make sure that it will be comfortable. You can adjust your hem if you need to.)
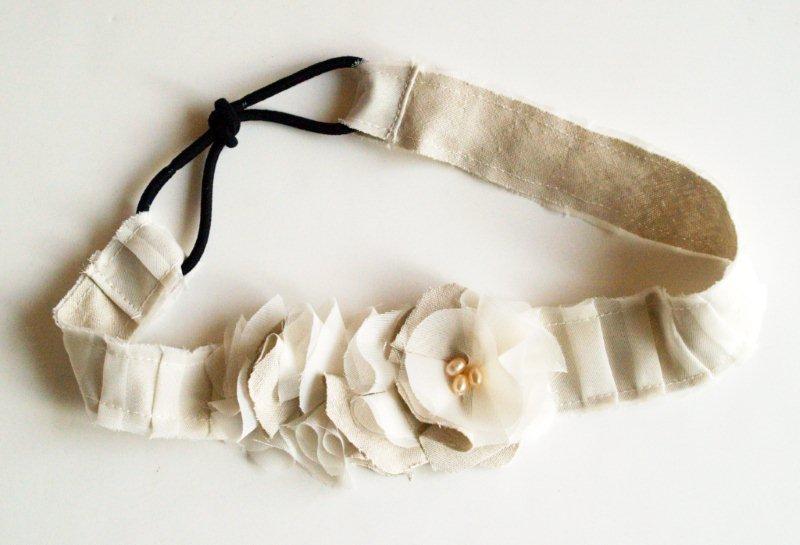
That’s it! Pretty easy right? :)
Feel free to get carried away and make a few more. . . .
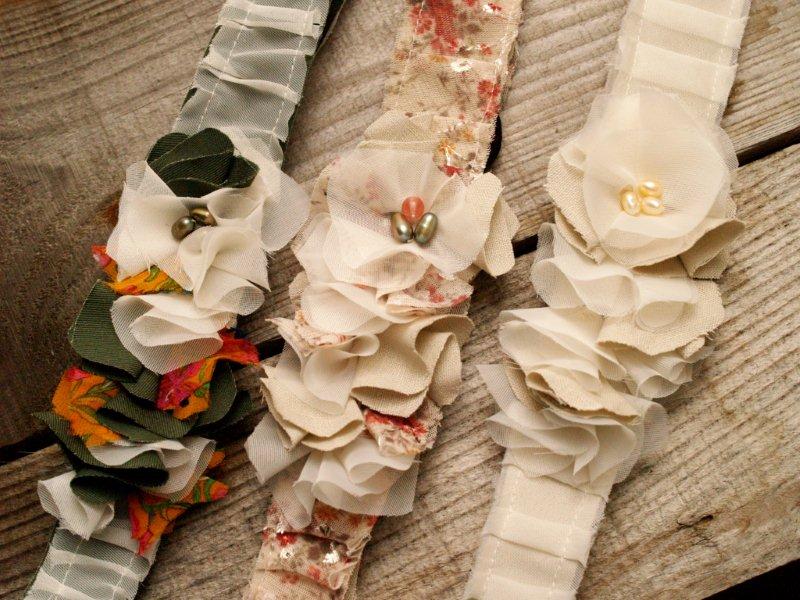
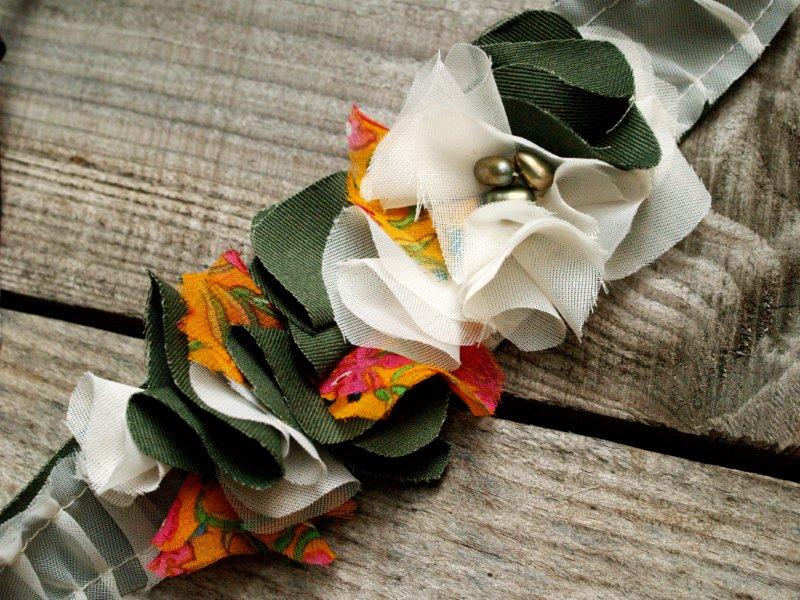
For this green one, I wanted to see what the chiffon looked like just gathered instead of pleated. I think that’s a pretty look too.
This is is made from some pretty knit lace I had – the knit worked great as a top fabric too!
I think they meet my criteria pretty well! I’d love to hear what you think!
I’m linking to Sunday Scoop, Today’s Creative Blog, Met Monday, Skip to my Lou, Tutorials & Tips Tuesday, Quilt Story, and the other fabulous parties on the sidebar – make sure you check them out!


Gorgeous!
Those are very cute! I’ll have to try one…
Well, you built up my excitement and came thru in the end! Great headbands, so pretty too!!!! Love the ruffles! Thanks for the “how to”, gonna have to try these. Can you say? Christmas gifts!!!! :)
Wow, they are beautiful!!
Jenny
http://daysofchalkandchocolate.blogspot.com
Beautiful! I love these! Thanks for the tute!
So pretty! I love that the flowers are small, too. I couldn’t resist pinning your tutorial: http://pinterest.com/iftoyscouldtalk/pins/
SO CUTE, Bev!
Oh my goodness, those are so adorable!!
Adorable, Bev! I love the pleats. I have the hardest time with headbands. I don’t know if its the shape of my head or what, but they are always slipping off the back of my head! :)
Beautiful! Great idea with the elastics!
These are really cute! Looks like it’s time to break out the sewing machine.
I love these! And I love the pony tial holder for the stretchy elastic!!
These are SO SO CUTE! I am going to try and make some for my baby girl!
Love them. Thanks for the tutorial.
Okay i’m totally doing this look and putting a spin on it. And animal or african print.. or even a really pretty rock with give it some urban glamour. Thanks for the tutorial I <3 it! :)
Wow, these are absolutely gorgeous!! I want to make one for myself, and I’m not even a headband person normally
Oh my goodness, these are beautiful. I love the idea to use hair ties for the elastic part. This looks so unique & original. I’m super impressed. Pinning this & plan on making one for myself soon.
Katy @ redBuddy notes
Okay – I totally have the same problem with headbands!! This is a brilliant and adorable solution! I totally want to make one!!
Love this!! Thanks for showing how to do them :)
Those are SO beautiful! I need some headbands just like ’em! I really love them :).
These are absolutely gorgeous!! Visiting via TCB
These are very beautiful! Definitely going on my “must do” list!!
I love these! They are so pretty and sweet. Thank you!
So pretty. I’ll be making some with school colors for our next fund raiser. Thanks! I also saw something like this- a ribbon ruffle over a wide head band. Looks like they used grosgrain on both sides. The top ruffled and the inside complimentary colors.
These are super cute! And I think I can even make these with my less than satisfactory sewing skills! Thanks so much for sharing!
You did it again Bev! Love them, they are sooo cute–I love your color combos too. L-O-V-E!
Hi there- found you through the hop and am a new follower. I love the gauzy material you used! So delicate and lovely! I hope you have time to follow my life in South Africa by http://withoutcomplexities.blogspot.com
I hope you have a great week!
Love, love, loving these adorable head bands. I have a small head and always hate finding cute headbands that look a little hilarious atop my noggin.
So, so cute Bev! Thanks for taking the time to do a tutorial. I can’t wait to try one. . . or maybe a few! :)
Gorgeous! Thanks for the tutorial, I can’t wait to make a few =)
Turned out really cute. Would love for you to link this up to my (wow me) wednesday link party going on right now on my blog. :) (I’m a new follower, too!)
Ginger
gingersnapcrafts.blogspot.com
LOVE!
Found you on SomedayCrafts Linky Party.. I absolutely ADORE these headbands! Thanks for the tutorial!
xo alanna
iheartlaughing.blogspot.com
Thanks for linking to Take-A-Look Tuesday – you were featured today!
–Mandy, http://www.SugarBeeCrafts.com
These are soooo pretty! I love their vintage look. Thank you very much for sharing.
This is the best tutorial I can’t wait to try this! I feel the same about you with headbands…hence why I don’t really have many although would love some!
Come on over and link this up to Scrappy Saturdays this weekend @ candacecreations.blogspot.com :)
I love this so much that I had to stay up late to make one. I wear headbands, but this is seriously the most comfortable one I have ever worn! I have to rethink my outfit for work tomorrow so I can wear this!
(I used a charcoal color for the bottom, with black chiffon on top, and did the charcoal/black for the flower.)
These are amazing! Simply amazing! I can’t wait to attemmpt to make one. Probably wont’ turn out as great as yours! Thanks so much for the amazing tutorial. Stopping by from Someday Crafts and will be your newest follower :)
WOWZA!!! These are absolutely gorgeous. I cant even pick a fave…I love the color combos and fabric on ALL of them. Just beautiful…and totally shop worthy.
Thanks for linking up to DIY Diva Thursdays and for helping me spread the word my friend :) You are always so kind.
Kara
http://www.mineforthemaking.com
Hi! I featured these in my post over on Sugar Bee Crafts. I think they are adorable! Your newest follower. :)
Bev, These are so beautiful! You have a great eye for making the most gorgeous things. I am highlighting this at somedaycrafts.blogspot.com.
Beautiful! A headband you forget you are wearing? Sign me up!! I am going to try this ASAP.
Thanks for the fabulous tutorial!
Love these. I have to make some soon!
Darling headbands! I am going to pin this and put this on my list of things to do. THanks!
Wow, you make some of the prettiest things Bev!
what a great, simple and pretty headband. i must try it.
I am so excited to try these for my daughter!! Thanks for the tutorial :)
These are really pretty! I love these for me and my 9 year old daughter. Thanks for sharing!
These are absolutely gorgeous Bev! I’ve been growing my hair out from a pixie and it’s finally starting to get some length (and not like a wannabe mullet). I’m so excited to finally be able to wear cute headbands like these. I MUST make some. I’m featuring your post on my FB page (of course) and pinning too, so I don’t forget!
Thanks for always bringing your A-game to “A Little Birdie Told Me…”!
Jenn
Love these beautiful headbands!!
Featured this on “What I Pinned Wednesday!” Come check it out and grab a featured button if you like!
http://littlesprinklesoffun.blogspot.com/2011/08/what-i-pinned-wednesday.html
ola sou do Brasil e amei suas tiaras gosto de terabalhar com retalhos e uma ideia otima bj
Those headbands are adorable! I’m definitely going to give them a try. Thanks for the tutorial and inspiration!
These are just beautiful! I just love the pleating and the flowers! Thank you!
I am dying over the cuteness of these little headbands! I can’t wait to make some for me and my girls. I have filed this at thecraftersfilebox.com.
Thanks for sharing!
featured these today!!!!
http://www.kimboscrafts.blogspot.com
I absolutly love theseI lost my hair due to Chemo therapy this year. and it is just starting to grow back again and I am able to style it a little but I am trying to embrace the short hair i am so not used too. So have been trying different hair accesories. But Like you said I don’t want the HUGE flower sticking of my head lol. These are ideal I love them. now to find the energy to make them thats a different story lol
I love this headband! I featured it in my DIY Headband Article on our blog! Check it out here– http://www.favecraftsblog.com/link-love-diy-headbands/
I’ve seen lots of headbands and lots of flowers that I’ved liked, but I LOVE these. They are absolutely gorgeous. I always want to wear headbands and/or flowers in my hair, but feel silly when I try because of how huge most of them are. I’m glad you agree. :) These are absolutely beautiful and I actually think I might be brave enough to wear one. Thanks for the tutorial and great pics.
I absolutely love these headbands. Have you ever considered making and selling? If you’d be interested in making and selling one to me please contact me? I don’t have access to a sewing machine!!
These are adorable and your tutorial is great! Thanks for sharing!
these are amazing and just what i was looking for! you’re great, thanks!!!
I had to go see your site, I think your Headbands ar very nice and done from someone that has imagination.
I’m not good at craft making…do you personally sell these?
:)
I plan to modify this and put on an elastic base to make a garter for my future daughter-in-law to wear for her wedding day. I can make her something truly unique and special thanks to you!
Those are so adorable! And I totally identify with those criteria – I hate it when headbands are too tight. Do you sell these anywhere? I am soooo un-artsy, so I could never make them :)
-mal :)
Thanks for sharing. Wore a headband just yesterday and I have to pin them in place. My head must be odd shaped. Thankfully I have a head full of curls to hide it. Lol anyhow, by the end of the work day I had a horrible headache. It was too tight. I’m so glad I stumbled onto your tutorial. Now to find the time
Hi do you sell your hairbands? I’m thinking for my little ones as I’d never have the time, if I could send you head measurements and pics of clothing for you to match please? They are adorable, I have 5 year old and 16 month old and also,live in uk.
Would be real grateful many thanks,
Kathrynx
I just made one of these headbands and it turned out great! I saw this tutorial yesterday and it really inspired me.. I just had to make one asap! Thank you so much for sharing, these are super cute!
I am in LOVE with these headbands, Bev. They are beautiful and not too crazy. I love that they’re adjustable with the hair elastics, then my daughters and I can all wear them. Great work and TFS.
These are precious, and thank you.
Love them going to try making them with my little daughters, as a craft together thanks for the great tutorial.
Cute! Thanks for the how-to!
Can someone please tell me how can I purchase those hair bands!!! Please email me
Thank you for sharing! There are super cute. I finally completed the headband for my 5mo baby girl… which I can also wear it. Thanks again!
Hi Bev,
I wanted to let you know that we have featured your ADORABLE project with our readers! You can see it here in roundup post “30 Fun and Easy Sewing Projects for Kids and Teens” http://hellosewing.com/30-fun-easy-sewing-projects-kids/
All the best,
Helen
I was wondering if I could get you to email this to me. I am presently without a printer. I was writing it all down, but I would love to have the pictures with it to refer to. I would really appreciate it.
Thank you in advance!!!
Omigosh! Soooooooooo cute!!!