Is it more fun to cook when you look cute? I think it is.
This results in me obsessing over creating things to wear/decorate my kitchen with.
Which you probably have figured out by now.
And since the 4th of July is around the corner, not to mention all the summer cookouts, I decided it was time to get busy.
Sure – I have aprons. And dishtowels.
But nothing patriotic. Nothing with even a smidgen of red, white and blue. Not a star in sight.
It was ridiculous, really.
I decided I needed something summery. With a patriotic feel. And I wanted it kind of vintage-y.
No problem right?
Here’s what I came up with!
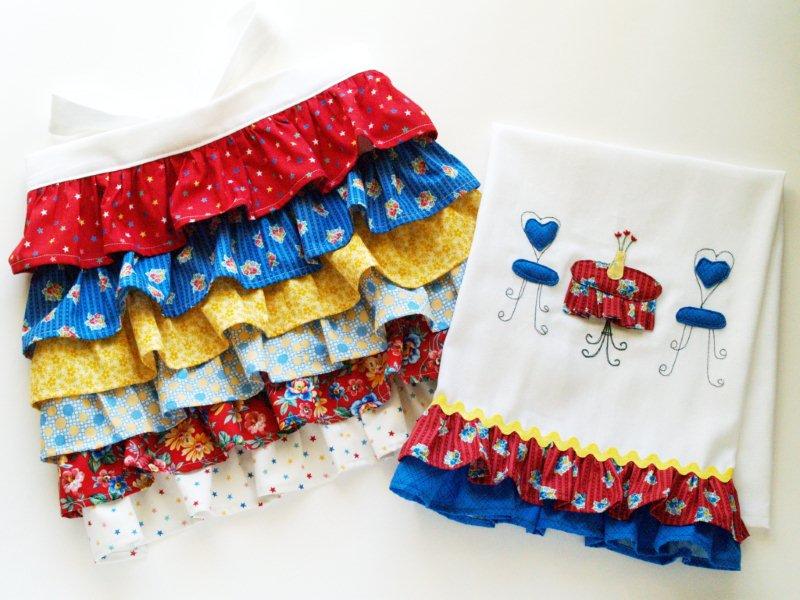
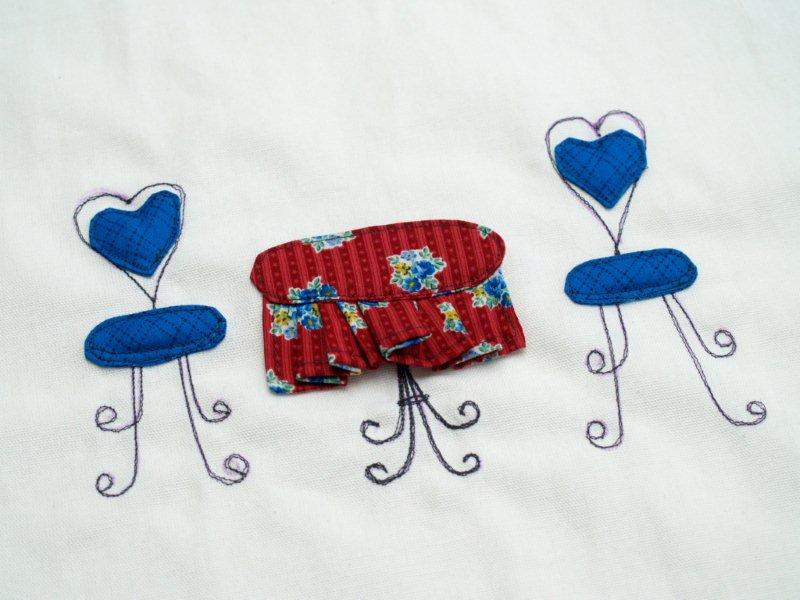
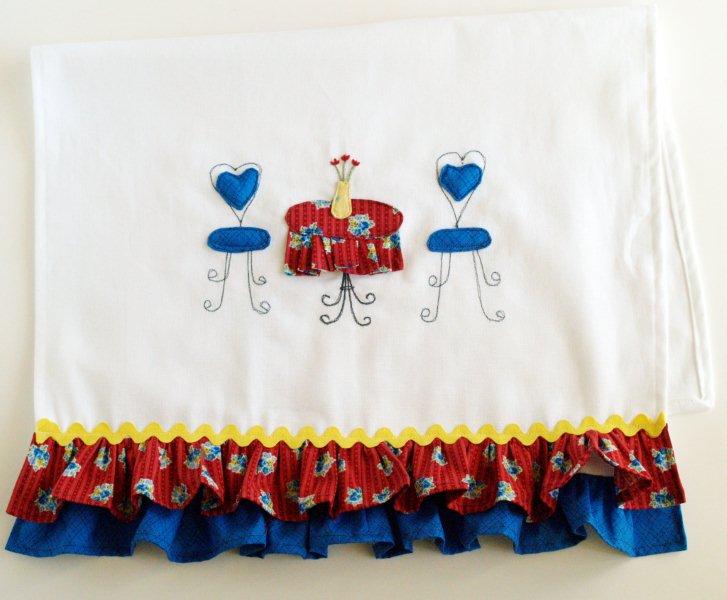
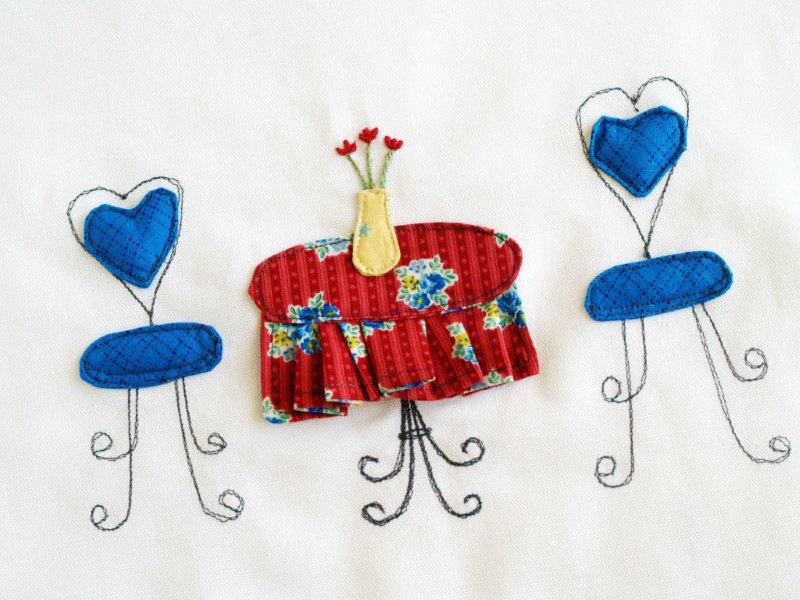
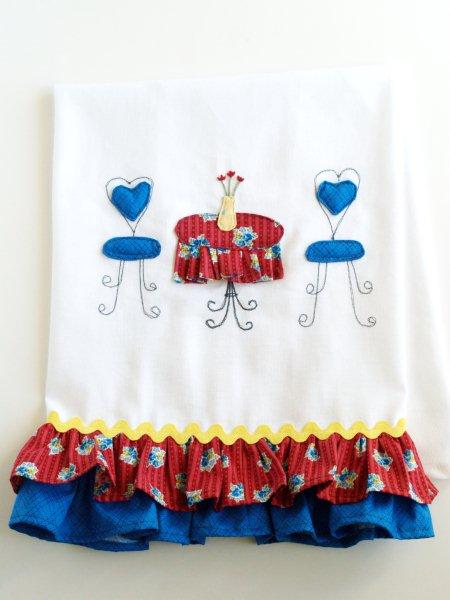
A Ruffled Half apron – and a matching dishtowel, decorated with a sweet little Ice Cream parlor type table and chairs!
Don’t you think Ice Cream Parlors and the 4th of July go great together? Me too. ;)
I’m breaking up the set into two tutorials – so we don’t have a post that takes three days to scroll through.
We’re starting off with the Dishtowel!
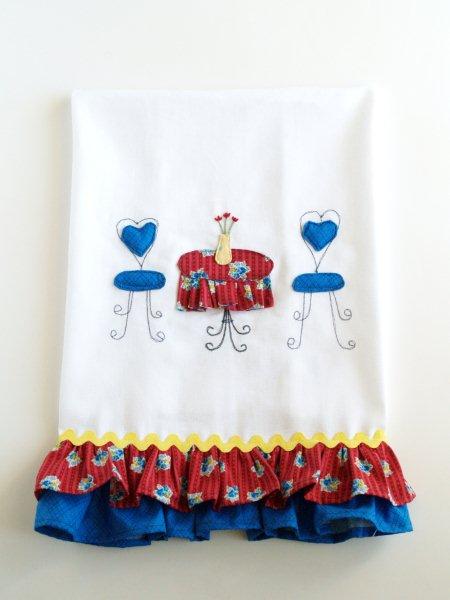
Cute little ruffles at the bottom, rick rack (duh) and a little table and chairs – 3-D style. ;)
Here’s what you’ll need for your dishtowel:
• white fabric (or purchased dishtowel) 20″ x 28″
• 2 coordinating fabrics for table/chairs, and ruffles – 1/8 yard each
• Rick rack – 20″
• red & green embroidery floss
• tiny amt. of fiberfill
• Pattern – click here for PDF version
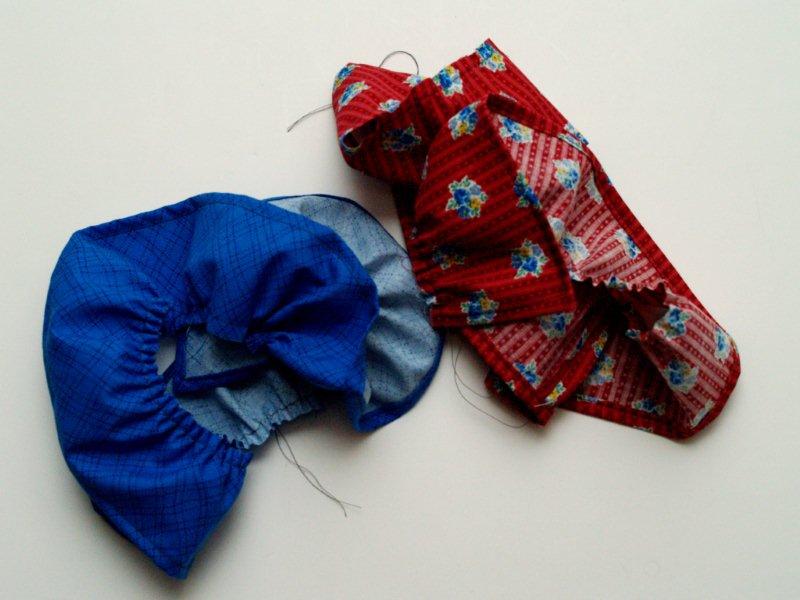
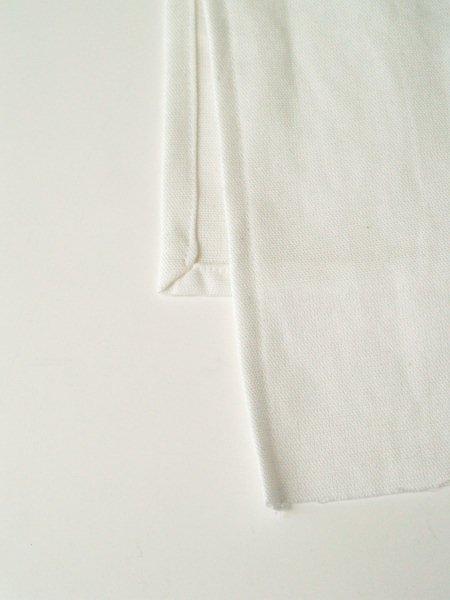
Begin by cutting out your fabrics and pattern pieces.
For the ruffles, cut pieces 40″ x 3 1/2″ of each color (or piece together fabric to make this length)
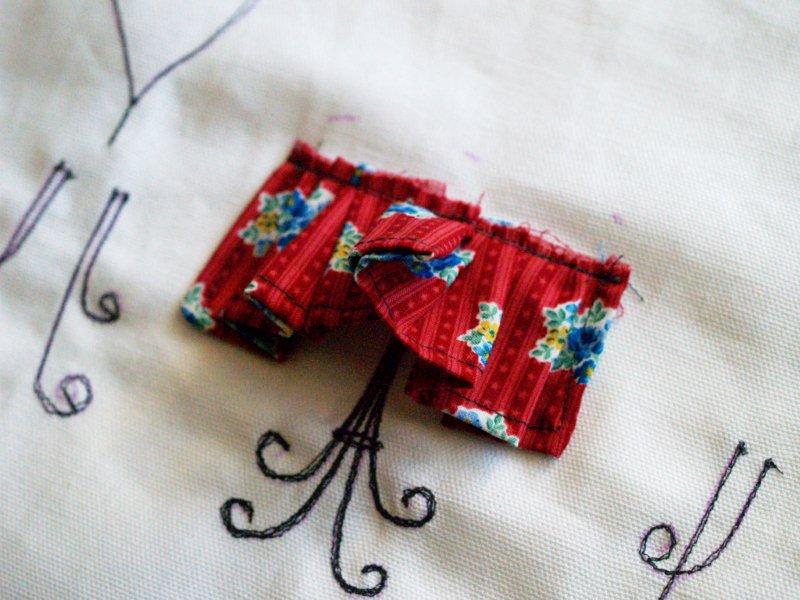
For the table skirt, cut a piece 10″ x 2 1/2″

Sew together your chair pieces (the heart and small oval) and the table top piece, right sides together.
Use a 1/4″ seam allowance and leave a small opening for turning.
Hem the two short sides and one long side of your table skirt piece.
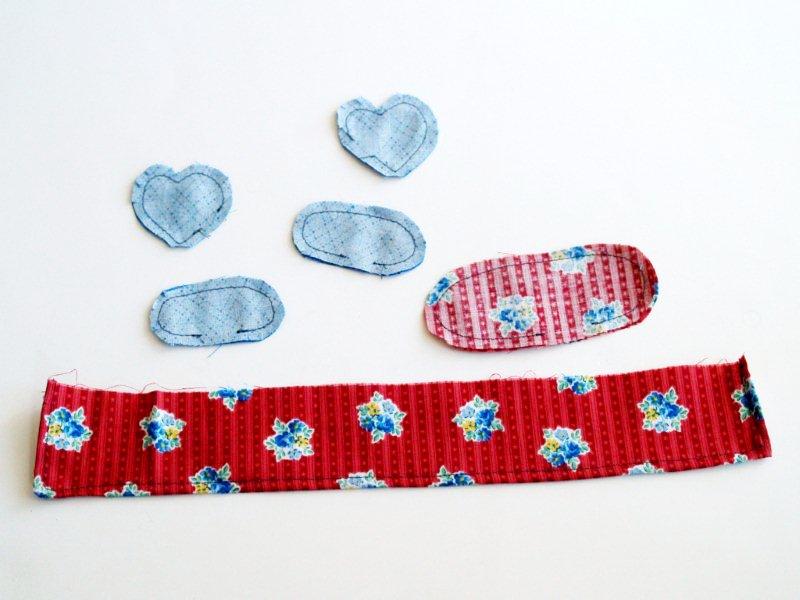
Clip all the curves.
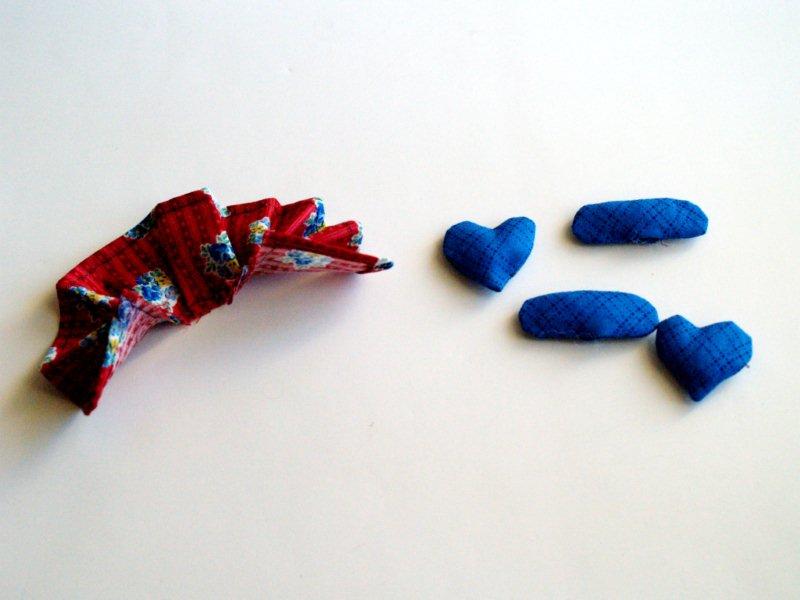
Turn all the pieces right side out. Add a tiny amount of fiberfill to the seat pieces so they are just a little puffy.
Like me after homemade ice cream.
Gather up your table skirt to just under 4″ – or the width of your oval table top piece. Sew a basting stitch 1/4″ from the edge.
I used some rough pleats for this rather than a gathering stitch.
Mark your sewing lines on your fabric with a disappearing ink pen.
Mark the lines above the table legs. This will show you where to place the table skirt and top.
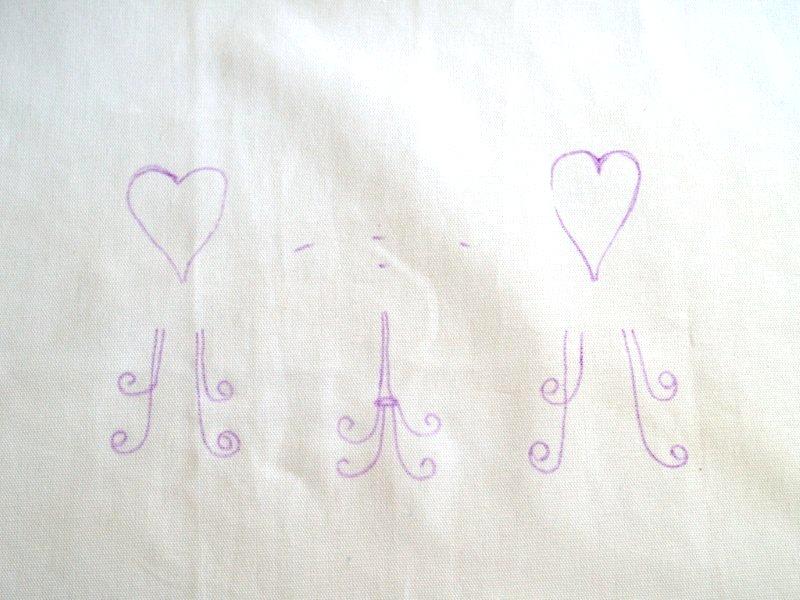
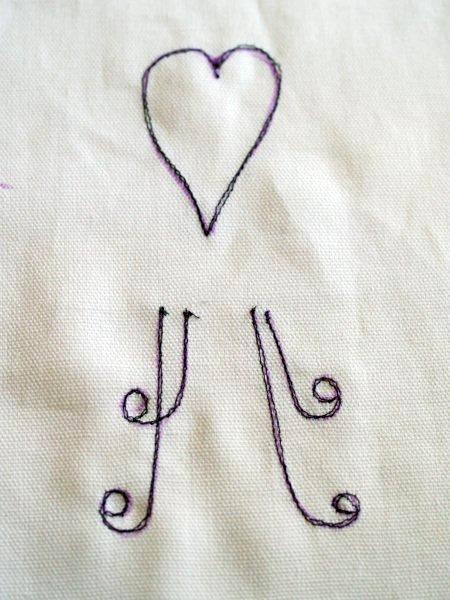
Start with one of the chairs. Follow the marked lines with stitching, in a dark color so that it stands out. I used dark gray.
Go over each line twice, but don’t try to follow the lines exactly.
You want it to have a “sketched” look to it.
Repeat with the other chair. For the table legs, go over the lines 4 times so they are a little darker.
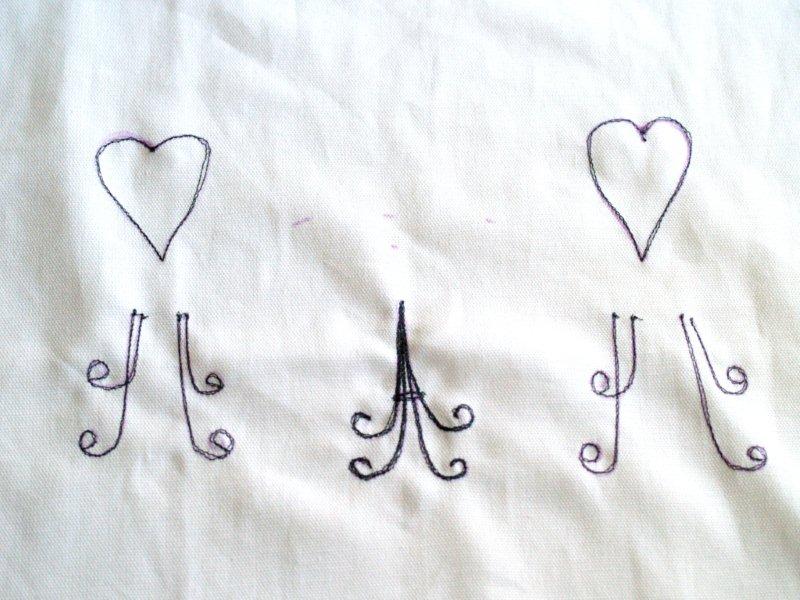
Place the table skirt at the straight line above the table legs, centering it above the legs. Sew down along the raw edge.
Place the table top piece along the top curved markings, overlapping the table skirt. Sew around the table top, just inside the edge.
This will sew it down and sew your opening closed at the same time.
Sew your chair pieces down the same way, centering the hearts inside the stitched hearts and the cushions over the tops of the legs.
Sew an extra line of stitching along the bottom of the cushion about 1/4″ above the edge to make the cushion look 3-D.
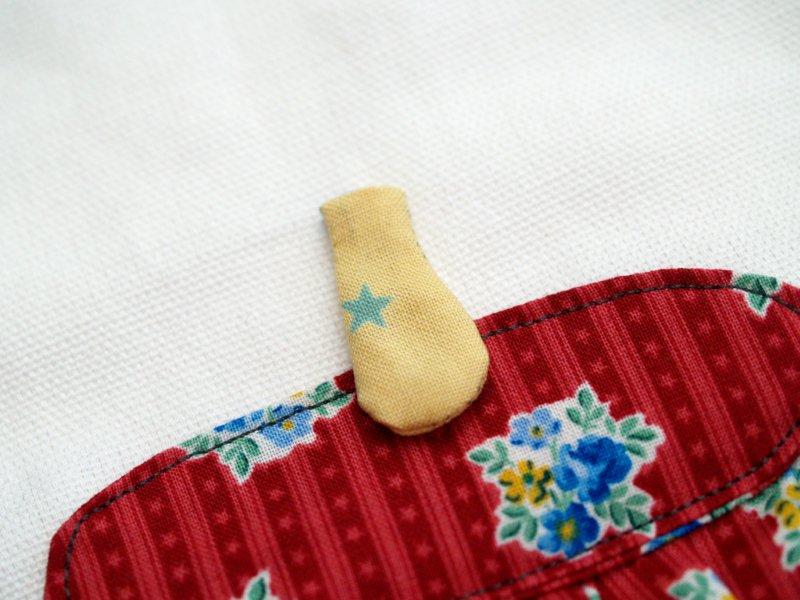
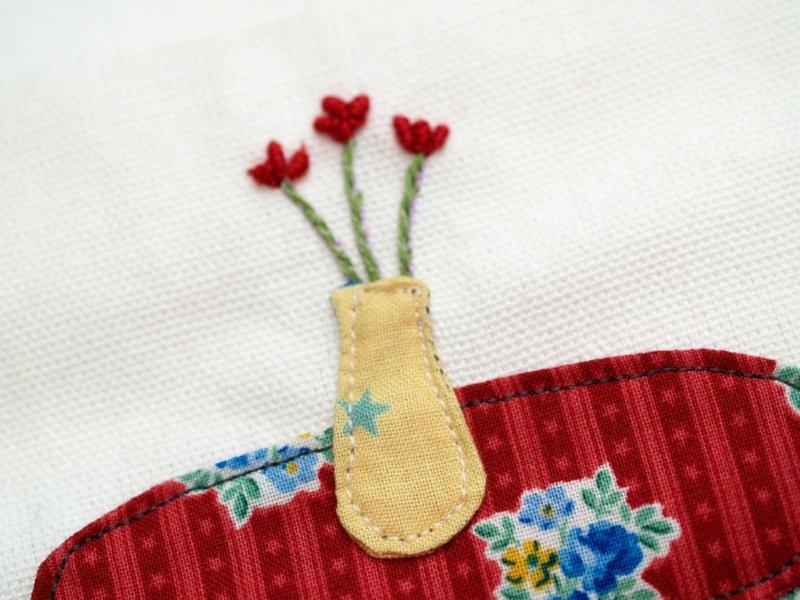
Sew your vase piece right sides together, leaving the top unsewn for turning.
Turn right side out and mark where you’d like it on the table.
Mark and then embroider your flowers on. I used a stem stitch for the stems and a bullion stitch for flowers.
If you need help with the bullion stitch, check out this tutorial.
Sew down the vase just inside the edge.
Ok – onto the ruffles.
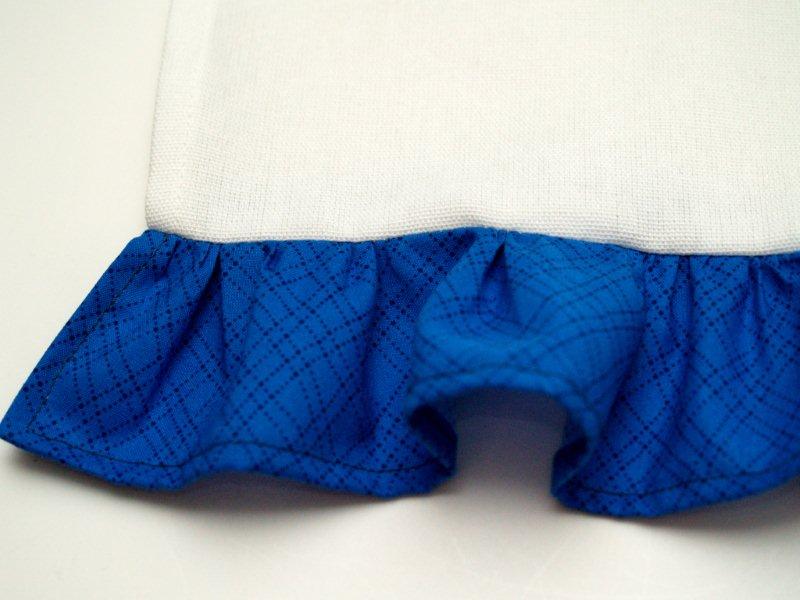
Hem the two short sides and the bottom of both of your ruffle pieces.
Run a gathering stitch along the top, raw edge.
Hem the two long sides of your dishtowel and the short top end.
Place a ruffled piece along the bottom edge of the dishtowel, raw ends and right sides together.
Sew down with a 1/2″ seam.
Press the ruffle down.
Measure up the dishtowel 1″ from the seam above the ruffle. Place the raw edge of the ruffle along the line, right sides together.
Sew down the ruffle.
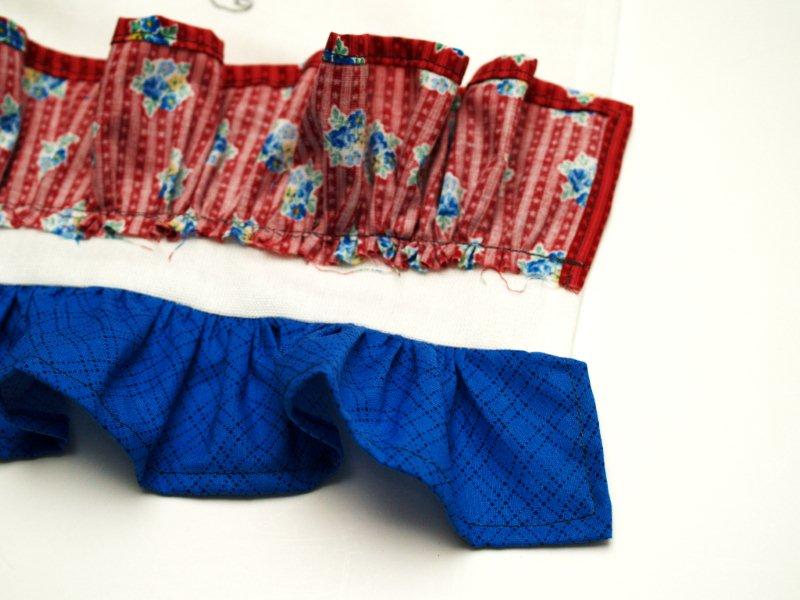
Press this ruffle down too.
Add a row of rick rack along the top of this seam.
(If you don’t happen to have a rick rack obsession, other trims would work just as well. Possibly. ;)
And that finishes it off!
Tomorrow we’re going to get our ruffles on – again – and make the other half of the set – the ruffled half apron!

I was going for cute and sassy with this pose and didn’t quite make it.
Instead it’s all, “You better come back for Part 2 or else”.
:)
**Update – you can check out the Apron Tutorial here!**


I love this tutorial. The dish towel is adorable. I really, really can’t wait for Part 2, though. That apron is deelish! :)
fantastic idea! absolutely gorgeous!!
SO cute!!! You did a great job on the little table and chairs. They are adorable!!
The dishcloth is the cutest ever!
Definitely on my list when I get a supply of fabric leftovers .
Not to Hypothetical Question: Will this be used anywhere near bbq sauce and oils?
If so, how do you get the stains out?
(I’ve quite a collection of such stains and would love some solid advice).
LOVE it!!!! So so adorable!
since I don’t cook, but i always do the dishes… that dishtowel is A.D.O.R.A.B.L.E. !!!!
REVELATION!!!
What a beautiful work! The dish towel is amazing so humorous! Wonderful
Very sweet and good tutorial.
You have a lot of patience. You make amazing stuff (as usual). Just wondering what you used as the white fabric? Is it cotton?
Incredible!
You did it again!! Great job I just love it. Thanks for the tutorial, I may just have to try this one. :)
This is too cute. Nice tutorial. Now to find the time to attempt this!
Adorable!!!
Couldn’t get any more stinking CUTER than this!!! I wouldn’t even want to use that towel, I would just drool looking at it ALL DAY!!!
oh my goodness….talk about darling….I love love love the ruffled and your tut is GREAT – thanks!
Love , love ,love them. You are the best at towels! ( and everything else)
So flippin’ flappin’ cute as always! This might sound like a completely ridiculous question, but where do you get your plain, white dishtowels? I’ve looked all over!
I love the ruffles. You amaze me. I can say that I knew back “when”. (((((HUGS))))
What a cute set and a great tutorial. Thanks.
Bev, you are the cutest! Another amazing project! I love this!
I love love the apron and dishtowel! Great project and can’t wait for the apron tutorial!!
Eeeeek that is SO cute. Are you sure you don’t secretly design for Anthropologie? You should. xoxo
Bev! This is SO cute! I always love your aprons and dishtowels, but I’m really loving this combo that you did. LOVE big time!
Very impressive and super cute. wow wow wow.
Beverly ~ Both of these are just super cute. The towel is friggin AWESOME!!!!!! I love it. Thank you. Gosh, me and my fancy/expensive embroidery machine may have to pull out the hand embroidery stuff again for this because it is just adorable!
THANK YOU!
Just found your site and am in love! I can’ t wait to try these! Thanks for the tut
Have a great day.
I saw this on Not Just a Housewife, I had to stop by to tell you I think the dish towels are really cute! I thought the chairs were embroidered until I clicked over, very neat.
Wow! This is so precious! Love the detail! Thanks for sharing!
I am in love with the towels.
I love both the dishtowel and the apron — simply adorable!!!!
These are fantastic, and what a fabulous tutorial! I wish I was a better seamstress.
A to the dorable! I love it! And I think you look cute and sassy :).
I am in awwww of the cuteness! So, so charming!
The perfect match!
~Liz
OMG Bev, they’re so darn cute…almost too beautiful to use. The dishtowel is a work of art!
Thank you so much for being a part of making “A Little Birdie Told Me…” this week, the very best week yet!
Jenn
This is so totally adorable!! i would be upset if I had that towel and someone tried to use it!
I’m in love with that towel!!!! thanks for sharing!
Adorei………Fiquei encantada com o trabalho no guardanapo e avental, e ja vou por em pratica.
Parabéns Nádia
LOVE it!
This is so adorable!! Thanks for sharing the ideas!!
Great project! I just wanted to let you know that we featured this project on our Facebook page with over 15,000 fans. We’d love it if you’d use our Featured Blogger button, available at: http://www.dailycraft.com/thank-you-for-crafting/. Our audience loved the project and we look forward to sharing more from you. Please let us know if you have any questions or projects you’d love us to feature! Thanks!
That is the cutest dishtowel I have ever seen! I love the apron too! Thanks for sharing. Hopefully I can get around to making these. What wonderful gifts!!!!!
I like the ruffles, I make dish towel sets but have used ruffles, but I will now.