I don’t know about you but I am loving everything that is blooming right now! One of my favorite things to decorate with is fresh flowers. I think it brightens up a room so much!
A couple weeks ago at Michael’s I found some tiny little glass vases for .99. I thought they would be fun to set around with some smaller blooms in them. I couldn’t find just the right spot to display them though.
Until now! In trying to come up with a place to display the little vases – I realized that I had lots of space – on the wall of my dining room!
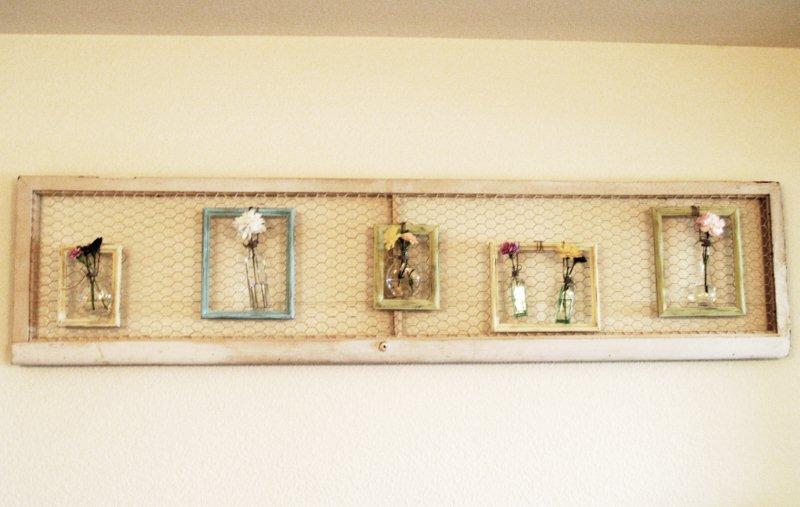
I have had a huge chicken wire screen door hung on the wall of my dining room for years. I change out the display on it often, cause I’m fickle like that. ;)
It seemed perfect for my little vase display and I love it!
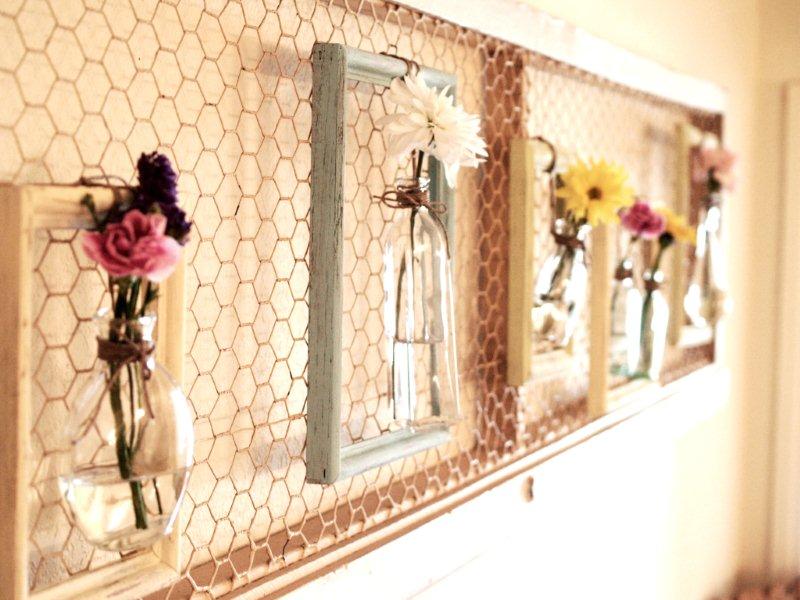
Isn’t it bright and cheery? These flowers are pretty special to me too. They were part of two big bunches waiting here for me when I arrived home from Creative Estates last weekend.
And not only were there 2 big bunches – but they were still in the paper, because Mr. F.T. knows how much I love to arrange them.
Is that the sweetest or what??
So let’s get started. This is seriously super easy.
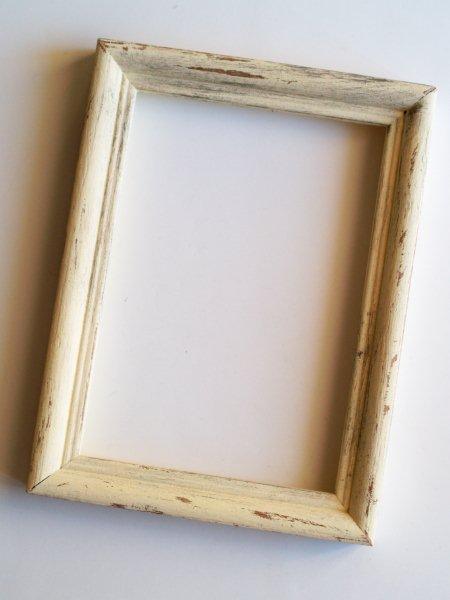
You’ll need frames, vases (one or two per frame), and twine.
If you are going to redo your frames, then you’ll need some paint too. ;)

If you have frames that you are happy with – you can skip this step.
I have a stash of ucky old oak frames – some of them were happy to donate themselves for a makeover. :)
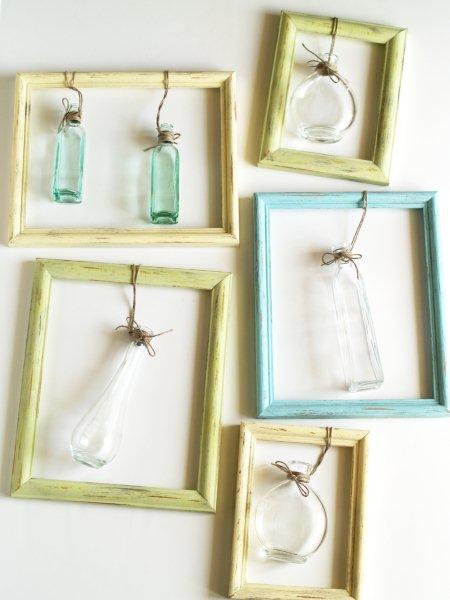
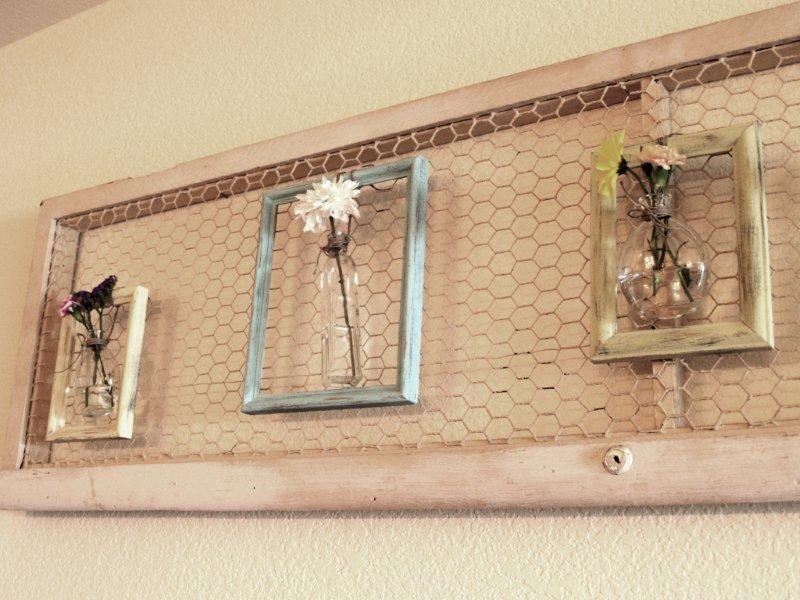
Start by painting your frames in the colors you’d like. I went for Spring-y colors – a blue, mossy green and a pale yellow.
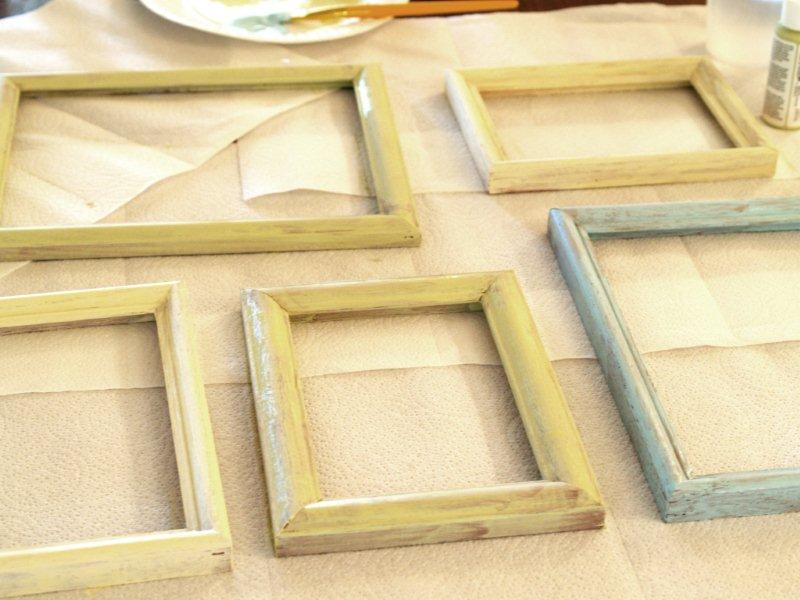
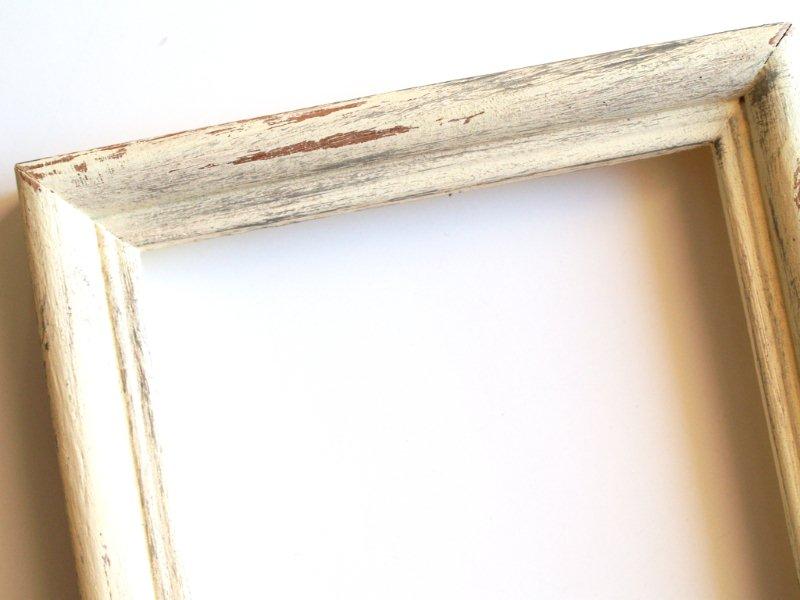
Make sure your frames are covered well – and that you paint the inside section where the glass goes as well. Since they’ll be open, this part could be visible from some angles when you hang it.
Once your frames are dry, brush on a contrasting color – I used dark gray. Get the brush wet, then circle it on a paper plate to get almost all the paint off. Brush the paint lightly over the frame to add some contrasting color. This will age the frame a bit.
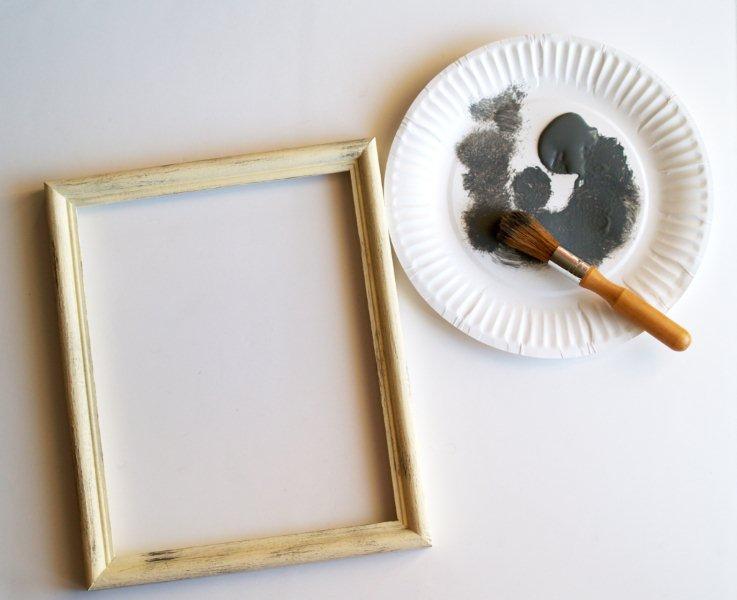
Once the paint is completely dry – sand off some of the paint you just put on. We’re going for intentionally rustic here. ;) Don’t sand all in one direction – it won’t look natural. Sand some in one direction, then switch and do a little more the other direction.
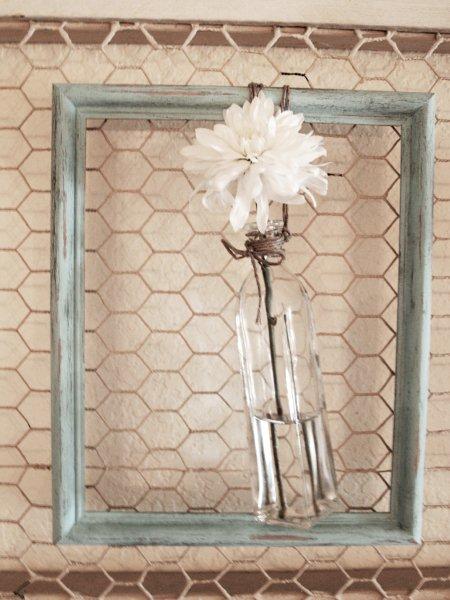
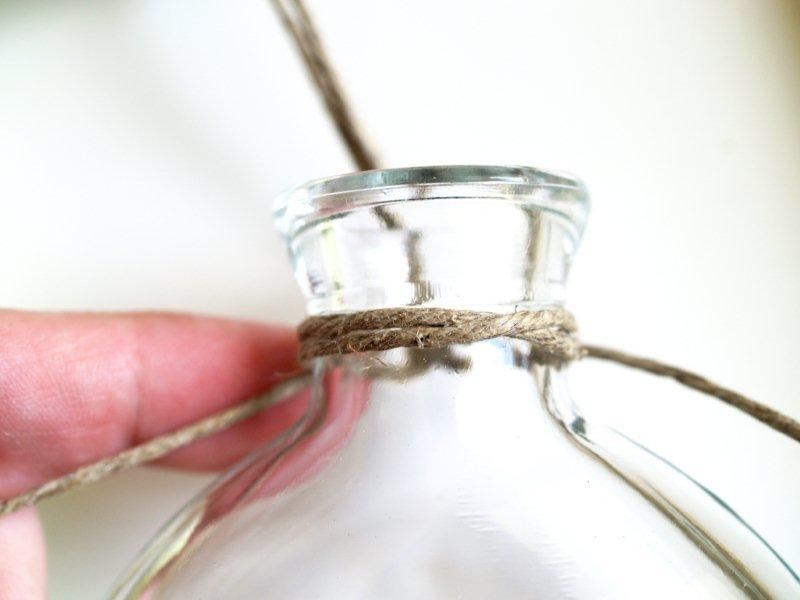
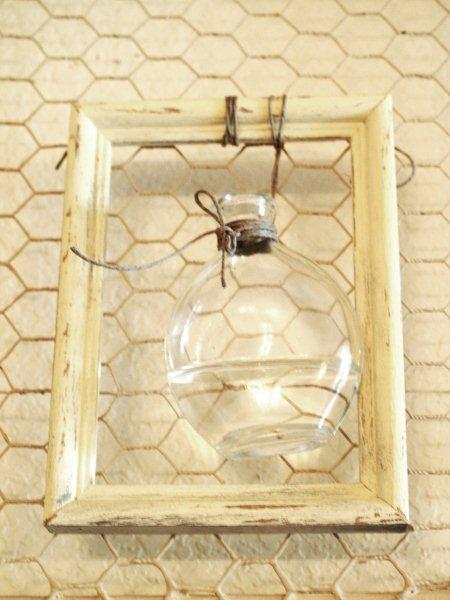
Once your frames are all ready and dry, cut your twine for the vases. I used about 40″ of twine per vase. I didn’t want the twine glued on because I want to be able to wash the vases. But I wanted it to be sturdy so were going to do some wrapping and knotting here. Loop the twine around the top of the frame and bring the ends up through the loop.
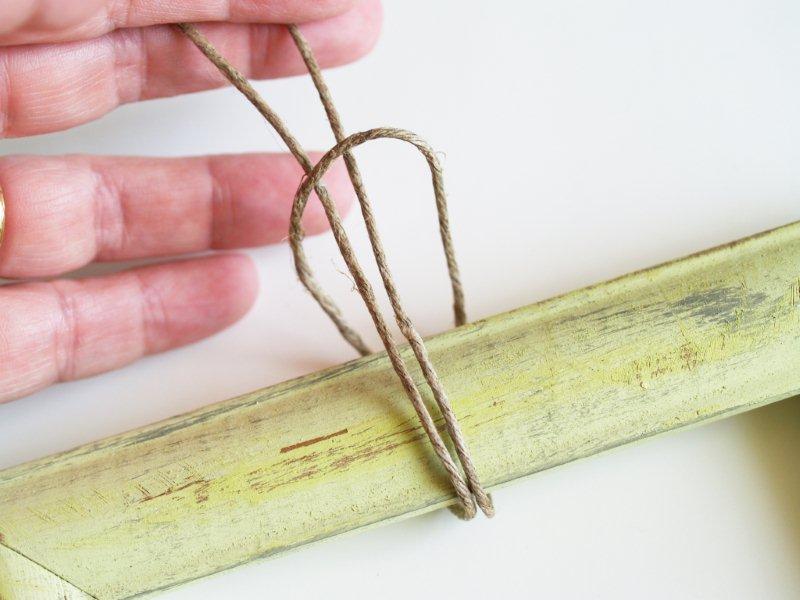
Pull this tight so that the doubled ends hang down into the frame. Place the vase in the frame about where you want it to hang and measure where the twine hits the neck.
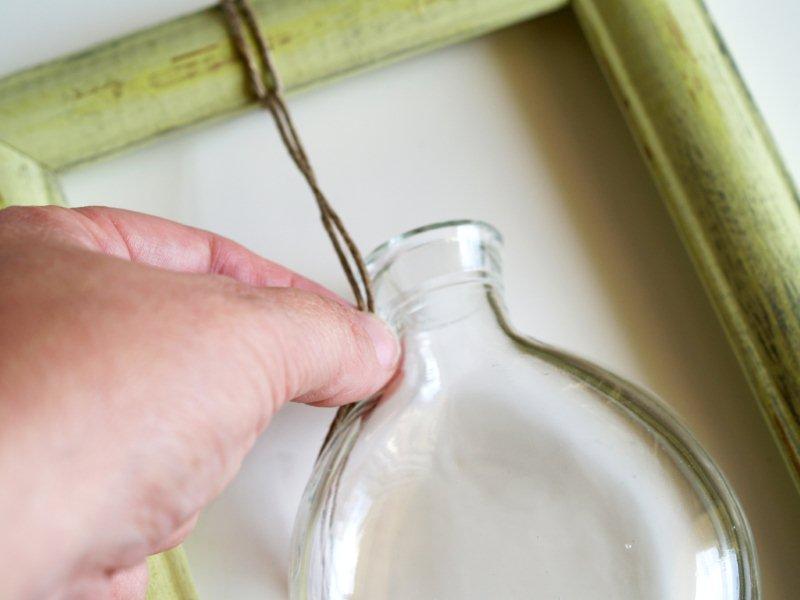
Make a knot in the twine right at the neck.

Align the knot with the back of the vase and begin wrapping the two ends of twine opposite directions around the neck of the vase.
Continue wrapping until there about 3 or 4 inches on each end. Tie the remainder in a bow on the front of the vase.
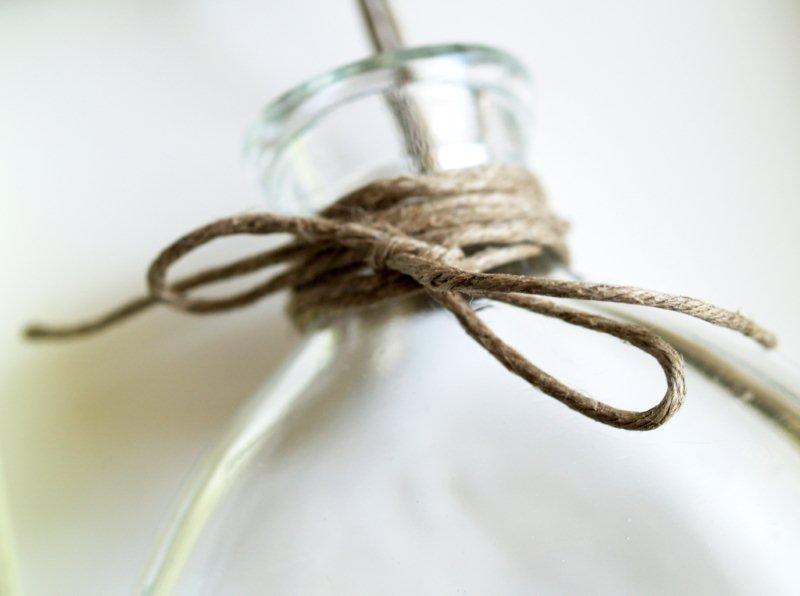
Now you have a pretty vase tied in your frame!
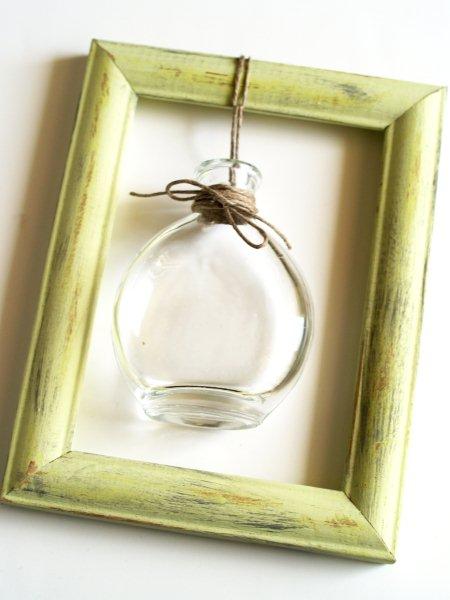
Continue with all your other frames.
And that’s pretty much it! See? So simple!!
Hang up your frames on the wall. You can rest them on nails (if you leave the nails showing it adds to the rustic look). I tied mine to the chicken wire with more twine. Add water to the vases. If you are using tiny bottles like these, you’ll probably need a funnel.
Add your flowers to the vases – and you’re all ready for spring!
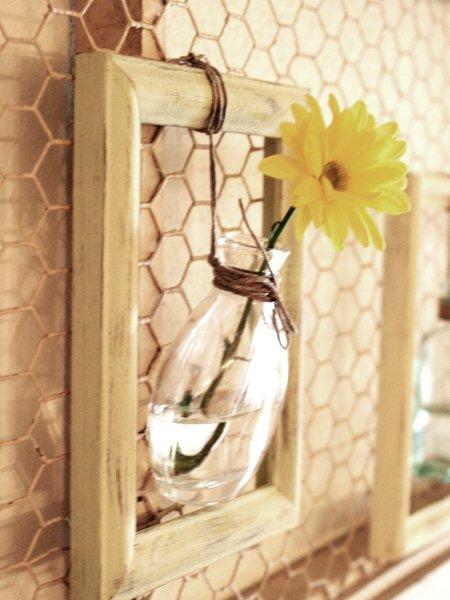
This would work so great as a wall grouping or a mantel display – there are so many options!
I’d love to know if you make them up!


This looks awesome! You’ve inspired me! I just posted today about making vases from recycled lightbulbs- and I think this would make an awesome craft with this! If you want to check out the lightbulb vase- it is here- http://threeyearsofdeath.blogspot.com/2011/04/go-green.html
I LOVE this project SO much! This is brilliant and looks like it should be in an anthropologie window display! :)
WoW! This is absolutely drool-worthy! I love how rustic, yet elegant it looks.
Thanks so much for sharing this beauty in such an easy to understand way.
Cheers,
Tracy
You are amazing. this is amazing. LOVE IT!
That is a truly beautiful project!
Gorgeous!!!!! GORGEOUS!!!
Looks great, I love it. I have a window screen that I painted years ago that I’ve been thinking of changing out to chicken wire. Seeing yours makes me want to get on the ball and update my window frame.
I LOVE this!!!
that is absolutely stunning! wow! great job!
OK – I LOVE this beyond belief!
Wow, that is FABULOUS! I would have never imagined anything like that but the outcome is just wonderful! Hmm… now I just need to think of where I could display something like this.
These are adorable!!!!! I really do love them and have some cute bottles to get started with!!
I would love to show your project off on my discovering beauty segment I do on Saturdays if that is ok with you. I will certainly link back to you for the credit on this darlings!
bee blessed
mary
I love this!! Such a cute idea! Well done. :)
Really clever idea, Bev. It looks absolutely beautiful.
Bev it’s gorgeous!! I love it so much! It would be perfect on one of my living room walls. How about you come make me one too? :) Or just come and watch me make one and we can hang out?!
What a beautiful display! I love them grouped, so much impact!
I’m sat here with my gob open so wide, it could accomodate a triple cheeseburger without even touching the lips.
How utterly, freaking, stinking (insert more words here) ADORABLE! Love your photography, too. It was cool without the chicken wire, but with it- BLAM, a million bucks. Mad skills, Bev!
Oh my goodness! This is a stunning way to display those bottles and flowers, I just love it! It looks wonderful.
Beautiful! I love the framed vases!
Gorgeous. Love everything about this. Very creative :) Thanks so much for sharing.
I am in love, like something from Country Home magazine. This is gorgeous!!!
A very beautiful and creative craft. I hope spring arrives soon!
That is the PERFECT spring solution to your wall!!!! LOVE IT – totally something Anthropologie would have in their store as a display ;)
I am absolutely in love with this look. You are really good at making something “rustic-looking”. I’m going to have to try this and feature yours on my blog today!
Miranda
http://www.justdrinkacoke.blogspot.com
You are BRILLIANT my dear!!!
Ah! I am in love! The Chickenwire, the little vases, everything!
Would love for you to share at my link party!
http://allthingsfee.blogspot.com/2011/04/calling-all-crafters-3rd-edition.html
SO darn adorable, I just love it…..i always can’t wait to see what you have come up with next…
you are so creative…
hugs
Brenda
THIS IS SOOOO gorgeous. I love it!!!!!
Oh… such a wonderful way to hi-light those single blooms I get from my garden… just perfect! Good job!
Maddie- the D.A.
Wow! This is gorgeous! I have had some chicken wire sitting around for ages that I have been trying to figure out what to do with it. I was wanting to put it into frames and make some sort of wall grouping but I never could exactly get an idea I liked! I will definately be making this! so glad you shared it! I would love for you to come link up to my Sew Crafty Party !
This looks great! What a fantastic idea!
I adore this!!!! I want one, too!! LOL!!
~Terry
This is GORGEOUS!!!
bev! these are so awesome! I love, love, love how you have them tied, and displayed!
gail
EEEKKKK…OMGosh! i LOVE this! how stinking cute. thank you SO much for sharing. this is going on my todo list asap!
http://thepinkinkdoodle.blogspot.com/
Wow, I utterly LOVE this. Wish I had the wallspace to do something similar. Such an inspiring post!
Oh my goodness! I am so glad I found you today! I just love the thriftiness and BANG this project gives. Great job! And I love that chicken wire!
I have a weekly linky party called Terrific Under Ten Tuesdays. It’s for projects made for $10 or less. I would love for you to link up sometime!
Bev, you are awesome, you always have the neatest stuff!
Bev– LOVE these…so much! xo
I love every little bit of this!
I have a chicken-wired window that I’m planning to post on my blog this week – but that door is SO neat-o!
~Bec
Great idea! this is very pretty. Came over from Today’s Creative Blog .
I am in love with this idea!!!! You are so creative! The little vases are so cute. I think I might have to try my own version of this.
Such a great idea!! I love it!!! Thanks for the tut!!
amber @ barbwired
What a great idea! I love it!
So gorgeous! Stopping by from Sugar Bee Crafts!
Oh, wow!! This is take-my-breath-away beautiful! I saw the thumbnail in a linky party and thought, “this HAS to be from someone awesome”…sho’nuff…it’s YOU! Not sure how I missed it in my reader since I’m already a follower… Hmmmm.
Aloha,
Charlie
I am in love with this! Wow! Soooooooo beautiful!
This is stunning. I just love it.
How cute are these ?! Fabulous project … thanks for sharing! *Becca*
Super duper. What’s not to love about fresh flowers and twine? Really beautiful.
I think it’s a great idea :) Makes me want to frame up some chicken wire!!!
i love this idea…and i have so many bottles lying around (i tend to be a bit of a hoarder that way). i also love the chicken wire door…did you make that or upcycle it? the whole thing is just adorable!
Oh dear, I read ONE post and I’m totally hooked. I LOVE this display and I love the framed jars! Fabulous idea! I’m a new follower!
Rachel @ Maybe Matilda
I LOVE THIS!!
I am so going to copy!!!
Very cute!!
I can’t even tell you how much I LOVE this!! I’m pinning it to Pinterest! This is a must do for my home:-)
This is adorable & they look perfect against the chicken wire!!
How pretty, I love it!
I absolutely love this! It looks fantastic! I’d love to see what else you do with your chicken wire door!
very cute…i just did a project with the wire myself
This is so cute and such a wonderful idea for those small vases. I have a ton of those with the same problem of not knowing what to do with them!
So cute great idea!!
LOVE!!
I am looking around the house wondering where I can do a mini version. So sweet, and thanks for giving the extra tips on the distressing/aging process you used, I can never quite get mine to look “natural” So appreciate that!
Came by from A2Z
oh holy cow.
how i love this idea. if only i had some wall space. ugh.
might have to rearrange some stuff because i’ve got to do this! thanks for the inspo.
I bought many boxes of frames when a local framing shop went out of business. Somehow my teen boys shattered to wrapped stacks of glass. For the frames that I have no glass for now, I think I will make up a few of these! Great project! Thanks for posting!
This is such a brilliant idea! I have had my eye on a roll of chicken wire at the hardware store, but needed the right project for it. LOVE THIS!
I LOVE this idea! It is so cute! I am having a giveaway. Stop by if you would like!
That is fabulous: simple, elegant, beautiful! Thanks so much for the tutorial, found you through Someday Crafts link party and so glad I did! Deb
This is SO cute! I am loving it!
Sweet and simple, a perfect craft!
Diane
I am in awe. You are AMAZING!!!! I wish I could come up with such beautiful things. Great job!
Very beautiful!
What a great idea! I love this and there are so many possible variations!
Awesome!!! You are on my to do list http://www.couturiermommy.com/
Such a pretty display! Love them against the chicken wire frame backdrop!
That has to be my most favorite idea so far! I have been on the “Shabby Chic Cottage” party, and your blog is STUNNING… Lord know I have plenty of frames, and now I can’t wait to get busy and to show my mom as well!
Great idea…….
It’s very cute and great idea! We’ve wrote on our blog http://www.craftreport.blogspot.com about you tutorial!
You kill me! I love all of your projects and I REALLY want to do this one!!!! You amaze me!
Oh my gosh! I LOVE THIS!! This is so unique, I have never seen anything like this. AWESOME job!!
SUCH SUCH SUCH a fabulous idea!
Just wanted to let you know I featured your awesome vases on my blog today. I hope that’s OK!
LOVE, LOVE, LOVE this Bev!! It is so pretty! Thanks so much for linking up! I’ll be featuring this tomorrow! :)
I love this! It is so fun, springy and versatile! Beautiful job!
this is perfect! I have been trying to find an idea for my master bedroom wall. I love this and may just try it. very creative!
new follower.
kathryn
http://www.thedragonsfairytail.blogspot.com
Love this idea! They all look great and a whole wall of them is even better.
So creative. I love it!Happy Friday,Happy Good Friday, Happy Earth Day, Happy Jelly Bean Day ( yes it’s actually jelly bean day)Hugs from Katherine. P.S have you entered my giveaway?
These are amazing! Thanks for the inspiration, I am so making some of these! :)
Oh my goodness, that’s beautiful! What a great idea!
Oh my goodness… I LOVE this! So pretty :) Came over from JAG, and I’m a new follower. Would love for you to visit my new blog some time!
This is incredible! The colors are soft and perfect, the simple flowers look amazing and the chicken wire frame behind it is incredible. So well done. Beautiful.
The.Cutest.Idea.I’ve.Seen.In.A.Long.Time.
Okay, I’ll stop being dramatic. I love this idea! Adorable and unique. :)
Wow I just love the vintage feel this gives off! The colors of the frames and the chicken wire and glass, so many different textures and it’s just all come together wonderfully. I also don’t know why I read your blog title “Flaming Toes” but it caught my eye and I had to see what was in here lol. I’d like to invite you to share this at my VIP party this weekend. http://designergarden.blogspot.com/2011/04/vip-party-12.html
Oh. My. GOSH. This is so cute/sweet/classy/chic/vintage/country/adorable/AMAZING! Bookmarked. Thank you so much for sharing this awesome idea!
wow! what a great idea now maybe I can do something with all those little bottles I have around. thanks for inspiration.
I LOVE THEM! I MUST TRY THIS ASAP!
{LOVE} it!
What do I think? I think I am going to make these like…. NOW!!! They would look so cute on a mantle… or anywhere, really!!! Love it. Thanks for sharing. Hopping over from My Repurposed Life.
GORGEOUS, BEAUTIFUL, CREATIVE, SWEET, CHIC, LOVE! You have been featured at CraftOManiac. winks-jen
I love this! I so could see this in my diningroom, now I need to go find some chickenwire to frame!
Happy Easter!
I love this so much! Where did you get the large chicken wire frame from? I have a large wall that I have been trying to come up with something to put on for a long time now…I think I just figured out what to do! thank you for sharing this idea.
This is beautiful…thank you so much for sharing! :)
~Jill
This looks amazing and seems quite simple to put together. Thank you for sharing your wonderful ideas!
Love, love, love this project! Thanks you so much for sharing the idea, and the instructions.
Really enjoying your blog…so glad I found it.
Cheryl
Absolutely STUNNING! I hope I can muster the courage to attempt this…yours would be perfect addition at my parents’ lakehouse…mine might be a a disappointment! :-)
If you get a chance, I’d love for you to stop by and share it at the Tuesday To Do party this week!
http://www.blackberryvine.blogspot.com
Smiles!
Jami
This looks amazing! So unique! Good job! :) I host a party on Thursday’s called DIY Thrifty Thursday and I would love you to link up this and any other ideas you have!
http://www.thrifty101.blogspot.com
Bev, I am featuring this tomorrow at Somedaycrafts.blogspot.com. I saw it last Wednesday, but wanted to feature it in it’s own post to get it more attention and had to wait until after Easter and Earth Day. It is beautiful! Great job!
VERY cool idea!!!! Love it!
LOVE this Bev! Featured you on Craft Gossip :) http://homeandgarden.craftgossip.com/spring-vases-in-a-frame/
I LOVE LOVE LOVE this!!! It’s so cute!! Such a cute and creative idea! Thank you so much for sharing! I’ll be featuring it on my blog sometime soon. :)
This is beyond FABULOUS. I am LOVING everything! Your tutorial is perfect, thank you for explaining everything so well. My husband and I just bought a house and will be closing in 2 weeks–this is perfect inspiration and oh man..my mind is racing! Thank you again :)
I think I am in LOVE! What a brilliant and GORGEOUS idea!!! I will definitely be making some of these soon! I would LOVE it if you would link it up at my new blog party Inspire Me Mondays @ http://www.homemakerinheels.com/2011/04/inspire-me-monday-week-1-is-here-come.html
Blessings!
Crysta
I love this tutorial and am planning on making it for my mudroom entrance – thank you
I am so in LOVE with this! Thanks for sharing…I might have to try this! SO cute:)
So beautiful! I love the way you colored and antiqued the frame. Every detail is perfect!
Thank you so much for being a part of “A Little Birdie Told Me…” Tuesday at Rook No. 17
Jenn
what a fun springy idea! – I shared your framed vases on our fb page! http://facebook.com/thingswithwings I’m for sure going to be visiting you again- I’m now a follower and facebook fan!
would love if you’d come visit us- http://thingswithwingsartjournal.blogspot.com —we’re actually having a giveaway right now!
I would love to have directions for the chicken wire frame. Please
Bev, this is simply stunning. I just featured it today on my Wednesday’s Wowzers. Here is the link:
http://oopsey-daisy.blogspot.com/2011/04/wednesdays-wowzers-hurry-up-summer.html
Thanks for the inspiration!
~Alison
I love this!!! Do you have pictures of the chicken wire door decorated for other holidays and times of year like you mentioned. I would love, love, love to see some. Thanks!!!
I love this (once again) and am totally featuring it on my blog today!
Beverly – This is simply adorable – I love the colors – so pretty! Thanks so much for linking to the Sunday Showcase – I greatly appreciate it. I have featured this today! Hope you have a fabulous week ~ Stephanie Lynn
What a wonderful and creative idea!! Love this! So glad you shared it with us.
I am in love with this. I use chicken wire and old bottles all the time. I will have to give this project a shot. Thanks so much for the awesome idea….
Take care,
Lisa
P.S. I am your newest follower…
LOVE IT.
THis is soo great and i love how cute and easy it is! brightens up any room!!
Just saw your blog from Under the Table and Dreaming! So glad this tutorial was posted b/c its adorable! Now I really want to do this in my kitchen. I have a perfectly blank wall that stares at me every time I go in there :) Thanks so much! I will be following your posts from now on.
LOVE this!! I just wanted to let you know that I have featured this on my first ever Timeout Thursdays post on my blog. you can see it here:
http://countrycottagechicblog.blogspot.com/2011/05/new-weekly-feature-timeout-thursdays.html
GREAT detailed tutorial and the photos are terrific, what camera are you using? Thanks for sharing!
Why would you need to ruin your site by bringing god in to it? He doesn’t exist just be happy
So beautiful! I am so in love with your blog!
Aha, and to think that I just “inherited” about 30 oak frames, mostly 8 x 10. I;m sure the $1 store will have bottles. I love the chicken wire also. I might have to back my frames with it!
These are gorgeous! So stunning! Thanks for sharing. I am a new follower. I would appreciate it if you followed me back at http://milliemorganmedia.blogspot.com!
wow! That is such a cute and original idea!! Love it! Here from TT&J
I used chicken wire for a Christmas gift for my sister and I was wondering what to do with the rest of the roll. This is BEAUTIFUL! I am thinking of rounding up a nice big frame, sticking some chicken wire in it and maybe doing a few pink and red frames with vases hanging in them and throwing those babies right on the chicken wire for a little Valentine’s decor. Thank you so much for the inspiration!
This is fantastic!! What a great idea…on a budget even!
Soooo love this! It’s one of my alltime fav projects of yours. I remember it well. :)
Shared it on FJI Facebook and pinned for SNS 116. :)
http://www.facebook.com/photo.php?fbid=10150568925446141&set=a.192514281140.164586.175378011140&type=1&theater
Donna
Great idea!! This will look great on that long wall in my dining room. So sad, Jim, it’s impossible to be happy when remarks are made against GOD. If you don’t believe, you don’t have to read her blog.
This is amazing. I absolutely love it, and can’t wait to give this a try!
The chicken wire frame could be used as a base for so many different objects. Did the repuposed door already come that way or did you build it?
Found you via Pinterest.
Please visit my blog as I am hosting a giveaway for a $50 Kirklands gift card.
it’s really amazing!! Bravo ! I love it!
I come to know about your project by RemodelAholic. It’s amazing DIY project for Easter! I have one more question for your project. Can we re-publish your project on our Blog?
Hi, I was wondering if the twine is sufficient to hold the glass with water. Would it not slip? Am looking forward to making this :)
Hi!!
I’ve had these up for a year now and I have water in them all the time and have never had a problem.
You want to make sure your twine is wrapped around the neck and tied tightly – it will be just fine!
I’d love to see them if you make them!
I looooove these!!! I recently got married and used vintage bottles of differing sizes for the centerpieces and then realized I had no idea what to do with them. This is such a great way for me to keep some of our wedding as part of our home. Thanks for a great idea!! I can’t wait to try it out :)
look what i found on Pinterest today! :)
I saw this and was immediately inspired to run out to Michaels with 20 minutes until closing. I recently redid my bedroom, but unfortunately my accent wall was entirely empty. This is exactly what I needed! Michaels didn’t have any twine–surprising, I know–so I opted for a different kind of “string” instead. It looks wonderful. I love it! Thank you!
something very different! love it
Hey I know its probaly ages since you posted this and this is a bit unrelated but do you have a tutorial for the chickenwire thing the framed vases are hanging on
Jane,
Thanks for your comment – unfortunately I didn’t make the chicken wire screen door that the frames are hanging on. I was lucky enough to find it at a garage sale several years ago. It’s basically just a wooden door frame, with chicken wire stapled to the back though.
Sorry that isn’t much help!
Bev
Not sure about the chicken wire, but these have great potential!
Very creative! I love it!
Hello Beverly!
I just came across this today, as I was looking for a way to use a beautiful vintage gold frame in an interesting way in my breakfast nook. This is perfect! So creative, easy enough for me (!), and I love the way I can incorporate different colors and shapes.
Thank you so much. You are an inspiration.
With every best wish,
Conna