Did you know Mother’s Day is about a week and half away??
Eek!!
I don’t know about you but I’m scrambling a bit here. ;) So I thought I’d help you out.
Actually, Melissa and I are helping you out. :)
Melissa sent in a Tutorial Request for a darling Boden Necklace – and I knew that it would be perfect for a Mother’s Day idea.
Or a “I’m going to make that myself for Mother’s Day” idea. ;)
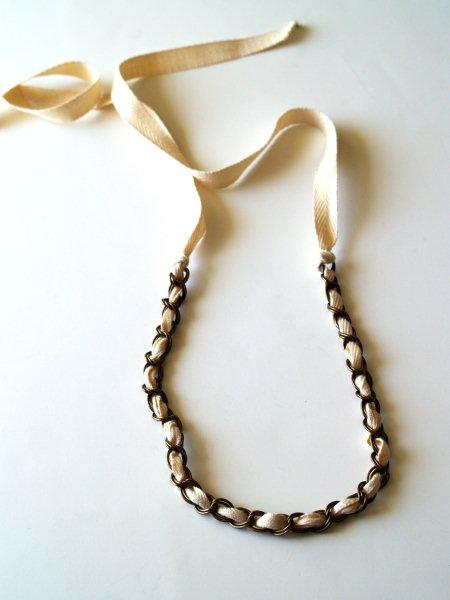
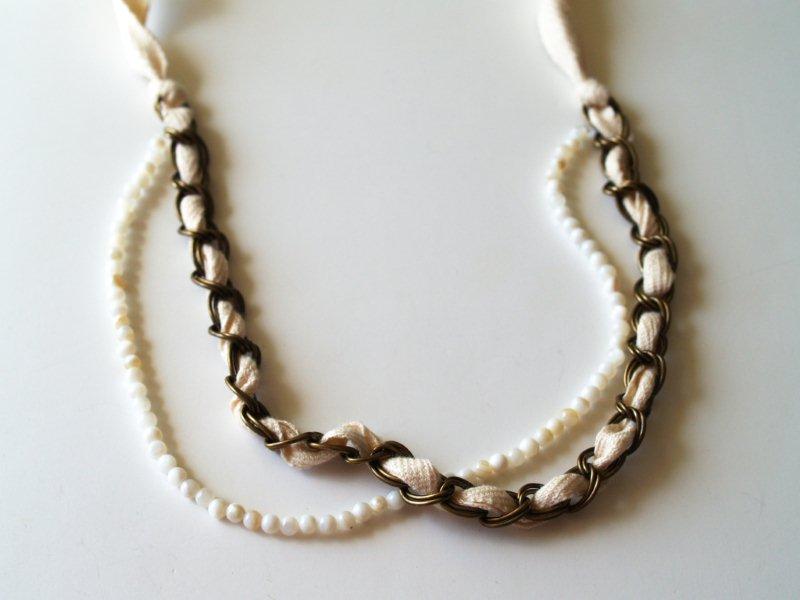
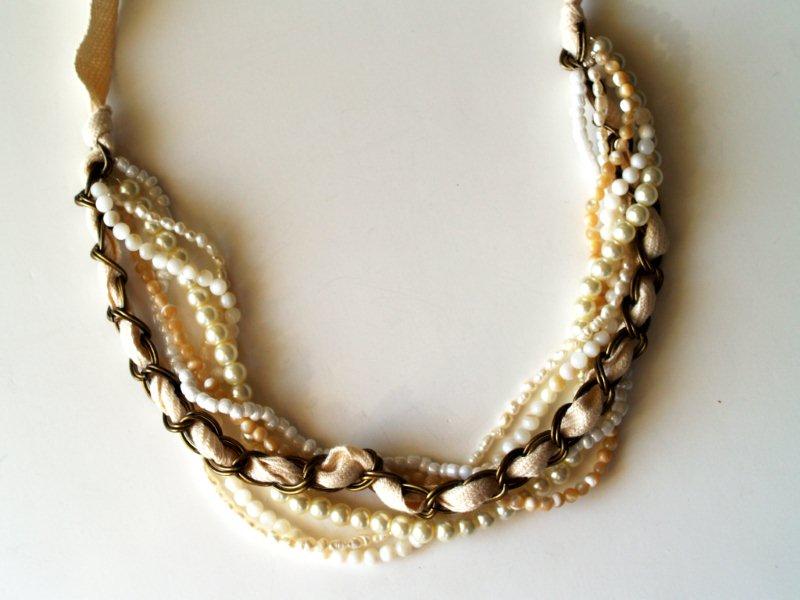
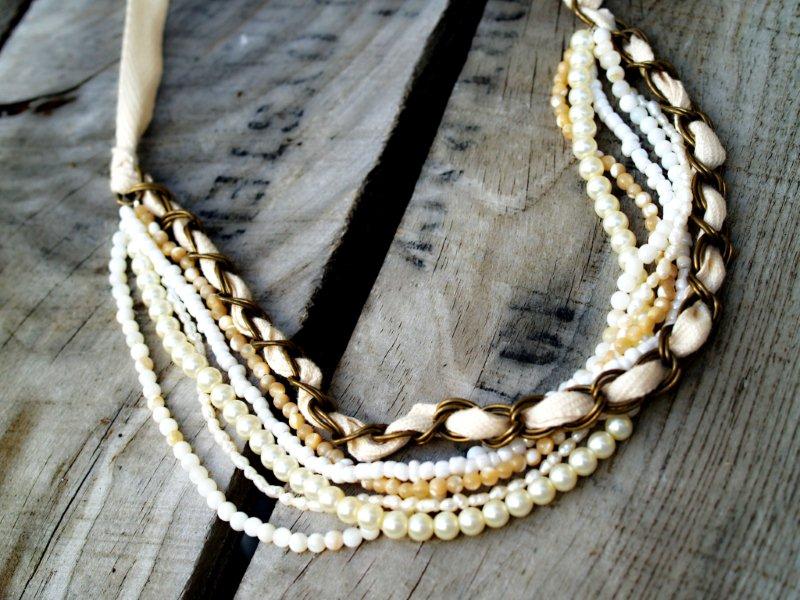
Here is my version of the prettiness –

And here is the Boden version – with a crazy retail value of $78 –

I like the navy they used but I went for a more neutral color scheme.
I think I’m drawn to these pearl/ivory colors – they go with so much!
This necklace is super easy!! I promise you can get it made up in the short week and a half before Mom’s Day.
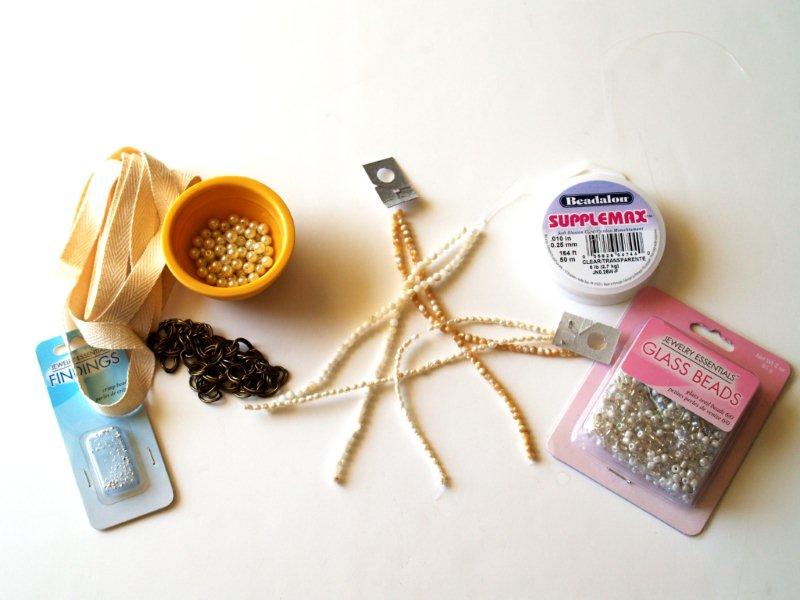
Here’s what you’ll need to make it:
twill or other ribbon (approx 50″)
large link chain (you’ll need a piece about 13″ long)
bead assortment – enough for 5 13″ strands
beading cord
crimp beads (10)
(All supplies came from Michael’s) :)
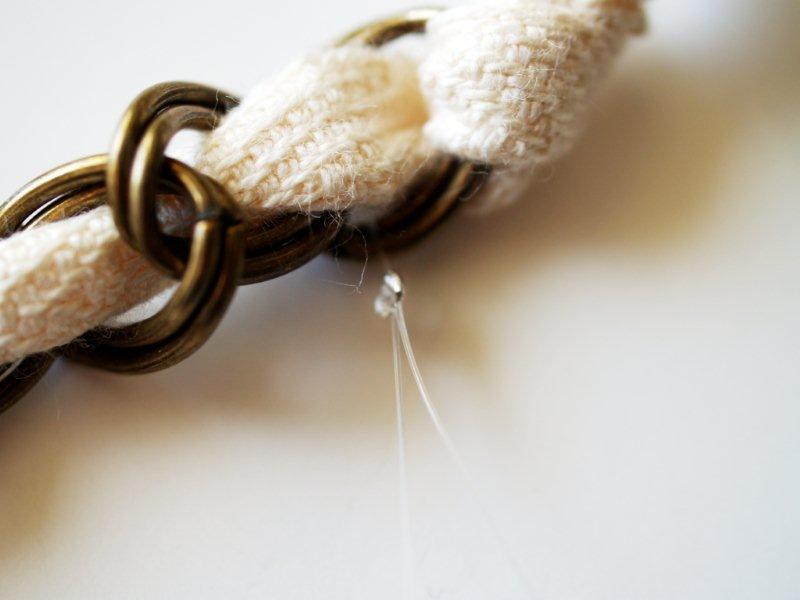
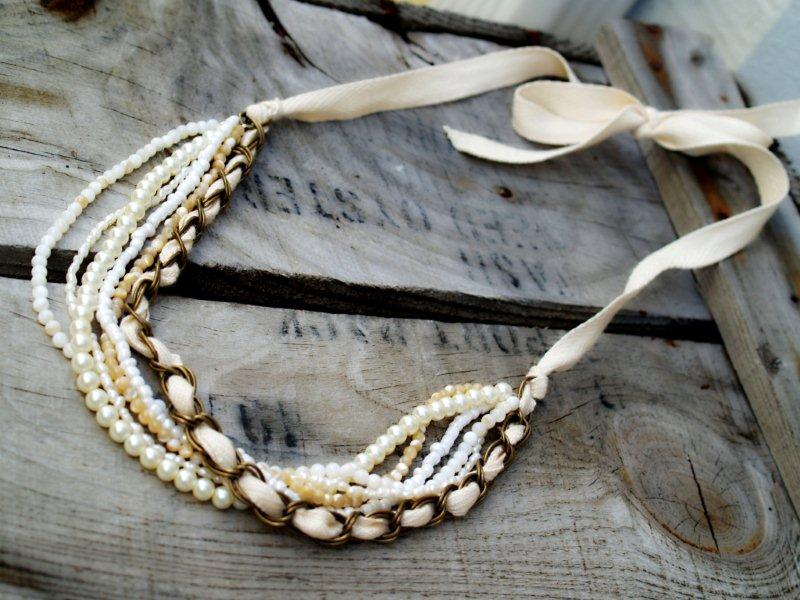
Start by weaving your twill piece through the links of the chain. Weave the twill over and under the links.
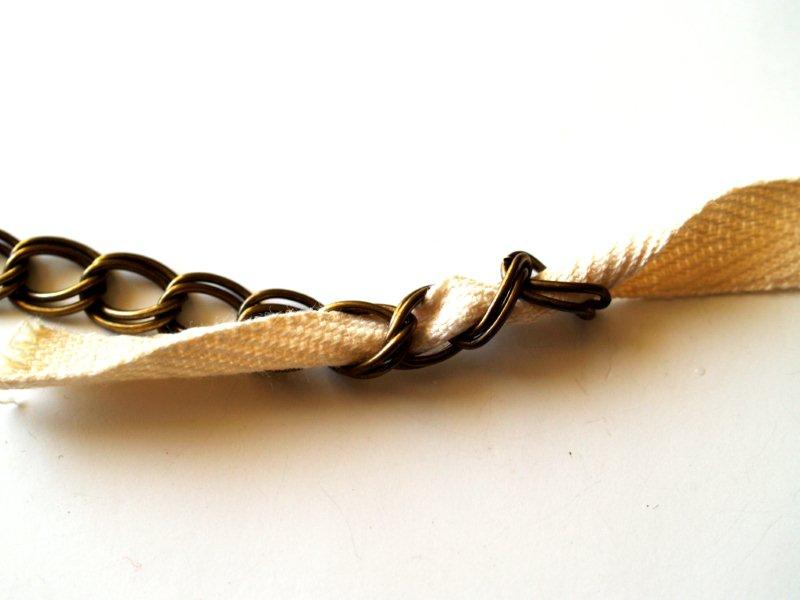
Continue weaving the twill through until the chain piece is centered in the twill.
Tie a knot around the last link of the chain on each side.
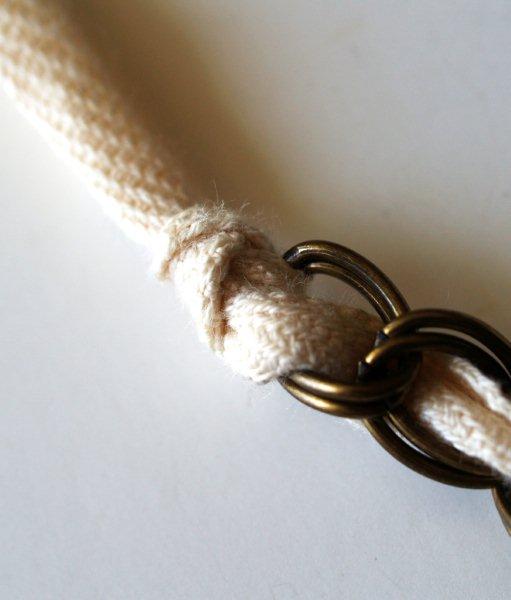
Pretty cute already huh?
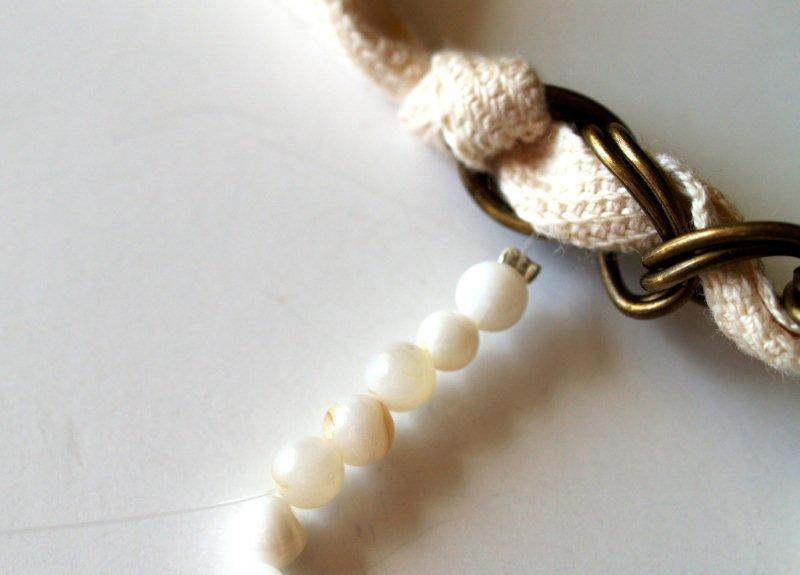
Now we’re going to start adding in our small bead strands.
Cut a strand of bead cord about 17″ long. Add a crimp bead to one end of the cord.
Wrap the cord through the last link of the chain where the knot is. Feed the cord back through the jump ring so it is looped through the chain link.
Crimp the bead tight with flat nosed pliers to hold the cording in place.
Feed beads onto the strand, covering the loose end of the cording as you string them. Add beads until the strand measures about 13″, or the length of the chain.
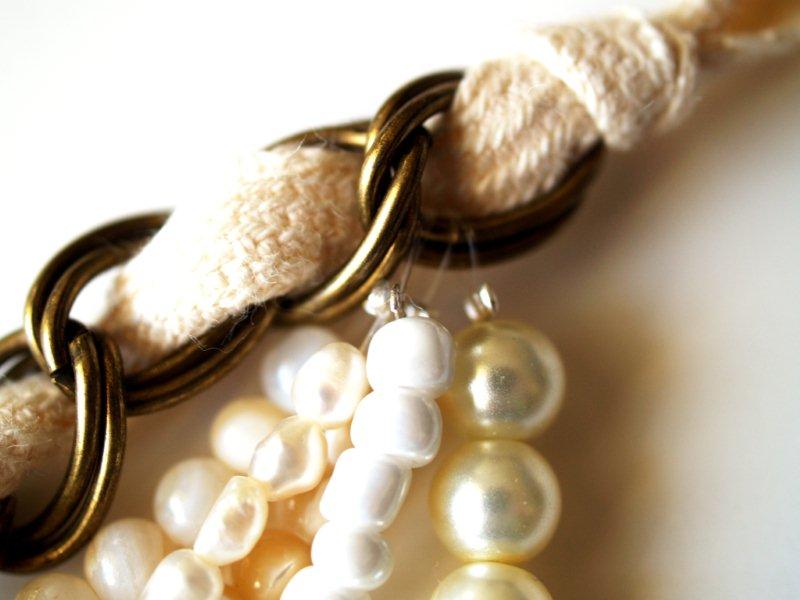
Finish the other end of the cording with a crimp bead looped around the other end of the chain. Feed the loose end of the cording through several of the beads and then trim off the remainder.
Repeat this process 4 more times with different bead strands. Vary your type and size of beads just a bit.
You will have 5 strands looped around the last links of the chain on each side.
And that’s it!! I told you – easy peasy!
The beauty of the twill is that you can adjust it for whatever length you’d like – to go with whatever you’re wearing!

Thanks Melissa for sending in this great Tutorial Request!!
Honestly this is so fun and quick that you could make up two! One for Mom and one for You!
As always – I’d love to know what you think! ;)
I’m linking to Sunday Scoop, Today’s Creative Blog, Met Monday, Skip to my Lou, Tutorials & Tips Tuesday,
and the other fabulous parties on the sidebar – make sure you check them out!


Oh wow! Love this one just as much as the marshmallow fabric one (no coincidence that they are the same color/have the twill tie) Thanks for another great tute!
It’s great Bev!! I would rock it with some jeans and a cute shirt. I love neutral creamy colors too. You look beautiful.
So pretty and great tutorial! I do like the neutrals with this design, smart move!
Um…LOVE IT! I am totally gonna make this for my momma (and one for me!) I am off to Michaels tomorrow to pick up all the supplies! THANKS for the great tutorial, I have been looking for a great Mom’s Day Gift!
I love the colors you used much better! Love this!
Love this!! I think I even like your version better! This is going on my to do list.
Amazing..super cute..you are always awesome Bev.. :)
this might sound like a severe case of bum- kissing, but if I was presented with both versions, I couldn’t tell which one is the Boden one and which one a “cheap” knock- off. Plus, I’d choose yours for my Mum, she looks gorgeous wearing light colours! Plus, your chain looks a lot better than theirs, not the shiny silver- plated look that can take a lot of fun out of jewellery (in my humble opinion, anyway)
Thanks for modelling the piece, it makes it a lot easier to estimate the size and the overall look. x
I like your version so much better! It makes it more feminine somehow. This is gorgeous!!!
Oh bev, it is stunning! I really love it!
So cute…Love the neckless…..on my to do list! I just might have to get into jewelery making!
So totally cute! This is my favorite of all of the necklace tutorials you have done. Thank you for modeling it for us!
This is really cute and looks so easy to make. I may have to try my luck with it. Thanks for the tutorial. It looks great on you. :) Love it!!
You are so talented, I stared at that necklace and couldn’t figure out how it was made. Thanks so much for doing my request and I’ll be sure to upload some pics of the ones I make.
GAHHH! I neeeeed one! It’s just lovely! Great job! One of my faves.
What is this Boden place?
THAT’S MY SONS NAME!
Crazy!!
I love it!! I need to make one of these for my mom!
Off to Michaels this morning!!!
You are so amazing, this knock-off is gorgeous. I love it!
I am in AWE!
hugs
Brenda
OOOOH! I LOVE all things Boden, this necklace included! Great tutorial and I like the colors you made it in even better than the original.
What!!!! I think I have the materials in my studio to make this pretty. May have to tweak a tad, my twill tape is 1″ wide.
Your version appeals to me, I’m always drawn to the softer/neutral tones.
I have never made a piece of jewelry in my life but this is the first time I think I might actually want to give it a try!
as i started to read it, i thought the pearl one was the original and the navy one was the knock off! yours is that good!
This is adorable…I love it! Great knockoff!!
I totally like yours better–it is so classic and pretty, but still really trendy and cool! Gorgeous!
Rachel @ Maybe Matilda
LOVE this!! Seriously you have the best tutorials! Half of my crafting to do list is made up of your tutorials!!
It’s pouring right now so I might just have to give this one a try while I’m stuck inside this afternoon! :)
Thanks for sharing!
It’s so funny because I saw the pictures and though, “Oh I like the cream one better!” And then realized that one wad yours, which has happened many times with you knock offs! You always do such a great job.
Bev this necklace is just so stinkin cute! I love it! You are one talented lady!
Rebecca Cousins
enjoyed the tutorial and photos! really beautiful.
new follower!
kathryn
http://www.thedragonsfairytail.blogspot.com
I am so making one of these for me! I know I have some twill already in my craft stash. Thanks Bev. Your tutorials are so easy to follow and you are so nice to share:)
Holy crap. I insist you do a giveaway for this! I want one!
SOOOO pretty! And the necklace isn’t bad, either. Hahaha.
I really, really like this one! It’s *summer-y.* ;)
Bev! This is just stunning! And I’m in love with the creamy colours of the pearls against the chains! Thank you so much for the great tutorial; I’ll go and run around London to find some nice pearls and chains this weekend :)
Very pretty!
very pretty…………….
I like yours even better than the original! It’s lovely. :)
Oh my! I think I like your’s even better than Boden’s! Love, love love!!
Love it! So FAb! You are way talented!
xoxoxo
http://runwithglitter.blogspot.com/
Happy b-day!
Ooh, Boden. Their stuff is so cute, but a bit pricey. This is adorable. I love your color palette so much more!
i love this, bev! so pretty!
SOOOO pretty! We would ♥ for you to show this off at join our link party!
Lolly Jane
lollyjaneboutique.blogspot.com
How easy, now to get the supplies! Love this!
Dig, dig, DIG this knock off!! great job Bev!
Hopping over from Momma Go Round’s facebook page. LOVE this necklace! Thanks so much for sharing! Hopefully I’ll get a chance to whip one up soon! :D
You did a great job! And thanks for the reminder about Mother’s Day. I have to get moving with my boys’ gift for my mom! Coming over from Met Monday – you are my after!
Jeanine
super cool!!
Cute! Please come and share it at my link party: http://fabricbowsandmore.blogspot.com
thanks good post admin…
That’s so pretty! I might make one for me! Thanks tons, I’ll be linking.
I’,m inspired to make one for myself as soon as I can decide which color! Thanks for sharing. I’ve linked in my Facebook page – http://www.facebook.com/TheBeadingGem
Pearl
Love it! I just got some chain that will work, not I must dig up some ribbon and beads…..
Bev, I love the neutral colors. The necklace looks beautiful on you!
Thank you for sharing your talent on “A Little Birdie Told Me…” Tuesday at Rook No. 17!
Jenn
oh wow! I like yours so much more! I thought that was the $78 dollar necklace!
Beverly – I am in love – simply gorgeous! I totally adore Boden and this is a fantastic inspired piece – fabulous as always! Thanks so much for linking to the Sunday Showcase – I greatly appreciate it. I have featured this {sunday}. Hope you are enjoying your week ~ Stephanie Lynn
http://www.bystephanielynn.com
I love this necklace, it looks just as good if not better than the shop bought one!
I don’t bookmark a lot of tuts but this is too cute! I’ll have to come back and reference it later. Thanks for sharing! :)
This is so cute! I’m definitely making it. Thanks for sharing :)
this is really cool and creative
Honestly, I quite like yours better than the retail version. You did a great job recreating it!
Wow, that’s a really cute necklace, and it seems relatively easy to make! I’m not sure what I was expecting…
Thank you for this tutorial! I thought it was so pretty when I saw it, and immediately went out and got the supplies. I did mine in a nice steel blue and silver combo. Thanks again!
-Katie
Aw, this is soooooooooooo cute!! I loved this idea!! :) Keep it up gal! U are very creative!
Hi Bev! What a great knock off! I’ve featured this post on Copy Cat Crafts today, you can view it here
http://www.copycatcrafts.com/diy-necklace-inspired-by-boden/
We’d love it if you’d like to display a featured button! You can grab your button on the right hand side of your post. Thanks!
A beautiful and simple necklace. A very suitable and gorgeous addition to anyone’s wardrobe! Thank you for sharing.
I like your version better!
Thank you, nice necklaces!
This is a great idea. Please notifiy me of new posts
I’m wondering if this could be a wrap bracelet also? yeah, the tails would be long but they could be wrapped more and then tied?
super cute and seems easy, going to get the stuff to make one soon. thank you for sharing, this is great!
Can you tell us how much your version cost? Thanks!
Where can you buy the link chain?
woah! I agree, yours is definitely prettier! You’ve inspired me to want to make one now lol.
Nice one! Looks very good on you :) I’ll try this sometime..
Made. My own. Love it
I’ve been making jewelry for over 10 yrs. but I always enjoy seeing what you’re up to. This necklace knock off is really well done! I like the use of the neutral color tones along with the chain and twill. A piece of jewelry that is fun to wear.
I love it. Just a classy “classic” design. ….and easy . Thanks
You do such a wonderful job of explaining the steps and the visual steps are a big help. I am very visual so needless to say, I’m very appreciative. Thanks.
Wow this is a great tutorial. I like yours even better. Thanks!