I’ve been ‘oohing’ and ‘ahhing” over all the Starburst Mirrors out there. I think they’re just gorgeous.
But I couldn’t really find one to fit my style.
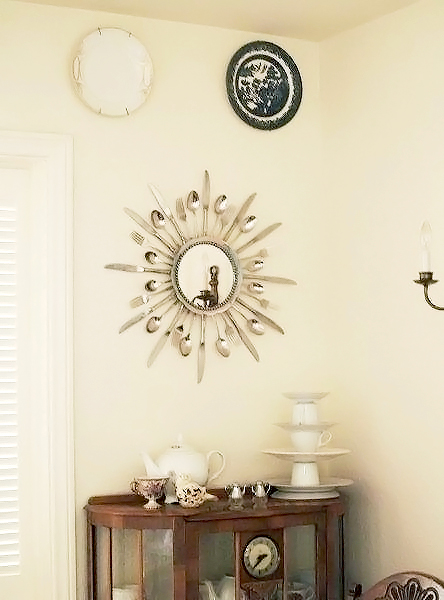
I’ve been wanting one for our dining room – I have the perfect little 1/4 wall for it. ;)
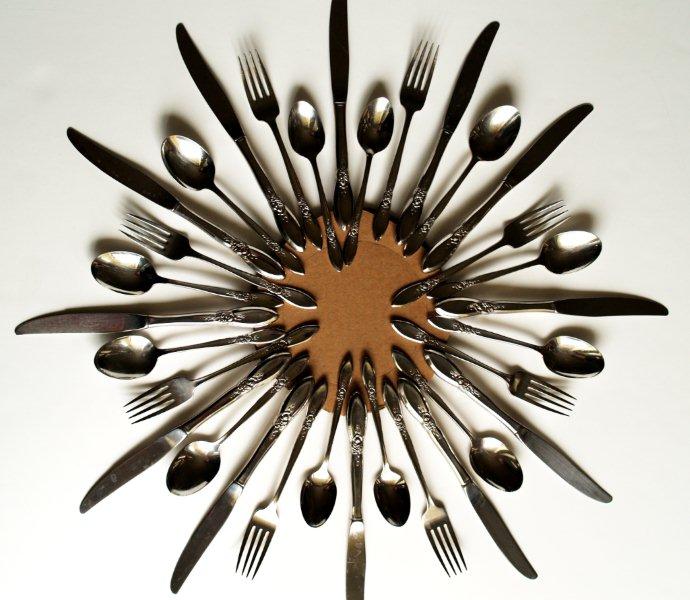
Well after looking and plotting and trying to figure out materials – I had the idea that since it was for the dining room, it might look cute made from Silverware!
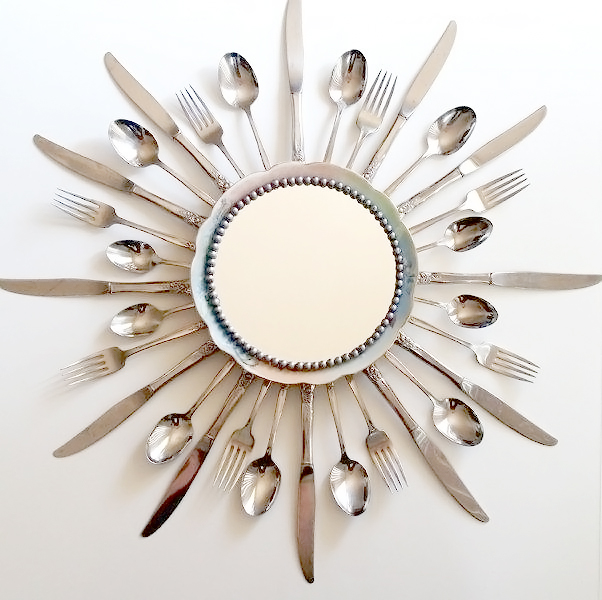
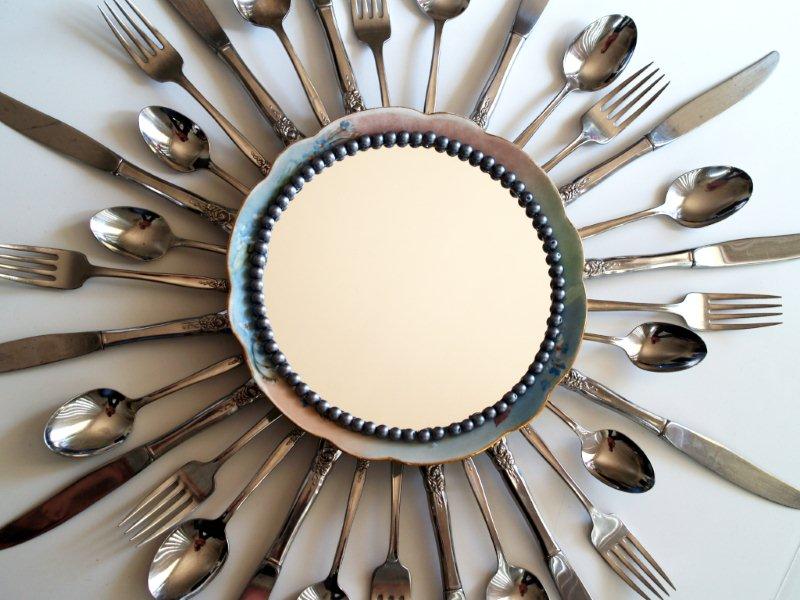
After much debate on layout (Mr. F.T. absolutely LOVES being a craft adviser, haha) and lots of glue, this is what I came up with!!
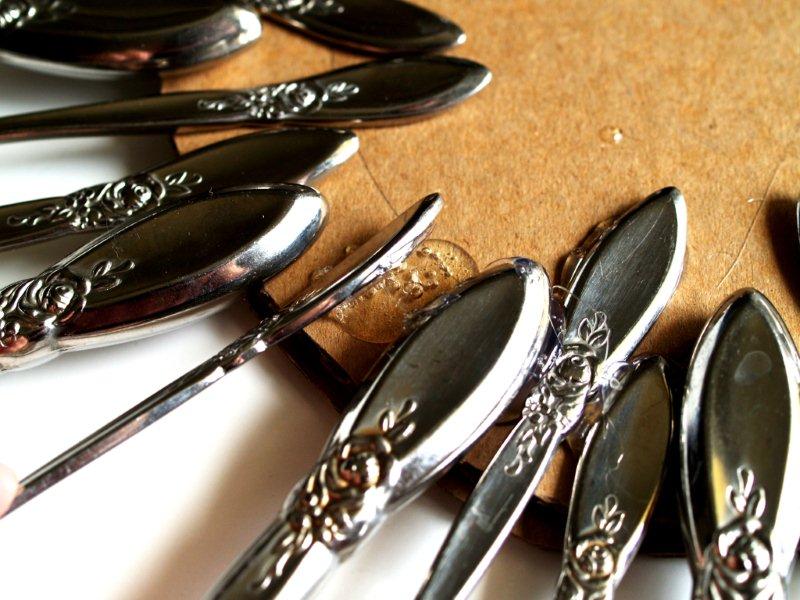
And a closeup:
It was soooo easy to make.
Here’s a quick tutorial in case you’d like one too!!
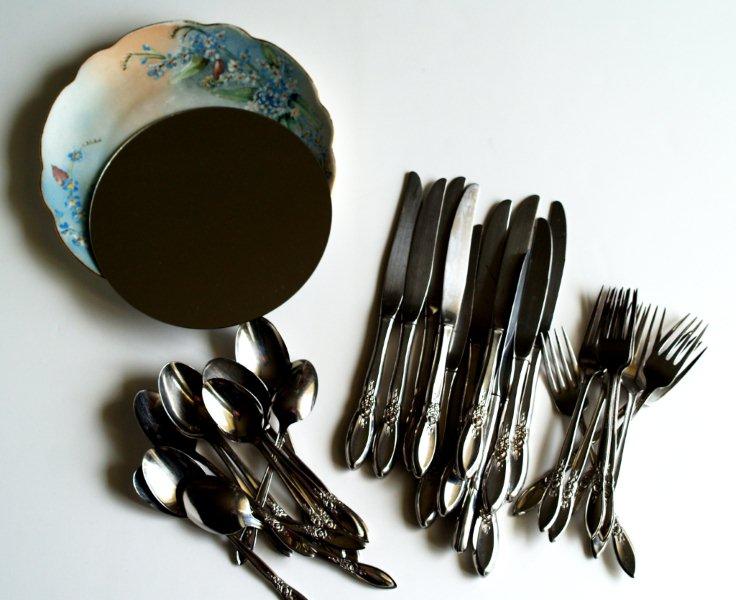
You’ll need:
Round Mirror – this one is 7″
(I picked it up at Joann’s)
Plate, a few inches larger than the mirror
Cardboard
Silverware (Depends on your layout. I used 12 knives, 8 forks, & 12 spoons)
Beads (enough to go around mirror)
Glue (I used hot glue)
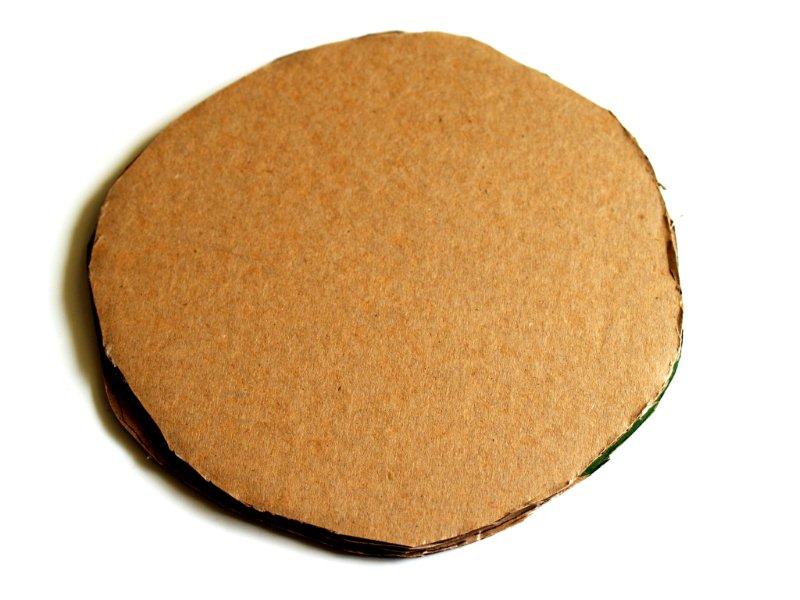
Start by cutting 2 circles out of cardboard. Measure halfway between the bottom rim of the plate and edge to make your circle.
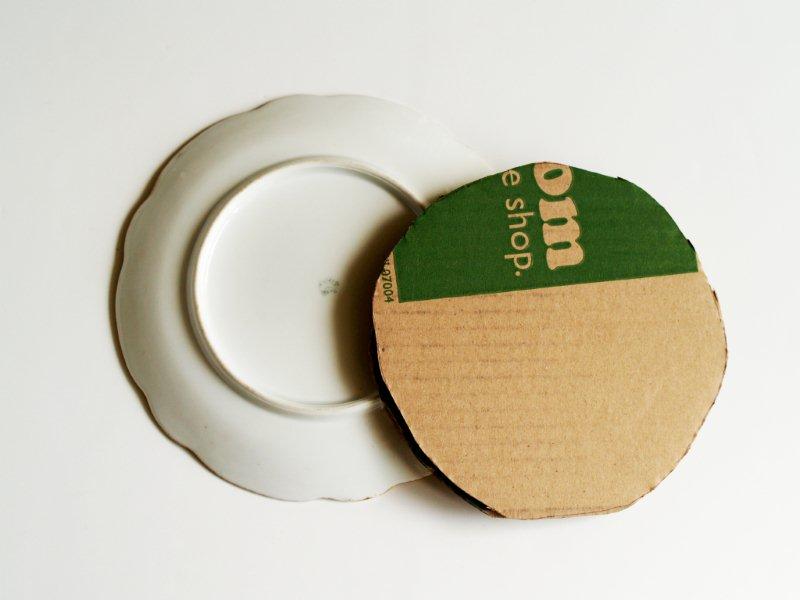
Glue the two circles together with hot glue. This will give you a stable base for your silverware.
You could also use wood or something else as a base, I was just going for cheap. ;)
(You thought I was kidding when I said I had terrible paper cutting skills didn’t you?
Evidently it also extents to cardboard. Don’t judge.)
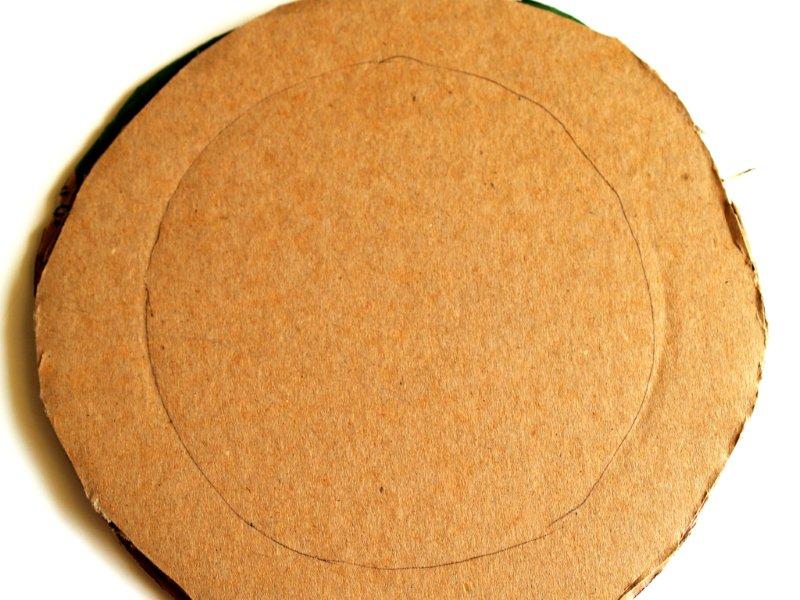
Press the rim of the plate down onto the circle, then trace this with a pen. That way you know how to place your silverware.
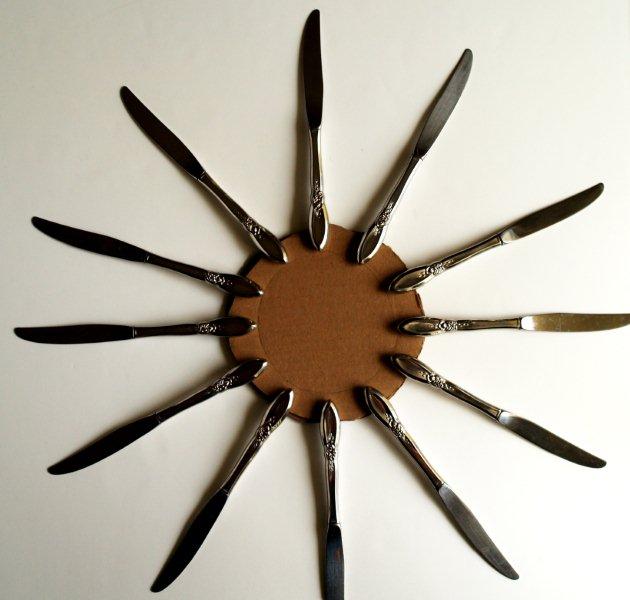
Start working on your layout. I recommend laying out all the silverware, then gluing it on.
I started with knives. They were the fattest in width so I didn’t want them under the plate at all.
I lined them up with the traced rim line.
Then I added in forks. . .
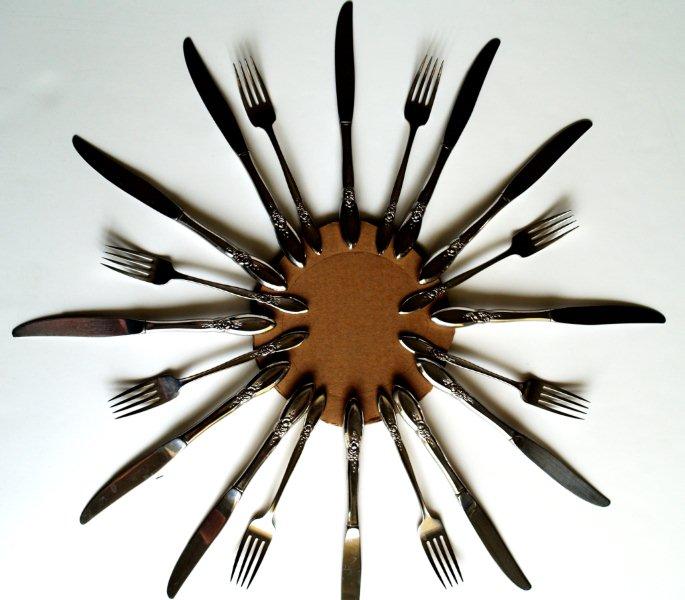
And then spoons. Use whatever pattern and layout you like.
I played with a lot of different looks before I settled on this one.
Place your plate on the layout and make sure that it lays as flat as possible. Make any spacing adjustments you need to.
Start gluing on the silverware, working your way around the circle.
***Update: After a year and a half I have had a couple of items loosen because of the hot glue. Rather than risk the entire shebang crashing to the floor, I pried off the plate and stabilized everything with E-6000. That should hold it through minor earthquakes and teenagers. I’ll keep you posted though.
Check your layout with your plate as you go. You might need to redo a couple pieces.
(I did. And doesn’t that look so nice and tidy.)

Finish all the silverware. It won’t look too pretty but the plate covers up the mess.
Add a good layer of glue to the cardboard to hold your plate on.

Ahhh. That’s better.
Add a layer of glue to the back of your mirror and glue that to the center of the plate.
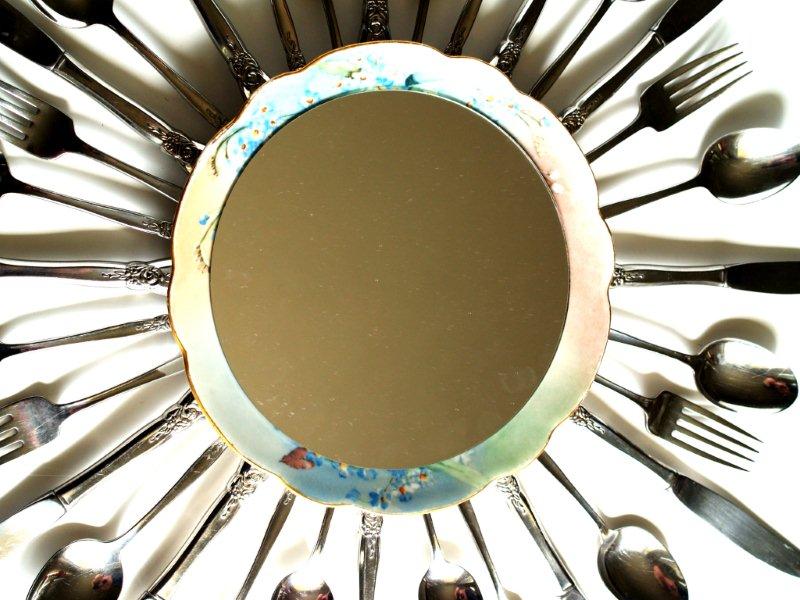
Before you glue on any beads, take a minute and clean any smudges or fingerprints off your mirror.
Glue a ring of beads or pearls around the mirror’s edge.
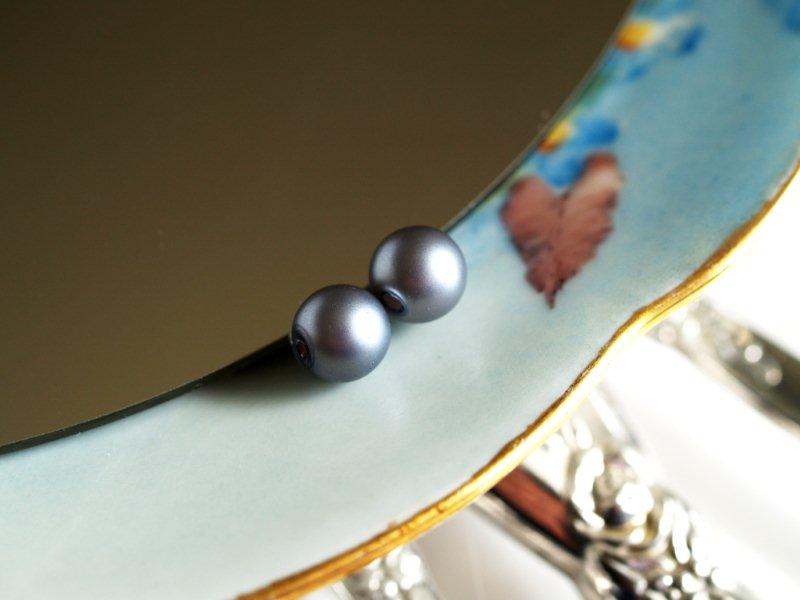
And that finishes it off!!
So easy right??
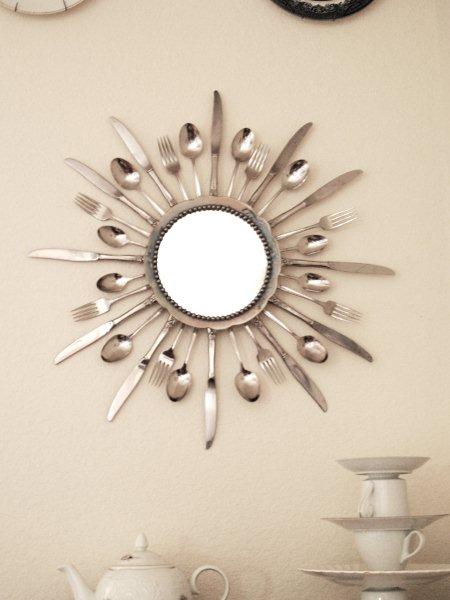
I hung it on the wall by putting three nails at the bottom of the cardboard, in a curve,
and one nail at the top of the cardboard, so the nail head holds it on.
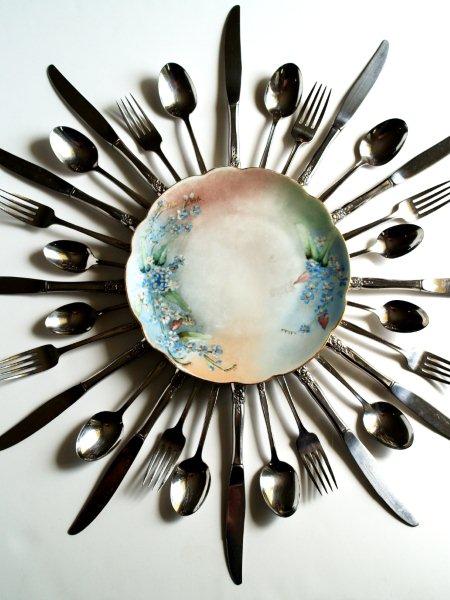
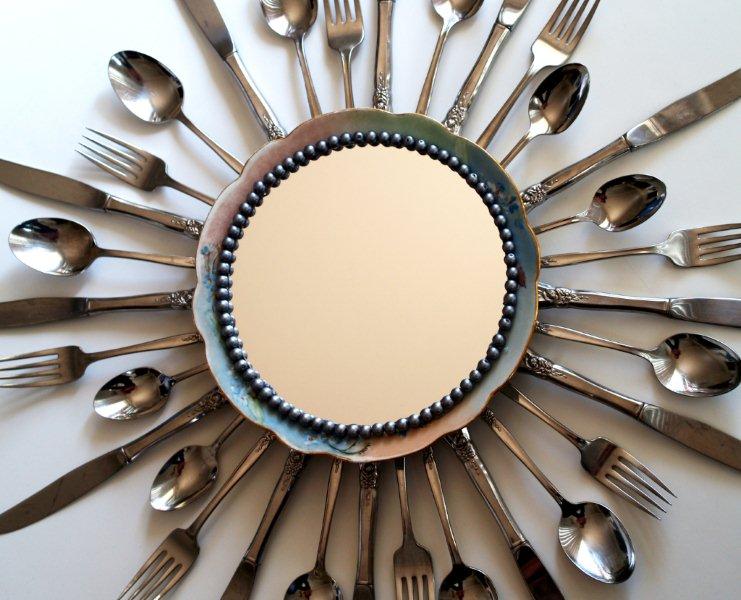
I really love the combination of the vintage plate and silverware with the mirror and pearls – but I want to hear what you think!!
*** UPDATES – I am not having a problem with the hanging method – but I think that I’m going to reinforce it a bit. I don’t want the cardboard to weaken over time and crash.
Also – I would consider spray painting your cardboard a color close to your walls. Where I’ve got it hanging you can see the cardboard from one angle. It would blend with the wall better if it was painted. ;) ***


Wow! Even my 10 year thought that was cool! I love your ideas, you are so crafty!!!!
Super cute! I love old silverware. I just saw one that used only knives and had the handles sticking out. You made this totally different and full of personality.
I love it.. I want one for my house… BUT the hubby would probably say NO!
Very very cool! You’ve done it again!
wow, i really love it and want one for my house too! great tutorial!!!
Um…super duper lovin’ this! …and am I the only one thinking this would be one, awesome ninja star? No one? Hmm. :)
LOL!!
I’m lovin it too! You’ve got my creative juices flowing :) I am saving this one to favourites. Thanks for taking the time share this will us. :) Keep on crafting on!
Bev I am so in love with this!!!!
I cannot wait until summer to give some of your tutorials a try!
I love this!! So appropriate for a dining room, and FUN! Great job and great idea!
This mirror is soooo cute!!! I would never have thought to use silverware to make a sunburst mirror, but it totally works. It looks perfect for that space. Great job, Bev!! :)
Looks GREAT!! Love the idea used in dining room. Thank you for sharing.
Have a God Filled Day
Shirley
That is just sooooo cute!!!!
Wow! That is absolutely amazing! Beautiful job!
Super cute! Love it! I want to make one now.
Super cool idea! Too bad I have NO space left on the wall in my dining room! Hmmm…may have to re-arrange some things! :) Tiffany, I learned a long time ago (from my own Mama) that it’s easier to get forgiveness than permission…she’s right! Go ahead & do it if you love it & iron out his objections later! HA!!
Swoon!! I’m thinking that I need me some old silverware….thrift stores… Thanks for the wonderful inspiration again Bev!! i heart your creativity!
What a lovely idea dear. like the way you have arranged the spoons and the forks together with the beads. So good, and so unique, I will definitely try to do the same son, and will tell you about the feed backs. I am amazed by your artistic skills.
Oh wow that is beautiful! The silverware, the beads…all so you. Love it.
beautiful…never thought that it was cutlery when I first looked at it…awesome :)
Seriously the BEST mirror EVER! I love it Bev. Oh how I wish you were here my friend and could come crafty up my space.
Love it!
That really is a great looking piece of wall art. I’m not sure I could do that though unless I managed to locate a really ugly plate. LOL
I have a large collection of plates that was my Mom’s hanging in my kitchen. There are so many that they run the entire circumferance around my kitchen. I’m always looking for others to add to the collection so it. would be hard for me to do this to one. BUT……….as I was typing that it dawned on me this also would be the perfect wall art piece to add to my kitchen wall to tie in the plates with one of these like you’ve made. hmmmmmm might have to think more on this one. I’ve also got a large amount of her silverware in a box that’s not used ever which would be awesome to use but yea, probably not since it isn’t used because it tarnishes. I’m not sure how easy that wall art would be to clean once it’s put together that way. I’m thinking you’d want to steer clear of the type of silverware that could tarnish. lol
oops. sorry that got kinda long. :)
It is VERY cool though. Thank you for the as always, awesome tutorial Bev. Maybe when you’re tired of looking at that you could just send yours to me so I won’t have to go through that agony of covering up a plate that way. HAHA
Just an observation. If you have a reallly pretty plate leave off the mirror. Maybe just place a pretty piece of jewelry in the center.
Very very cute! Everyone is loving the silverware theme lately, and this is quite a unique twist. Great job~
Wow Bev!! I absolutely love this!!! So clever. Definitely bookmarking this one!!
I made a sunburst mirror this week too. I’m see all kinds of DIY ones lately. I love yours! My only suggestion is to use a better glue – perhaps liquid nails. I find that hot glue holds just great until one Tuesday afternoon when it fails, then you’ll find silverware all over your dining room floor.
Love it! What a cute idea!! :-)
Oh, this is awesome!!!!!!!!!!!! You did a WONDERFUL job!!! You smarty-pants…
I LOVE this and I am going to try it next chance I get…I have a stash of vintage silverware that would look amazing. Thank you so much for sharing.
-Aaron {the girl with the boy’s name}
mudpiesandmarigolds.blogspot.com
I really really love this – – checking out spots in my kitchen right now to see if I can hang one somewhere….
That is just too cute! Very creative! Dropping by from Met Monday. When you have a few minutes, I’d love for you to come see my recovered chairs.
Allison
Atticmag
OMG, this is awesome! I absolutely am loving this. What a great gift for a new home owner or a newlywed couple. I am adding this to the “To Do” list for sure.
http://www.itsybitsypaperblog.com
Just Love this silverware mirror! Have to make one! I say that so many times when I read your posts. I have a file of things I want to make just from your site. You are so very, very talented. I never leave comments, not because I don’t think the things are cute, but I make a lot of art quilt journals and if I get caught up on the computer, the hours can fly. I am currently making a quilted flamingo tote bag. I really Love Flamingoes, too.
Keep up all your geat work. You are very creative and so generous to share your time, by making the tutorials, for all of us.
Holy crafting, Bev! This is AMAZING (and slightly dangerous looking, hehe!). It looks absolutely fabulous on your wall. Love the plate you used, too. Great colors. The beading really sets off the mirror. Love, love, love this!!
is it weird to want to marry a mirror? I love it THAT much!
Best. Idea. Ever.
OMG Bev that is stunningly beautiful!
Stopped by from the Polly crafter hop! Love this project…ESP the bead details!
I totally love that! Your dining room photo looks like a catalog page!
You are amazing, to come up with that idea – and it looks ideal in your dining room. Love it!
WOW!——————The things we do with things that are not what suppose . Love it. Gets the creative juices flowing—————possilby substite other things . The silverware could all knives fork ect. I even thought about using mix match of some. Any way great project.
Oh my gosh. I love your creative mind. How did you ever think of that. It is so stinkin cute. I bet it is heavy. Love it. Watch out Pottery Barn or Anthro. will be stealing your idea.
So sorry that I have been such an awful blogging friend. I am really trying to shape up. Thanks for all your encouraging comments. ((((HUGS))))0
I love this!
This is adorable! I love that you used the plate and silverware!
oh my goodness! haha! this is awesome! so fun :)
sooo cute bev! You should email it to Anthropologie and become famous ;) I too can’t BELIEVE we didn’t take any pics on Thursday – what kind of bloggers are we?! I guess the kind who were just having to much fun to stop for a pic :) Thanks for all your advice too – I’m up on Facebook and trying to work on the Stumble thing…
Love it!
this is amazing!!! i don’t know if you felt it or not…but I pinned you to my board on Pinterest! Woot!
=)
I LOVE this mirror! I’m definitely going to have to make one of these! Thanks so much for the awesome directions!
sooo cool!!!
Great job, looks awesome!
http://createdbykaty.blogspot.com
This is so amazingly creative! It looks so pretty on your wall over the buffet.
K, that’s seriously RAD!!
This is so gorgeous! Such a fun take on the sunburst mirror thing… but even more customized to your dining room and your house!
This is fabulous! I love how clever your idea is and how amazing it looks! Excellent job on brainstorming and execution!! :)
This is brilliant! I LOVE it! Thanks for linking up.
Oh, that is adorable! I’m not a fan of starburst mirrors, particularly, but this one, I love!
This is AWESOME! I’ll be linking it from Dollar Store Crafts this week :)
I love, love, love, love this (LOVE)! I want to make one NOW!!! But, I kinda need to go to bed so I can get up at the crack of dawn for work… I’m soooooooo making this though!
What an adorable mirror! I totally love it!
That is crazy cute!
OMG — it’s sensational! Sharing on FB and Pinterest!
Jenn
This is awesome!
Haha, Suuuuuuuuuper cool!
Oh my gosh! This is seriously awesome! I’m smiling just looking at the photos! You did an amazing job : )
That is the cutest thing that I have seen in ages! Fantastic job! I am a new follower! Can’t wait to see what you do next.
That is such a great idea! I love it. You are very creative!
this is fantastic!
YOU SMART GIRL.
love it.
Holy Robin’s eggs Batman! I am in LOVE with it!
That is gorgeous! Very creative of you. didn’t think it was made with cutlery at first glance! Really lovely. Thank you for the tutorial.
This is seriously amazing! Gorgeous! I’d love for you to submit this to the M&T Spotlight at http://www.makeandtakes.com/spotlight
Hi Beverly, you’ve done it again. I believe this style of mirror will sweep the blogosphere! It’s just not fair to the rest of us that you have so much talent. I really like the finishing touch of the beads as I hate those raw-edged mirrors. Hugs, girl! Kim
I love this! It is so cute and cuter than most other starburst mirrors. What a great idea for a kitchen or dining room!
WOW! Thank you for a great tutorial! I would love for you to stop by and link up to my Ten Buck Tuesday link party!
Beverly—This is fabulous! Thanks for sharing another one of your great ideas!
~Pam
pamspaintparlor.typepad.com
THIS. IS. AWESOME!!!
I absolutely love your rendition of a starburst mirror. It’s so creative. Great job!
I might have to make this, but instead of a mirror I’m thinking it would make a fantastic kitchen clock. Now if I could just bring myself to try drilling through a plate. I’ll admit I’m slightly wary of power tools.
You’ve done it again, Bev! Amazing… your creativity astounds me!
That IS so perfect for that spot! I love it :-) Great job!!
I love it! i made a sunburst mirror for my bedroom, but this idea for the dinning area would never have occurred to me. So thank you because I finally know what to put in the bag, blank spot on my dining area wall…AWESOME!!
~bernadette (agirlandherhome.blogspot.com)
I love it! I have been wanting to make somthing like this for awhile, just really never knew how.
I am IN LOVE with this! Found you on the Sew Much Ado linky party…excited to start following!
This is fabulous!!!!!! I’m gonna so do it now!!!
http://lanis-hammertime.blogspot.com/
Awesome! I love this. What a great use of materials and appropriate for the dining or a kitchen.
My NEW FAVORITE sunburst mirror! Bev, this rocks! This is amazing! I am featuring it at somedaycrafts.blogspot.com.
This is genius!! I LOVE it!!
What a great job you did, this is so creative! I’d love it if you would link this up to our Wicked Awesome Wednesday link party! :-)
Amazing! I love sunburst mirrors, but was always afraid they would look too contemporary among my non-contemporary digs. But this is a perfect blending. I WILL be creating one…thanks so much for the tutorial!
kathleen
This is SUCH a genius take on the starburst mirror craze. LOVE it!
I’ll be featuring this on my blog on Saturday!
http://sumossweetstuff.blogspot.com
Thanks for linking up!
Sumo:)
I love seeing ordinary objects used in a different way to make something so pretty! I’ll have to try this since I, too, love sunburst mirrors!
That is pure awesomeness! Such a creative take on all of the sunburst mirrors being done right now.
OMG! I love this, how creative!!!! You are amazing! I want one of these so bad now :)
Love this! Thanks for linking!I’ll be featuring this on BCD tomorrow and inviting my readers to come see what else you’ve been up to!
OMG – this is AMAZING!! I love sunburst “anything” but I think this is the best I’ve seen yet. I followed the link from oneprettying.com to see it. Love your blog and RSS fed it to my computer. :)
I <3 this so much!
Beverly, you are so creative! I want to share this with my readers on FB! Love it!
xo
Kate
Love it! It is so beautiful! Your are so super creative, keep it up sister!! Thanks! Lisa
love, love LOVE!!
wow! this is such a creative idea! it’s so awesome!!!! :)
So cute and creative! Great job!
i love this! So brilliant!–connie, measuredbytheheart.blogspot.com
I love using silverware for kitchen and dining decor, so I freaking ADORE your mirror! I’m totally making one for my house, too! Thanks so much for the idea!!
wow this is awesome I LOVE IT !!!!
Followed your link from Gail’s Catch as Catch can party. This is soooo cute, and your tutorial was great!
Nice job!
This is really a great project. Absolutely love this! I’d like to post a link on my blog and use your pics? Let me know.
OMG, That is so beautiful. I am amazed by your skills, I mean from where you got this idea? That is perfect. I will try this with the wooden spoons and forks. Amazing, just amazing
That is awesome! It would even been cute without the mirror. I love it.
This is so funky and cool — I LOVE it! Thanks for the great inspiration and blog.
Thanks for linking this up. This is the coolest project ever ever ever!
Wow, I’m off to a good start this morning…lol I left a comment for you over at Blue Cricket Design{like you would see it…duh} Here goes…This is just Adorable! I love how you took the inspirations out there and interpreted it to match “you†{ha I sound like an American Idol Judge} but really! I love it! You did a great job with the littel tutorial too…TGIF! Have a great weekend!
Very clever! Found you at Fingerprints on the Fridge. I’m your newest follower!
I LOVE the uniqueness of this!!! I am going to make one as I love and have vintage flatware,etc. Just one thought though to give you a heads up if this should be a possibility: After time, could your cardboard start to weaken from gravity and the weight of your mirror and give way or bend a little, thus letting your mirror fall forward and crash to the floor??? Just concerned…unless I didn’t understand how you stated you hung it with using the nail heads to hold on to the mirror. :^}
Yeah, Merry, I realized that after the fact. I think it would be better to reinforce it a little more on the bottom and add some hanging hardware to the top. I’m haven’t done that yet but it’s a good idea.
Thanks!!!
I think this a ADORABLE! Might just copy it for me kitchen!
So unique and creative. Very nicely done too
I love this project! This is hands down the coolest sunburst mirror I’ve ever seen! I love how creative this project is, and how well it fits in a dining room. Such a great tutorial, too! I have an old box of silver that might look great, although, I’d have to get over needing to keep it polished. I’m off to go play with my box of silver. Thanks for sharing.
I’m hosting a Throwback Thursdays Party, and would love it if you swung by and linked up something you made/bought/did from before blogging. I can’t wait to see what you bring.
OMG!! I am in awe of your creativity!! Simply amazing! I will be watching for you to be featured on the Today show, I swear! Fabulous job!
Thanks for linking up to Making It With Allie! I can’t wait to see what you have for next week!
AllieMakes.Blogspot.com
WHOAH! That is BRILLIANT! I can’t even believe I haven’t seen one of these before. How cool are you? LOL. Beverly you are so talented! I’d love to have you share this at my VIP party today @ http://designergarden.blogspot.com/2011/03/vip-party-7.html
Love this idea!! very creative! I think I may try one but make a clock out of it, great job!
bev–i am so close to having enough silverware to make my own one of these. a girlfriend and i are going to have a crafting day and make them. i am so excited!
spotted you at tater tots. You are a rock star, I salute you.
I LOVE this! L-O-V-E! :) I could see this in a {very expensive} catalog! Nice work lady, this looks awesome! :)
This is SOOOOOO cool! Unique and creative!
This is pretty amazing! Best sunburst mirror I’ve seen.
I just dropped by via Funky Junk Interiors (hadn’t gotten to Gail’s yet…) and I must say I LOVE this mirror. And what’s even better is my 11 yr old son loves it also!! Now if only we had a place to put one like it…. Hmmm I see a project coming on once we have the addition built! Woo hoo!
This is just wonderful! Thank you! I’ll have fun browsing the thrift stores. This will be perfect for my kitchen!
LOVE IT!!!!!
I SO need to make one now. Thanks so much!
This is such a cool idea. And like you’ve I have liked the sunburst mirrors that are popping up these day but hadn’t found one I really loved. I LOVE yours. Thanks for sharing how to make it.
LADY!! This is so awesome it’s crazy!!! :)
I just wanted to let you know that I featured these on my “What I Bookmarked This Week” post today. You can stop by and grab a button if you want.
Danielle
http://mostlyfoodandcrafts.blogspot.com/2011/03/what-i-bookmarked-this-week_19.html
most creative sunburst mirror yet!! really GREAT job!!
I love this! So incredibly cute. You did an amazing job.
I love this! I would love to feature it on my blog, Reduce, Reuse, Upcycle. Feel free to stop by and grab a featured by button. Thanks!
Love this idea! I have a drawer full of flatware that I picked up from an antiques/juntiques store for a penny each! This might be a project for them! I think it would be cute to make into a clock!
So adorable! I featured this on my blog today, feel free to check it out! happy spring!
Jen
http://jen-simplyliving.blogspot.com/2011/03/stuff-i-like-sunday-7-8.html
truly amazing! Great tutorial too!
Take care,
Lisa
I NEVER leave comments if people have more than like 30 or so, but I had to tell you … CUTEST. SUNBURST MIRROR. EVER. Seriously. Amazing!!!!!!!! jules
that is fantastic. i love it. perfect over that sideboard
I love that you and I both used silverware last week to create unique projects! http://www.prettyhandygirl.com
I adore your starburst mirror, thanks for sharing your tutorial.
I LOVE THIS!! Absolutely the cutest thing ever. And it actually looks like something I might make :)
Looks fancy and expensive…great idea! I like the way you lined the mirror with the beads, it gives it a complete look.
OMG!! That looks amazing. Thank you so much for sharing. I hope you stop by DIY Home Sweet Home and link up to More The Merrier Monday.
http://diyhshp.blogspot.com/
LOVE!!! Featuring this on my creativecataglog.blogspot.com site. All the best!
Holy cow I did;t know if I would find the end of all these comments! But I don’t blame everyone for commenting. THIS IS AWESOME! What an awesome idea.. ILOVE IT! no I am not yelling but I am excited! Great work I am excited to look around your blog.
Lindsay
countrygirlhome
I just love this mirror! I love the surprising detail that it’s from silverware. Such an amazing job! I blogged about it here: http://holy-craft.blogspot.com/2011/03/things-i-love-this-week_21.html
This is beautiful. Probably the most unique sunburst mirror I’ve ever seen. Love it.
Bev, it was such an honor to have this project in the #1 spot at “A Little Birdie Told Me…” this week. It’s dazzling!
Bev, you’re amazing! I wish we lived closer to each other. I’d love to get together and make stuff!
this is so adorable! I love the idea to do it with silverware!! Looks great on your wall.
Ahhh! This mirror is so fun. I even showed my husband (who smiled and nodded appropriately- love him).
Bev, do you have any idea how seriously FABULOUS you are?! Who would think of this but you, my dear?! It’s genius!
This is so wonderful and creative! I am inspired~ thanks for sharing!
This is a great idea! I got a plastic Coke clock for Christmas…this would be great to dress it up! Instead of the mirror I will put my clock. Thanks for the idea!
I love it! I’ve got an empty wall in my kitchen that is dying for something like this! Thanks!
That is gorgeous! I love it.
I’m going to try this! Thank you!
Amazing, just amazing! What an absolutely brillent idea. I can’t wait to try this. Thanks so much for sharing the tutorial..
:) Michelle
This is awesome!! I would love it it you would join my first Eats and Treats Party……It’s a linky party for anything kitchenish, foodish.
http://bargainhoot.com/2011/03/24/join-my-first-link-up-party-share-your-eats-treats/
Very unique! Thanks for the steps you posted to show us how you made it! I’m now a follower!
WOW!!! I love it!! I think it’s going to be my next project. ;)
come ON!!! This is fantastic! Really looks so good! I am totally doing this. thanks so much for sharing! Here is my version of a starburst mirror using wooden skewers from the dollar store!http://scrapbits.typepad.com/scrap_bits/2010/07/overwhelmed-with-art-ideas-where-to-start.html
Bonjour , je viens d’arriver sur votre site , cette Å“uvre est superbe !! Vraiment une excellente idée ! Bravo , cela me donne une idée !! Belle journée Marie-Claire.
I’m visiting…over from JustSomethingIMade & Cathe, and I’m here to say; “Holy Smokes!” What a creative, wonderful starburst! I confess, I wondered about how to hang it and couldn’t picture your solution, as described…I’m going on “the hunt” for something stronger than cardboard per your concern about “crashing over time”…I LOVE your starburst…from pearls to plate to (silverware) pattern!
Wow, this is amazing!!!!!!!!!! I love this.
http://amandawickcunningham.blogspot.com/2011/04/starburst-mirror-project-from-flamingo.html
This is my version of this awesome project. I did do something slightly different so that it would hang securely to the wall. Can’t thank you enough for this cool idea!
This is so unique and pretty. You did an awesome job!
oh come ON! this is seriously fantastic! I am moving into my own house in the summer, and I am SO making this. thanks so much for sharing
I love it! I bought some forks from an antique store like 4 years ago and I hadn’t know what to do with them…this would be perfect…now I need to buy spoons and knives. :) Thanks for the inspiration.
This is so super cute! Ive been looking for some cheap awesome art for my massive dinning area. This is perfect!
I also love the little table you have under it ( I know it has a cool name but i can’t think of it haha)
Id be interested in seeing your whole dinning room area- i like your style.
LOVE this! You are amazing! I have seen so many people try to duplicate this, but yours stands out so much!
I would love to have you link this up to my first link party–
http://southernlovely.blogspot.com/2011/08/show-share-1.html
Love this! Very ingenious! I’ve added a link to my Squidoo article Silverware Crafts. May I use a photo to add to the article? Thanks, Peggy
Cute idea. Just pinned it to my pinterest wall.
That is the unique and beautiful mirror placed on the wall. The mirror makes the look of your kitchen unique and beautiful. I haven’t ever expected before that it is made on your own. You are really creative person.
This is so AWESOME! Whenever I get to remodel my kitchen (whenever that will be), I want to make one!!! I’m pinning this! :)
Oh how fun!!! I LOVE this!!
Happy New Year!
I love this but I tried to make one, I don’t understand how big to cut the cardboard, I just kep reading it and still didn’t get it. Also, when you glue the plate on do you just leave the space open between the silverware and the plate? I would love to see what the back looks like when it’s done. Thanks for the great idea.
What a great idea! Thanks for sharing.
Absolutely beautiful! I love how it turned out.
Love the starburst!! I’m thinking it will make a pretty centerpiece with maybe a candle or something on the mirror. My daughter is getting married in June and is using simplicity in decorations. Very nice!!
I had this TERRIFIC idea to turn silverware into a clock or mirror… so I googled it and of course I shouldn’t be surprised, up pops Flamingo Toes! You always have such awesome projects. Love this! Great job. :)
I fell in love with this mirror and set out to recreate it with materials from IKEA. I found that the hot glue didn’t set properly — between the cardboard and the flatware, I don’t know if it has too much “give” — but after gluing all of them down, when I lifted it, about 8 of the 20 pieces just popped right off. I thought I used more than enough glue. I’m planning to try it again with an epoxy-type glue and a larger plate instead of the cardboard. Thanks so much for the inspiration!
WOW! What a great idea! I think I am going to try this project but with a larger mirror. I would love something like this for my formal dining room :) Thanks, and GREAT job!
I love this going to try it but with old silverware…i love new ideas for recycling any thrown away objects…..
When it first popped up on my screen I thought – what a great kitchen clock this would make. Instead of the mirror – use a clock mechanism (available at craft stores) for the center.
Or…..just use the plate, omitting the mirror. It’s pretty enough as is.
Any way you look at it, I think it needs something more substantial than a cardboard base which will deteriorate, especially given the weight of the silverware. A very light weight wood base should hold up and be able to support both the silverware and a hanger device. Epoxy or E-6000 will hold better than hot glue, as you already discovered.
What I’m thinking about now is how to conceal the space between the silverware and the mirror or clock mechanism so you don’t see a big gap when viewing it from the side. Will keep thinking.
Great idea! Your layout is quite attractive.
Love the idea. I just moved to new place and am looking for decorating ideas.
I’m going to try this but replace the mirror with a clock face and use the silverware as emphasis of numbers.
Knives 12, 3, 6, 9 etc.
Will go great in dining room.
I may use clock, thanks for the idea.
Janet
Another AMAZING project. You’re a singular talent, my friend! Totally thinking of doing this for my dad’s new kitchen!
Wow this is totally amazing and creative. Thanks for sharing!
I like this idea and I have lots of old knives, forks @spoons I can use. But the plate would have hang by itself, it is too pretty to cover . Now to find a place to hang.
Thanks, janet
I wanted to send a picture of how we hung our starburst mirror! My husband put to screws into a piece of scrap wood and wound a piece of wire around the screws, creating a hanging cord. He then glued the wood to the cardboard backing so that it would hang with the appropriate knife at 12 o’clock. It seems to be working out well! Thanks for the inspiration! http://nearlyfearless.blogspot.com/2013/03/afternoon-crafty.html
*two screws, darn it!
Loved it, but I’m going to place a clock in the middle. Great idea!
love love LOVE this, i have been trying to find inspiration to decorate my newly-painted kitchen and this will look fantastic! found it on pinterest (by way of http://homesweethuis.wordpress.com/2012/09/03/10-diy-sunburst-mirrors/). Thanks for the great tutorial!! :)
I am going to try this but I have a ton of silverware that I want to make look vintage and don’t know how. I tried the overnight egg yolk covering but nothing. Any suggestions?????
I love, love, love this!!! Am going to try it with clear plastic cutlery that I will spray paint first.
Thank you for sharing this great project.
What about repurposing plastic ware?
I think is unique and pretty, I think I try this Thanks for sharing God bless.
I love your creativity. I just scored a bag of silverware for a $1.00, and I love your wreath. I may have to modify it somewhat since I want to place it on my fence behind the garden. But, yours is a great inspiration. Thanks for sharing.
Could you please show a picture of the back of the silverware mirror so that we can see how you hung it on the wall? I love this idea for a mirror!!
Thank you much,
Amanda