One of my favorite things about the blog world is all the inspiration out there.
In the past, before I started reading blogs, I didn’t really decorate for the holidays – other than Christmas. But there’s something about taking the time to add some fresh new decorations throughout the seasons that makes me feel more proud of my house and decor. (I wasn’t really so much before.)
And this time of year it’s really hitting me – you take down all the Christmas things and yes, the house feels all fresh and clean, but it also feels kind of naked. Like a dog that’s been shaved for the summer. You know it’s a good idea, but it’s still kind of weird.
So I’m diving into Valentine’s Day with both feet. I have a lot of fun ideas – I’m hoping I can get them all done. I might still be celebrating in March. We’ll see.
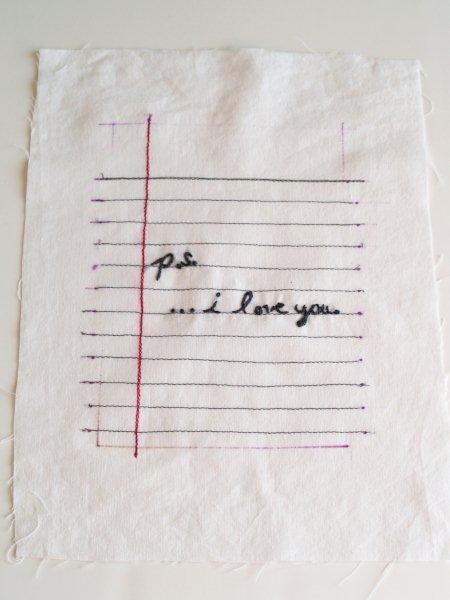
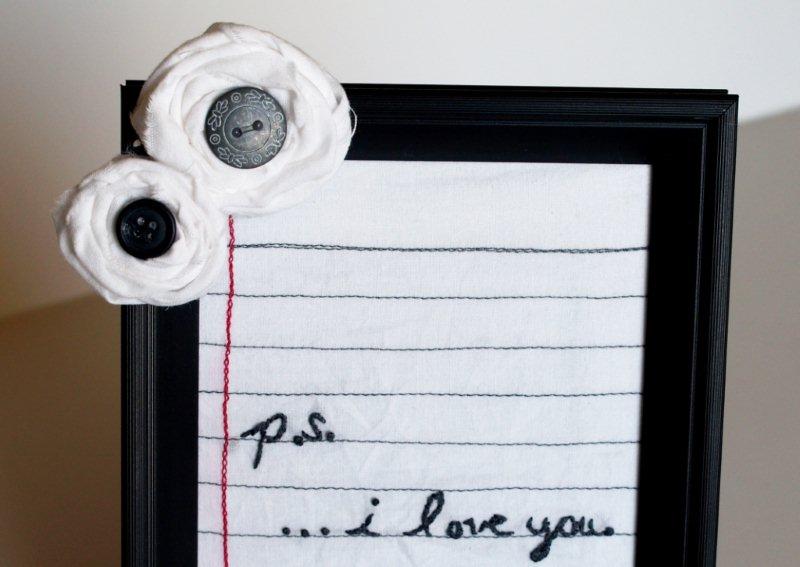
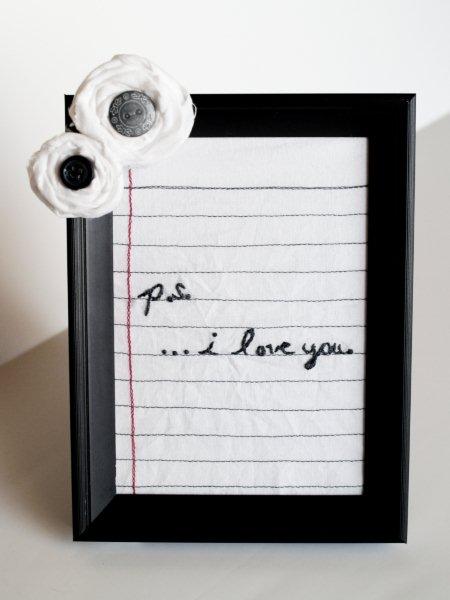
I’m starting off with this little stitched Love Note.
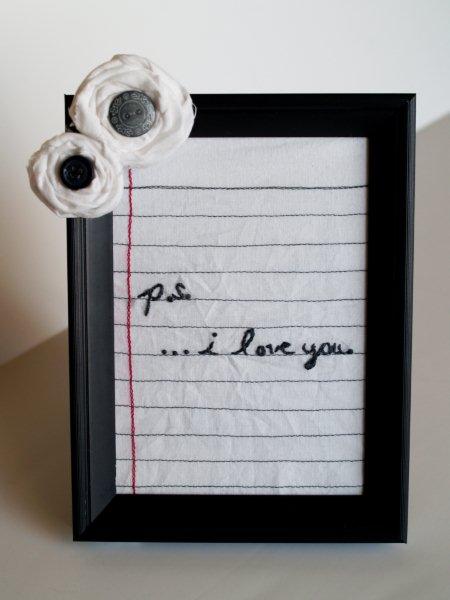
It’s a little note embroidered onto fabric that I stitched lines on to look like paper. I know the idea’s not a new one – I can’t remember where I’ve seen it. But I think it’s so sweet and simple.
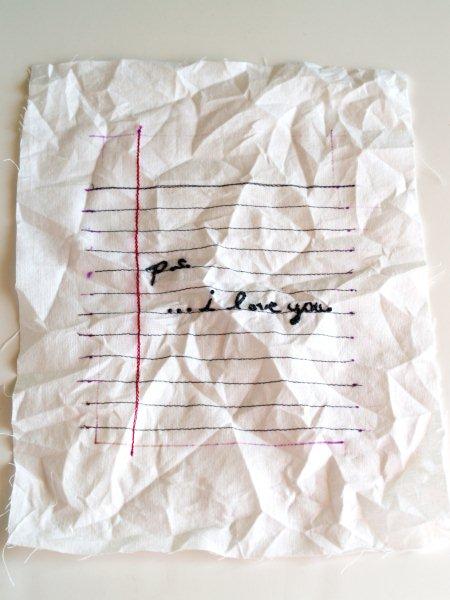
And I love how the fabric looks all wrinkly- just like a note that you carried around forever and put in a frame.
Ready for a tutorial?? :)
You will need:
• Frame – mine is a 5 x 7 – from the Dollar Store – woohoo!
• Fabric – white – 8 1/2 x 11 piece
• Thread for paper lines – I used Gray and a Dark Pink
• Dark Gray embroidery Thread
• Extra fabric, buttons and trim for decorating frame (optional)
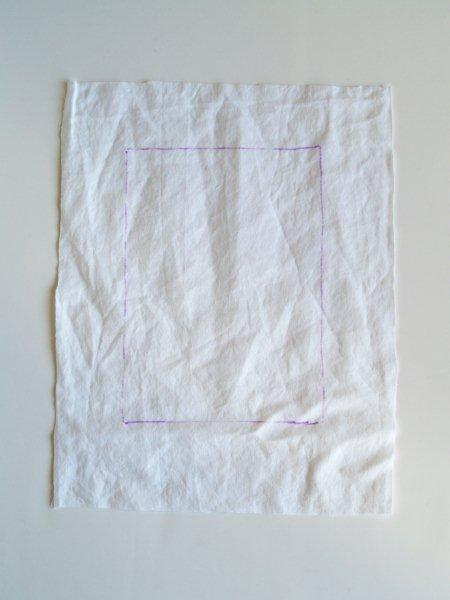
Begin by tracing a 5″ x 7″ rectangle onto the middle of your fabric piece with a fabric marker. You can use the insert from the frame for this.
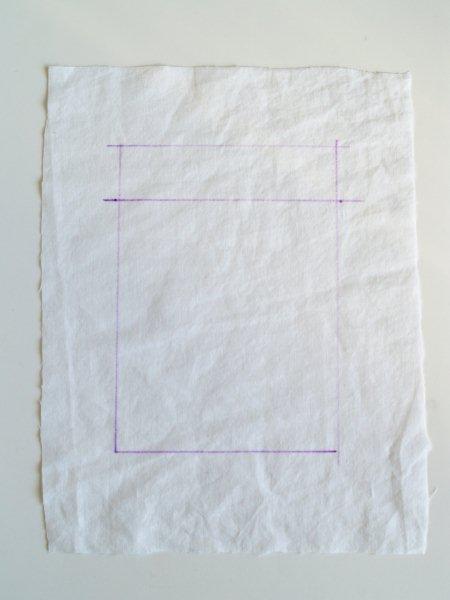
Mark another line 1 1/4″ down from the top of the rectangle.
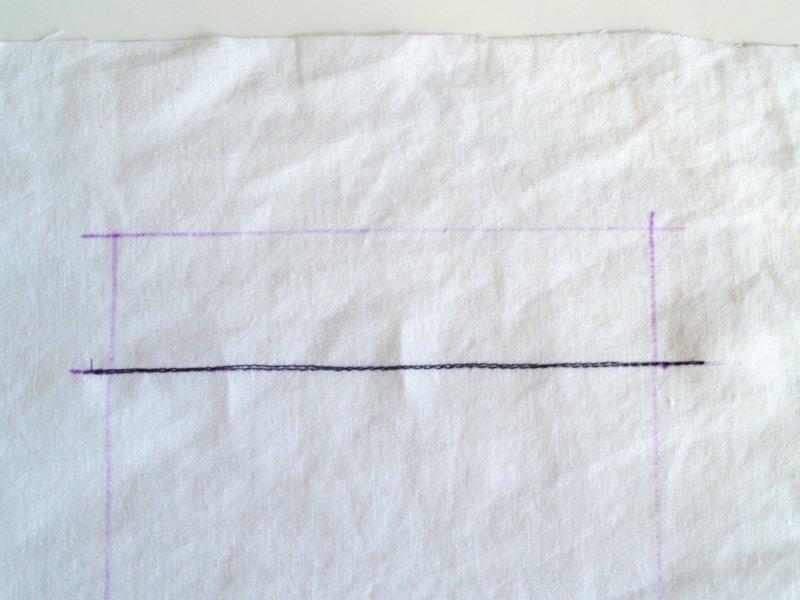
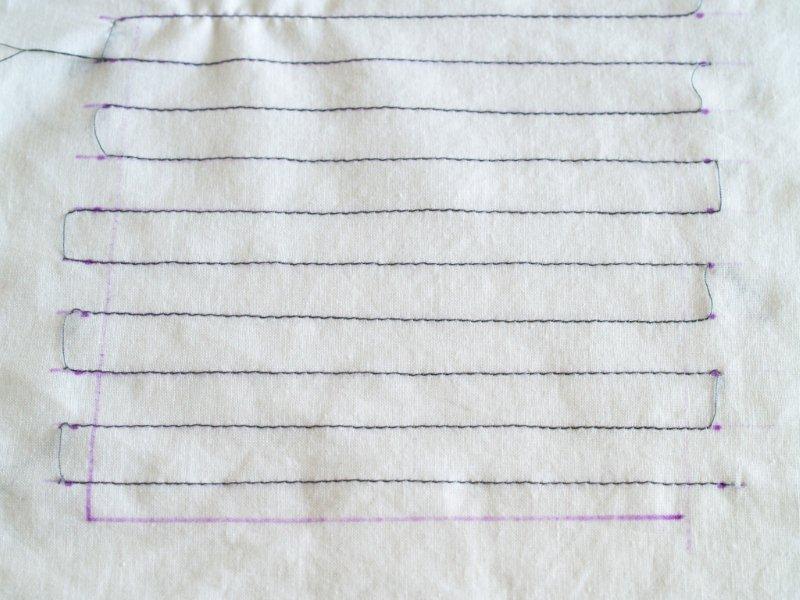
With your gray thread, sew a double line of stitching along this line. Sew a straight line in one direction, leave the needle in the fabric and flip it around, and sew back the other direction.
Mark lines down the rectangle 1/2″ below the sewn line and every 1/2″ after that.
Sew single lines of stitching on these lines. Feel free to extend the stitching past the 5 x 7 rectangle.
You can take a little shortcut with these – don’t clip your threads after every row. Just sew down one row, then rotate the fabric and sew down the next row, and on down the rectangle.
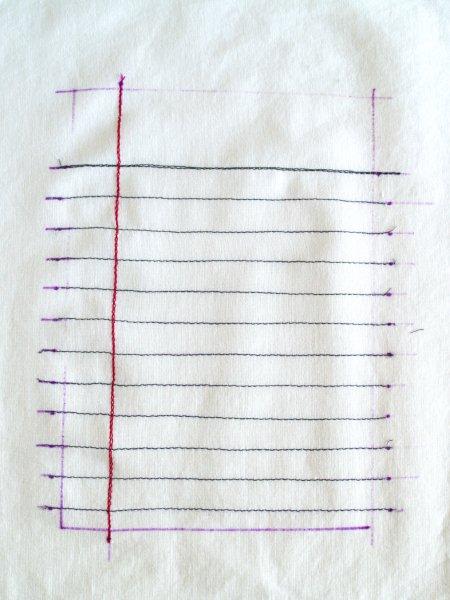
Trim all your threads – then switch to your dark pink or red thread.
Mark a line vertically down the fabric, 3/4″ from the left side of your original rectangle.
Sew a double line of stitching on this marked line.
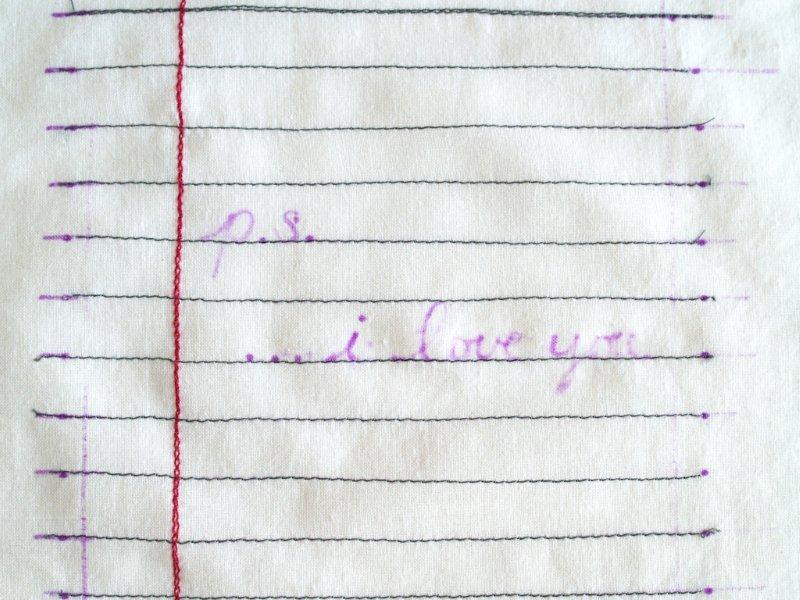
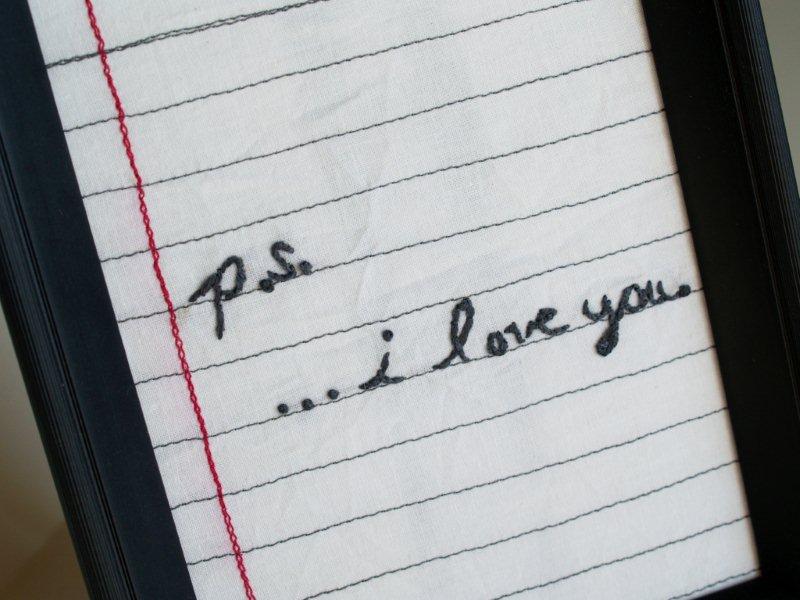
Decide what you would like your note to say. You can either print out a cute font, or write it in your own handwriting. Either way, practice tracing it out on paper a few times, then write your note on the fabric with your marking pen.
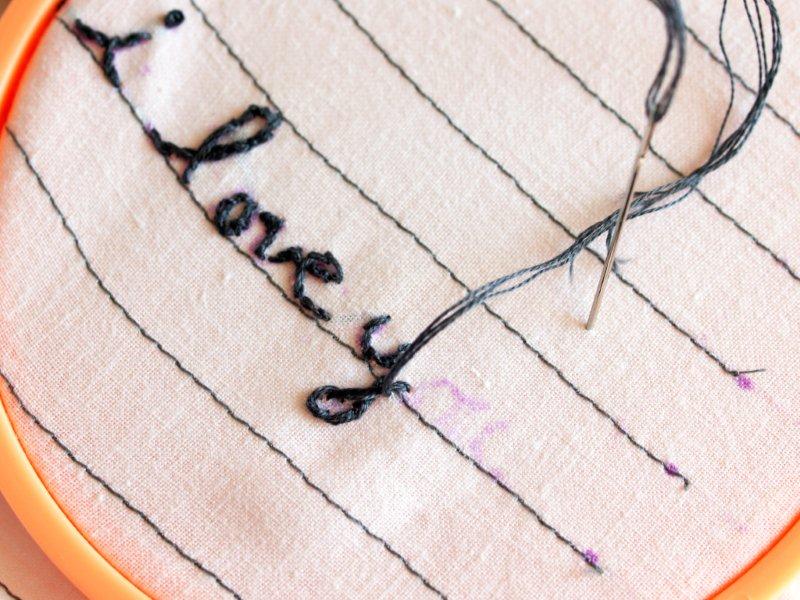
Embroidery your letters using 3 strands of embroidery floss and a stem stitch. (You can find directions for that stitch in this post.)
Remove any marking and press the embroidery hoop lines out of the fabric.
If you liked the wrinkled paper look – crinkle up your fabric. Smash it up into a ball. :)
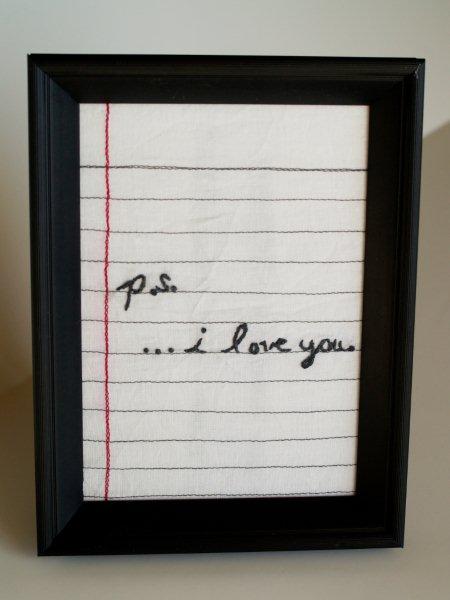
Put your fabric into your frame.
Decide that maybe you’re not too happy with this boring frame. Dress it up in true bloggy fashion. ;)
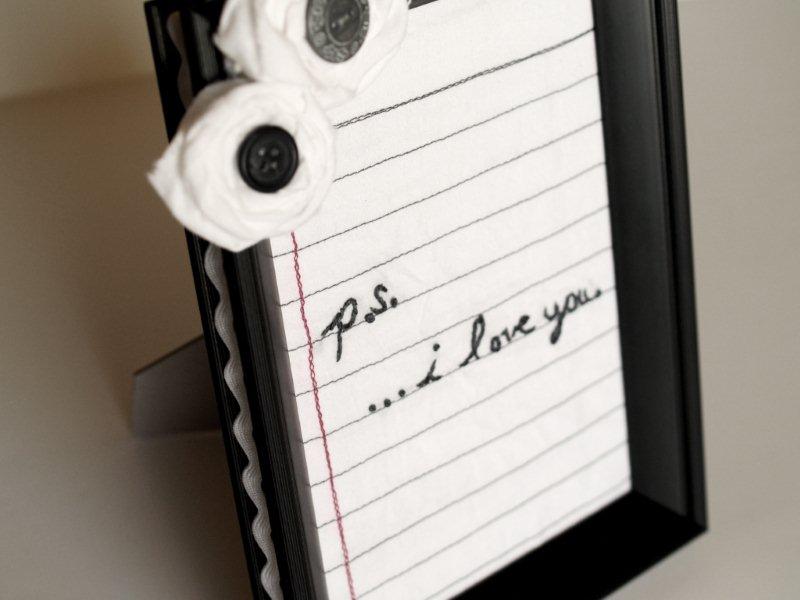
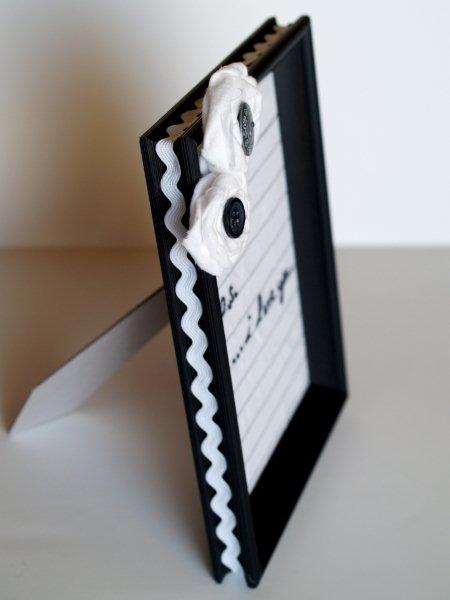
This frame had a groove around it that I thought would be perfect for ric rac. Because really, what isn’t??
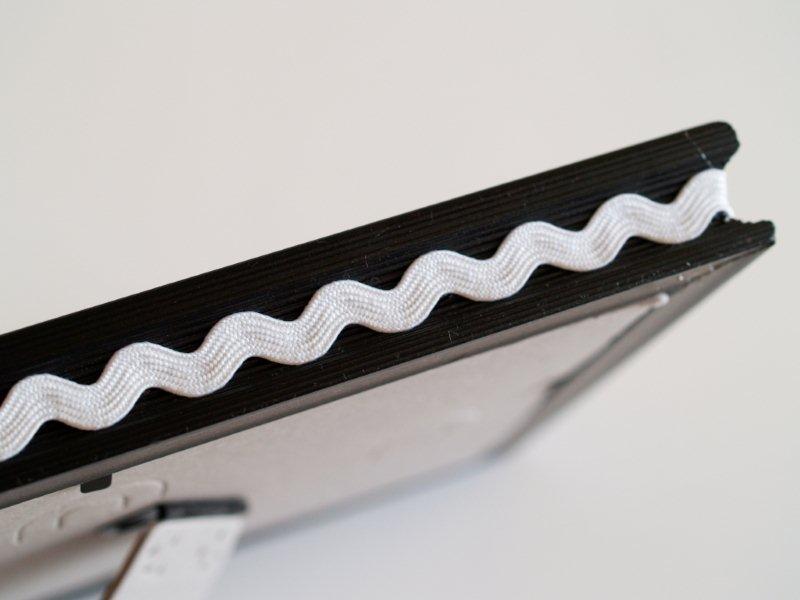
I hot glued it on – with my handy dandy new fancy Christmas present Glue Gun – that I adore. (Thanks sweetie!)
It’s Smoking Hot. Literally.
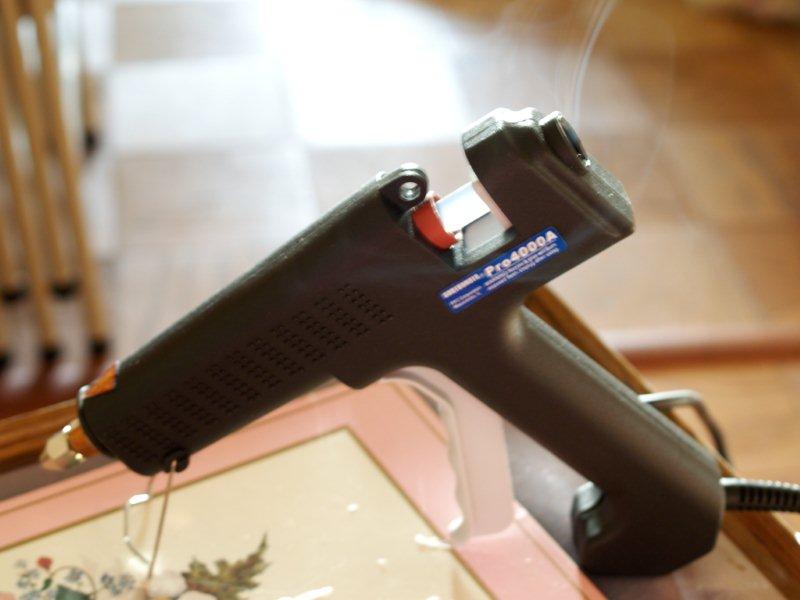
I was seriously distracted watching this thing smoke. I’m going to assume it’s smoking because it’s new.
I also made a couple of fabric rosettes to add to the frame. There are a milllllllion tutorials out there for these – but I thought I’d include one since I’ve put them on the frame – and really, I think it might be a blog requirement written in secret code somewhere – along with uses of mod podge, burlap, and book pages. :)
Start with a strip of fabric about 1 1/2″ to 2″ wide. Make a small knot in one end.
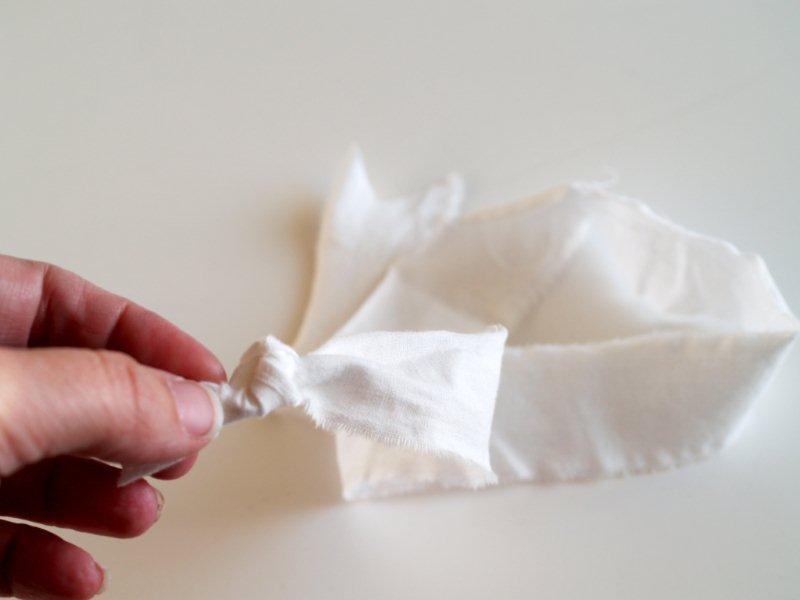
Hold the knot in your left hand and with your right hand, begin twisting the strip and wrapping it around around the knot.
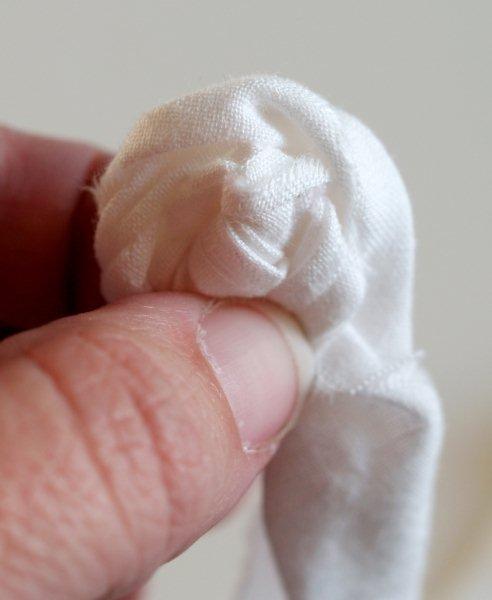
Continue wrapping and twisting, using your left hand to hold the rose in place as you go.
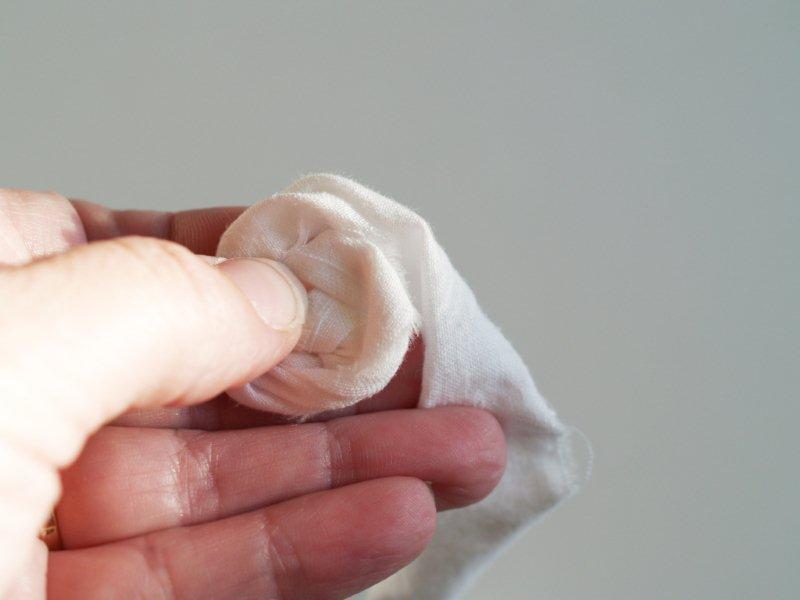
Clip your fabric when you get the rose the size you want and tuck the end underneath.
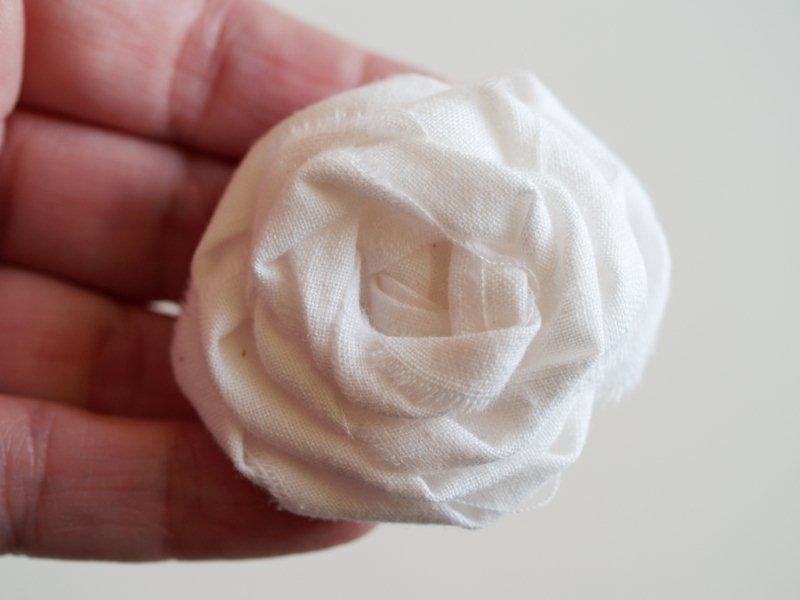
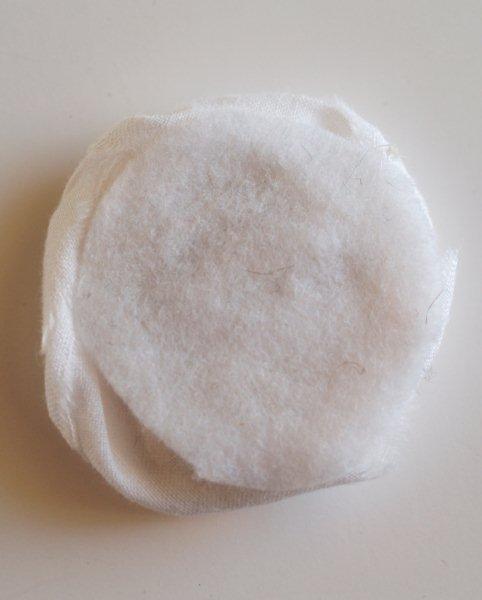
Glue the rose to a felt circle slightly smaller than the rose. This will hold all the folds in place.
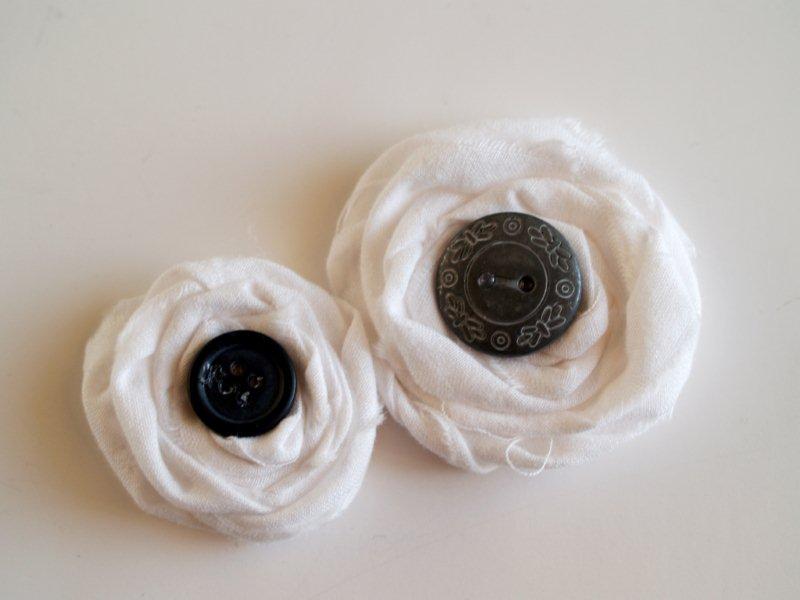
You can leave them as-is at this point – or you can dress them up a little. I added buttons to the center to tie in the gray in the stitching.
Glue the rosettes to the frame –
And you’re all finished!
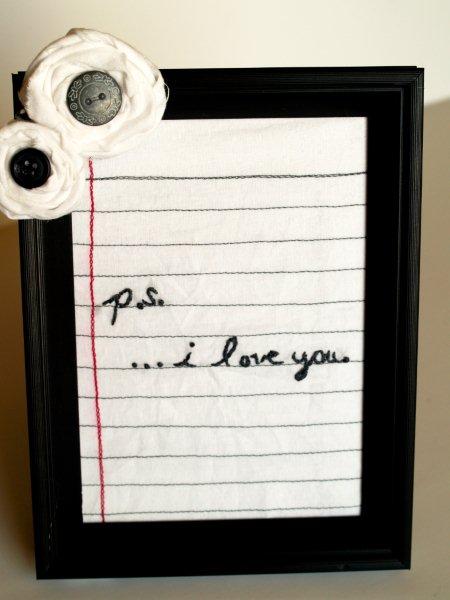
What do you think? I love it. It makes me smile. ;)
Do you decorate for Valentine’s Day?
In addition to the fun parties on my sidebar – I’m linking up to the Valentine’s Edition of Tip Me Tuesday and the CSI Project!! :)

![]()


Aww, that’s so sweet! I really love it. <3
PS I love…this! And your creativity…love that too.
Oh my goodness this is soo cute! I think I know what I just might be doing tomorrow….
Hi! I gave your blog the Stylish Blogger Award. Don’t feel forced to participate, but if you want to, you can find it on my blogs at http://bit.ly/eho0Xq and http://bit.ly/eo8jT7 . Have a fantastic evening! :-)
~ Tina
http://parkavenuechihuahua.blogspot.com/
http://anotherdomesticdiva.blogspot.com/
What a cute idea! I’m loving this design–if only my husband appreciated crafts as much as I do. Heehee!
P.S. I LOVE THIS!!!
Wow that is so cute!!
Oh, this is so sweet! I want one! :)
You are right, so simple yet so sweet, I love the stitched notebook paper, I need to remember that!
Oh my word, Bev! You’ve done it again. Absolute perfection in every detail! I really need to get my act together and make a point of doing this project for Valentine’s day!
Oh dear! That shaved dog metaphor was priceless. Made me giggle!
So darn cute…adorable! Just absolutely makes my heart melt.
I must admit my decorating for the holidays was like yours and still is…I am celebrating Christmas still finishing projects! I am so going to be on it next year, um this year!
This is very cute! I’d love for you to come link it up to my Love Linky Party. It would be a fantastic addition!
Krista
This is so cute! I don’t decorate for valentines day but I think I’m going to have to change that. This is sweet without being cartoony (is that a word?). I may have to make this for my valentine.
This is so adorable! I’ve seen this idea before, and it’s right up there with the embroidered heart and initials on woodgrain fabric. :) Just so sweet.
~Kristin
Adorable!!!
PS… i love your blog design.
Should I frame that? :D
That is positively adorable! I love the look of note paper and your embroidery looks great! Love it, Bev!
Hey Bev, great idea…!!
one suggestion though – once you crinkle the fabric (if you want it to stay as is -i.e. crinkled) just spray a blast of steam on it from the iron without actually ironing it. The crinkled effect with not be lost even after you frame it. This technique is called heat setting with steam works better if there is any polyester in the fabric.
cheers
I really, really like this! I can’t wait to make one myself.
~Ilsa
I love it. And I’m right with you on the blog influence on decorating.
Bev! This is beyond cute! I love the ric rac accent on the sides, too. So what kind of fabric marker do you use? I’m in the market for one.
This is new to me! It looks great.
i absolutely love this. you always have such great ideas!
OMG…I love this. Perfect for my daughters. Thanks so much!
So cute!!! Great tute :)
I adore this. I had seen it on Twig and Thistle and have saved it forever. Your detailed tutorial is super helpful! Yours came out beautifully.
You come up with the cutest ideas! I love this!
This one’s all new to me, can’t wait to give it a try except I’m thinking pillow instead of frame….
Thanks for the instructions!
What a cute idea! I love it!!
I have to say that I love and adore this! Thanks for the tute, it’s gonna be used! :)
I’d love it if you came and linked these up to my new linky party, Tute {Yourself} Tuesday!!
LittleEme.blogspot.com
I love this!!!! I’m not in for mushy gushy hearts and stuff, but I am totally making this for this year.
Thank you for the beautiful idea!
i adore this!….
This is super cute! I love everything about it!
I love this project. Love love.
Hi Bev! I can’t stop thinking about this cutie project so I’m showing it off over at Crafts & Sutch today! I hope you’ll stop by to take a peek and grab a SUTCH an Inspiration button. :)
Have a wonderful week!
Erin
I LOVE this idea!!! And I really like to stitch, so it’s perfect!!!! If you get a chance, we would love for you to link this up at Fancy This Fridays!!! :) http://trulylovelywiththelaneysisters.blogspot.com
Awww!! This is so stinking cute! I’m totally doing this one. And I don’t know what rock I’ve been living under for the past three months (when I started my blog), but this is the first time I’ve seen yours! Absolutely adorable. Just became a follower. Excited to see what you come up with. ;)
Aloha,
charlie
In love! This is so great!
This is adorable! I love it! Thanks for adding it to Anything Related! I’ll be sharing on my Facebook page! (http://www.facebook.com/pages/All-Thingz-Related/272039786701)
This is absolutely adorable!! And I know just what you mean about decorating for other holidays! It makes me feel so happy though!! :) I am still on winter! :) Gotta jump on the v-day bandwagon soon! Too cold!! :)
GAHH! soo soo cute i really love this =)
What a wonderful Valentine’s Day idea!!!
You are a treat to share your talent. Thank you so much I love XOXO day ;.)
oh my goodness, I absolutely love this!! :) i’m thinking about turning it into a fabric card for my valentine :)
Love this!!
love it! it takes me back to the days of note writing…
If you have a moment, please link up to Creative Juice Thursday!
http://momnivoresdilemma.blogspot.com/2011/01/creative-juice-thursday-7-freshly.html
<3
nicolette
Oh my dear!! You never cease to inspire me!! I don’t know how you have the patience for embroidery, but this project was truly worth it. This is ADORABLE!! Your own twist on a cute Valentine’s Day project–so sweet!
you are fabulous! i love this!!
This is totally adorable…..LOVE it! I definitely decorate for Valentines Day, it’s my fav holiday! Gives me an excuse to decorate the house with “love” themed items, and you know….possibly leave them up year round. :)
I love this idea. It’s so simple and sweet. I think I found my husband’s Valentine’s Day present!
I love it, I didn’t realize at first that you stitched the “paper” that’s fabulous and I really like the extra steps you took to make it super cute…the rickrack border. Thank you for sharing this week at A Crafty Soiree.
Bev, I absolutely adore this! It is so endearing. I will be featuring today at somedaycrafts.blogspot.com.
WOW! (as always!) This is lovely! And totally original! And….I love this movie :) Posting this on my fb :)
I absolutly love this! I just found your site through Someday Crafts. I’m glad to be a new follower!
This is sooo cute! I love it – thanks so much for sharing!
I love this! How absolutely adorable is this?!?!?!?!?!!! I am posting this on my lil ole blog…love your creative juices! Thanks for sharing!
Super sweet project. I love all your special touches.
Oh, wow! This is sooo cute! I thought maybe you had some fabric that looked like notebook paper, but when I realized you’d made that too, it just made this whole project even better!
This is so stinkin’ adorable! I love it!!
I shared this on my blog’s, A Glimpse Inside, FB page! http://www.facebook.com/AGlimpseInside
Stopping in again to invite you to link this up at Favorite Things Friday!!
http://thespeckleddog.blogspot.com/2011/01/favorite-things-friday-no-7.html
This is adorable. I’m linking it up to my five finds friday tomorrow. Great work!
Cheri
I love this idea. I am going to get out my cross stitch supplies, that I have not touched in forever and see if I can make this.
And I love this! I’m linking it up at http://www.holy-craft.blogspot.com today.
OMG – that is SO cool! I am definitely going to do something like this. I think this could be a lovely Valentines gift for someone. Totally sweet!
Oh this is soo cute and exciting. I’ve never embroided before, let alone learned to use my sewing machine. Great inspiration and a great starter craft for me. Thanks for the idea.
Hi!! This is way cute!! I am highlighting you on my top 15 V-day crafts thus far!
SIMPLE AS 1-2-3
http://simpleas1-2-3.blogspot.com/
Love this!! I featured it on my blog, thanks for the inspiration!
http://www.auntielolocrafts.blogspot.com
I’m so sorry Bev. Can you link up again. I had the wrong kind of linky thing. Thanks!
Completely fabulous. I love that it is all hand-stitched. Clever, clever girl.
This is so sweet, and such a great tutorial!
This is one of the sweetest Valentine’s crafts ever. {Really and truly.} I love this idea, and the little rosettes were the perfect addition to your frame. Thank you for sharing this. :)
Blessings,
Jenni
That is such a darling idea!! LOVE it!
Love it! Such nice embroidery, I’ve just started getting in to that. I’m working on a pillow of random squares for practice. I’ve got a few update posts about it in the “relaxing” section of my blog. (www.thatredheadedstepchild.com) Thanks for sharing such a great idea!
This is such a sweet idea! I love all your decorative touches!
LOVE this…SO CUTE!!
I LOVE this!! I can’t wait to make one myself. I love how you stitched it into fabric, and I love the rosettes on the side. This is so creative, and the perfect addition to any shelf. Thank you for the idea!! I will be featuring it on my site next week :)
Cami @ youseriouslymadethat.blogspot.com
Wow! I seriously LOVE this! I really need to learn how to sew…
This is just so sweet. It would make a cute gift to from the kids to a grandparent or aunt! I love the rickrack. I would love if you’d link up to my Sew Crafty party and giveaway!
http://wildflowersandwhimsy.blogspot.com/2011/01/sew-crafty-saturday-adventure-date.html
LOVE LOVE LOVE this!
I like this – so unique!
Hello there! Saw this on the TT&J blog and HAD to come over here to tell you how much I love it! I know you said in your post it’s been done before but I’ve never seen it! My little brain is already swimming with more possibilities for this…..now all I need is a sewing machine! hehehe any suggestions for a good one? I’m currently going over to my mom’s to use her’s every time I want to do something that requires a large amount of sewing. I just love that you dressed up the little frame at the end –so stinkin cute!
Thanks for sharing your talent.
ps. I’m your newest follower here and the newest “liker” on the facebook page!
that is the cutest thing i have ever seen! your tutorial is brilliant and so easy to follow! i think i am going to have to try this one, or at least put it in my files to try for next year! adorable! i love it!
This project is officially on my list of DIY things this weekend! Thanks for sharing and teaching!
I just love this!
I love, love, love this! I think I am going to try and make one today! I would love to have you come and link this up to Fantastic Friday at http://ironvioletdesigns.blogspot.com
Thanks for the great idea!
I really should feature other people more, but I can’t help it, you are so AMAZING!!! Tell me there are like 3 of you doing this blog pretending to be one. I am SOOO in love with this. I NEED one! Lovely lovely lovely! I am (of course) featuring this tonight on my blog! Thanks again for linking up to Topsy Turvy Tuesdays!
That turned out wondeful! I love the ric-rac on the side. Thanks for sharing … I’ll be linking. And please come join my link party anytime!
http://childmade.com/index.php?name=Shared%20links
Bev, I’m so glad you dove in and embraced Valentines day, and in the process producing an heirloom quality memento! Thank you so much for sharing this project at “A Little Birdie Told Me…”
What a FABULOUS project idea! I love it!
This is so adorable and personal! Thank you for the inspiration!
I am featuring it on our blog at:
http://www.VintageAccents.blogspot.com
Beverly, This is adorable. The paper lines…the crumbled look – perfect! Thanks so muchf or linking to the Sunday Showcase. I greatly appreciate it! Hope you are enjoying your week ~ Stephanie Lynn
Hey lady! I featured this today.
http://thespeckleddog.blogspot.com/2011/01/favorite-things-friday-no-8.html
This is so cute Bev! Thanks for linking to Your so Very Creative! I featured it today at Featuring You Friday! Go check it out and grab a button! http://memakingdo.blogspot.com/2011/01/featuring-you-friday_21.html
Just found you through the shabby nest. Love your blog. This is too adorable! I had to get out my supplies and make one right away! Even a novice like me was able to handle this project. Thanks for the step by step directions.
what an adorable idea. LOVE it!
Oh my gosh–this is amazing!!!! And I love your rosettes…the picture is timeless! What an awesome Valentine’s Gift!!!
XO
What a cute idea! I will be copying your idea. Thanks for sharing! :)
I just posted with my version of your project and linked to your. Hope that is okay. Link to my post is below. Let me know if you want me to change or delete. Thanks!
http://dragonflysandstars.blogspot.com/2011/01/crumpled-notes.html
Great tute. I’ve been wracking my brain of what I can do for my son for valentine’s day that he can have forever. I’ve been wanting to write a “love note” to him for each Valentines Day for him to read later in life and I think this would be an AWESOME way tot start!! He is only 15 months but it’ll be something I put in his hope chest probably or in his room. I
Super, super cute idea! I can’t wait to make a similar one for my hubs! I am filing this at thecraftersfilebox.com. Thanks so much for sharing!
I love this! so so cute!
What a cute idea. I love this.
LOVE this! So many possibilities…
p.s.
….i love THIS! What a cute and simple idea. It’s precious and could easily be used in a nursery all year round. cute!
I love the wrinkled paper. I’m featuring this in my Friday Favorites tomorrow!
p.s. I love your blog! And your fantastic ideas! I made this fun project and just posted it. Thanks for sharing.
This is a great, simple idea. I made it, along with a distressed pink, red and white frame for Valentine’s Day. It looks great! Thanks!
Congrats your in the top 10 at Today’s Top 20! Get your friends to cast a vote! :)
Amanda
http://www.todaystoptwenty.blogspot.com
Ah I am so happy! I had no clue what to do for Valentines Day and had no inpiration because I used all my tricks at once last year. This is so cute, and my husband really likes it when I am crafty so I think we will really enjoy this. Your blog always does me well! Thanks so much :)
AH sorry I’m still just so excited to make this, I hope it turns our as cute!
This is great I made it quickly and it looks fabulous in my 7 month old sons room! Thank you very much for the wonderful tutorial.
I used your picture in my “Love Note” post, it fit perfectly! Thanks for such a fun project.
http://www.wmcraftgoodies.blogspot.com
I was inspired by you! http://plcsewing.blogspot.com/2011/02/highschool-type-love-note.html
How sweet, thanks for posting the tutorial!
I am featuring this in my Tuesday Idea List:
http://www.stashhappy.com/
I LOVE THE SIMPLICITY OF THIS PROJECT.
AND YES, WE DECORATE FOR VALENTINE’S DAY… AND LEAVE MOST OF IT UP ALL YEAR… THE RED HEARTS GO SWELL AT CHRISTMAS…. AND JUST ADD SOME FIREWORKS AND FLAGS FOR THE SUMMER MONTHS… THAT USUALLY COVERS IT ALL!
so cute – pintresting this now!!
This is so very cute! Thank you for the tutorial on the flowers, it’s just what I was looking for!
Beautiful roses, thanks for you tutorial! Making these roses has been something that has eluded me no matter how hard I try.
I’m wondering how long are the fabric strips you use for the large and the small rose. Thanks! LOVE your blog!
THANK YOU so much for your wonderful P.S. I love you idea. I shared this awesome idea on my doodle blog springtimetreats.blogspot.com with several links over to your blog. Thanks again!!! – Spring