Did you miss the guest post last week over at Someday Crafts??
Well never fear – here is the tutorial for you – and I have a super cool announcement at the end!!!
I’m so inspired by all the Fall Decorations going up – I just had to join the fun!
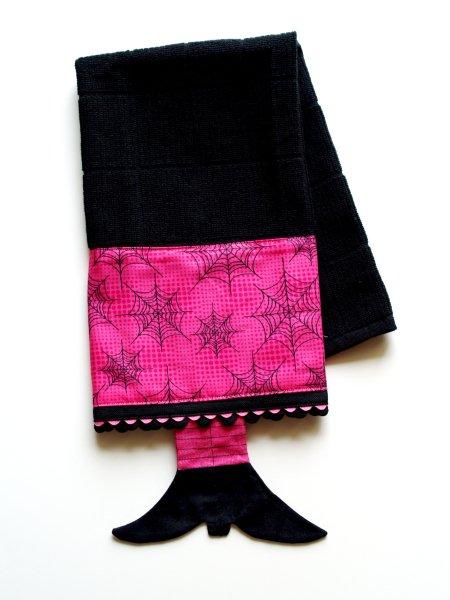
Here’s my first Fall craft – the Feelin’ Witchy Dishtowel!
(And check it out – our silly flamingo is decked out for Fall up in the blog header.)
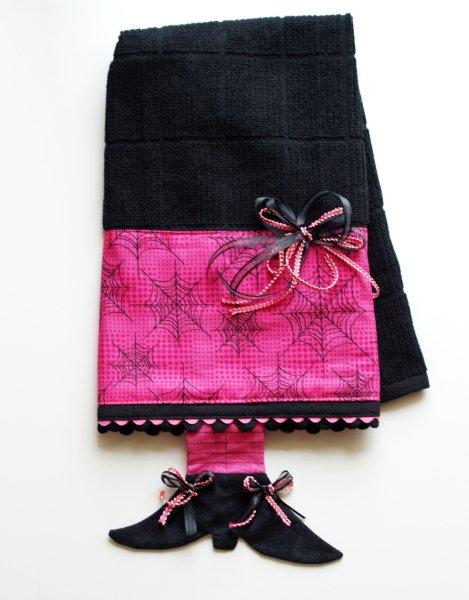
I know. I’m rocking the boat with the pink. But who says that pink is only for Valentine’s Day?!?
Plus it’s got ric rac. You can’t ever have enough ric rac. ;)
Here’s what you’ll need to make your very own.
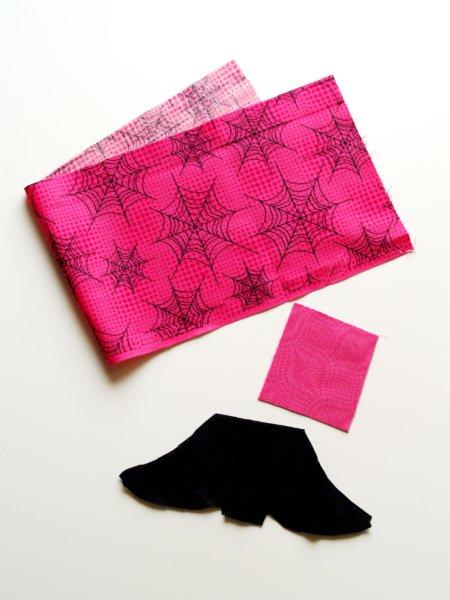
• Dishtowel: I bought mine at Target
• Fabric: Small amounts of three different prints. The pink part is optional.
• 2 Colors of ric rac. Make sure they are two different sizes.
• 2 colors of contrasting ribbon
• Thread and sewing machine
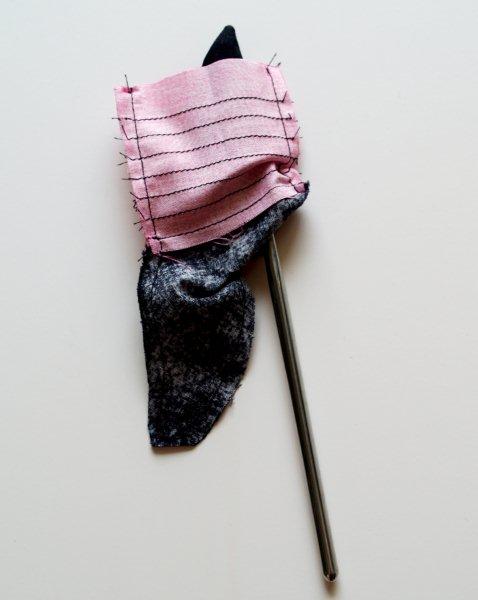
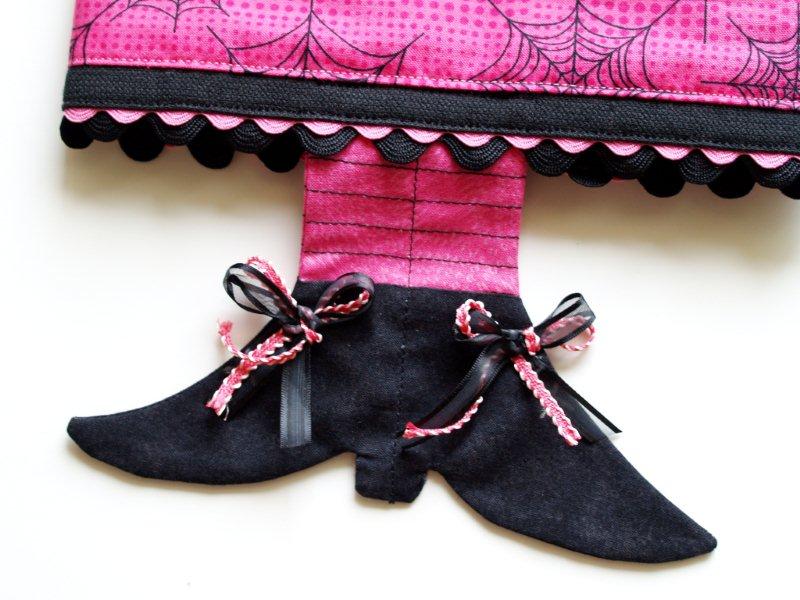
Start by drawing out your witch feet. You want one piece, with a leg section and two shoes.
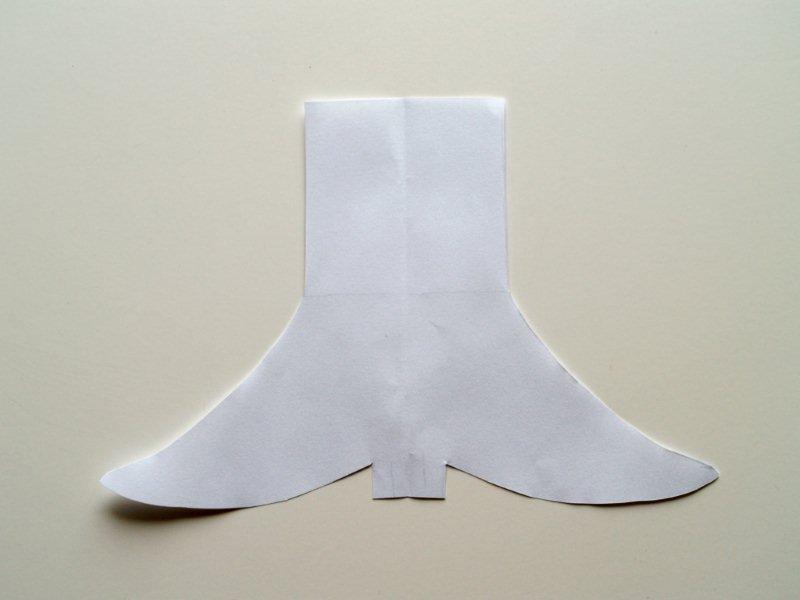
Cut your pattern piece apart where the tops of the shoes would be.
Cut two shoe pieces out. Cut 2 leg pieces out.
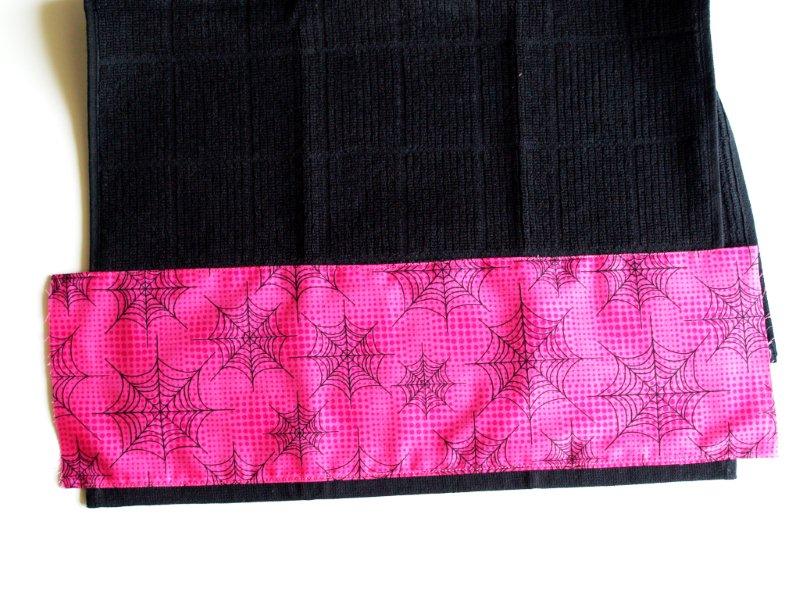
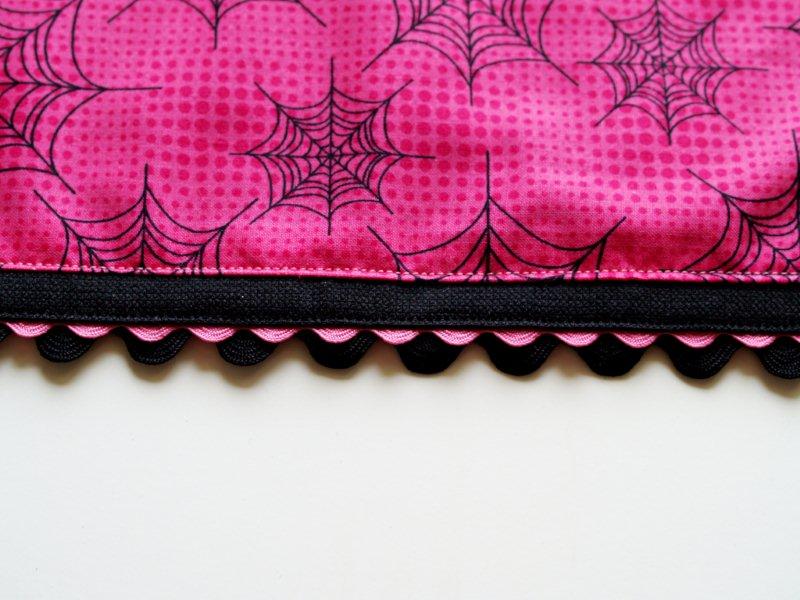
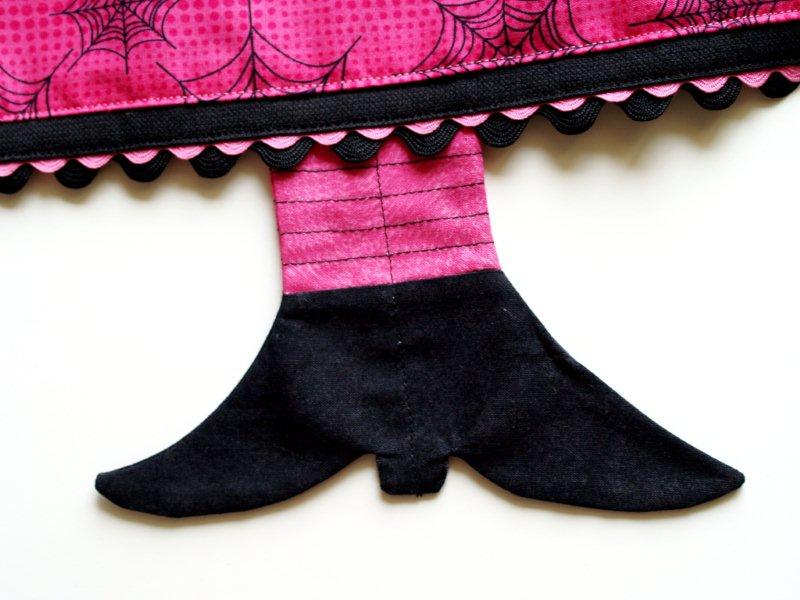
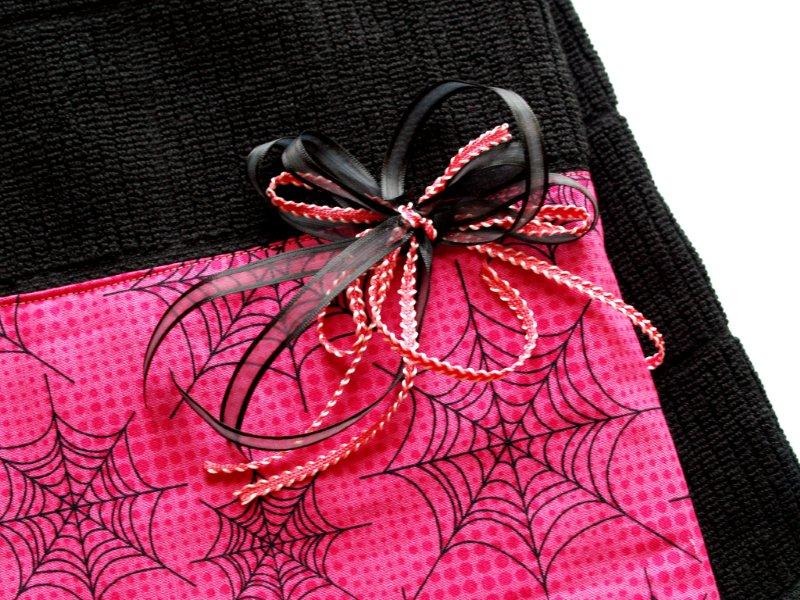
Cut a rectangle of fabric 2 inches longer than your dishtowel and 6″ tall.
Press the top and bottom of your larger fabric rectangle down.
Sew it to your dishtowel close to the folded edges.
I left the bottom binding of the dishtowel uncovered for contrast.
Fold one short edge of the fabric under twice and wrap it around to the back of the dish towel. Sew this down close to the edge.
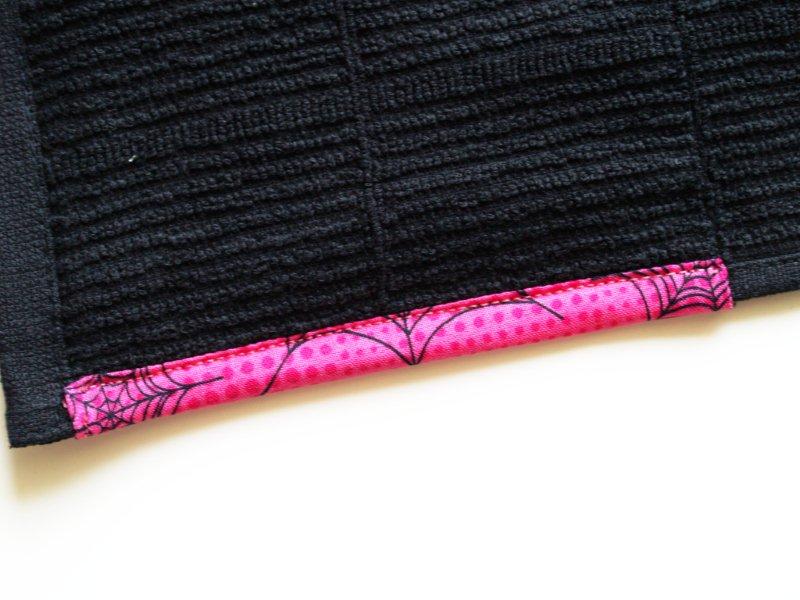
Repeat for the other side.
Layer the ric rac so the smaller width is on top of the larger. Place your dishtowel over the layers and sew the ric rac to the back side of the towel so it peeps out. Turn the edges under at the beginning and end as you sew.
Set your dishtowel aside for now.
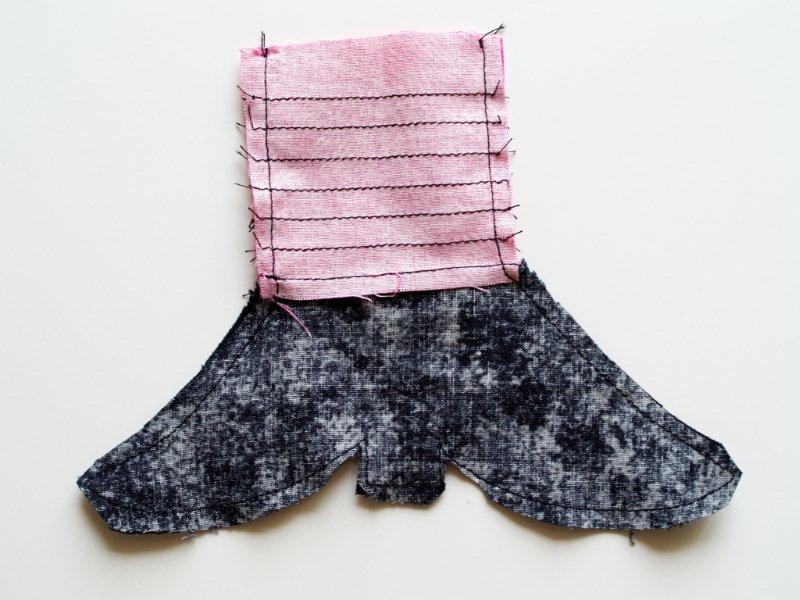
Sew a leg piece to a shoe piece, right sides together. Do this for both pieces.
Press the seam towards the shoe.
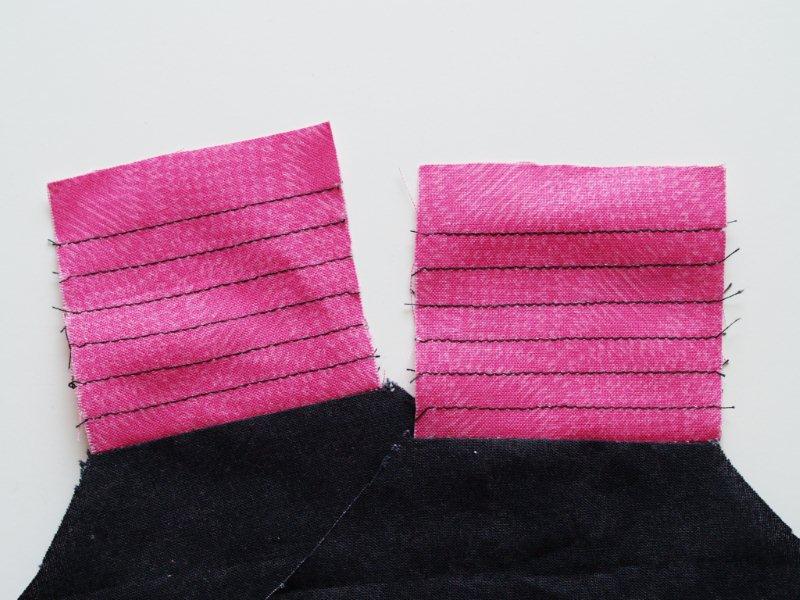
Sew six horizontal lines of stitching to each leg piece. Make sure they’re evenly spaced.
You can use the presser foot as a guide.
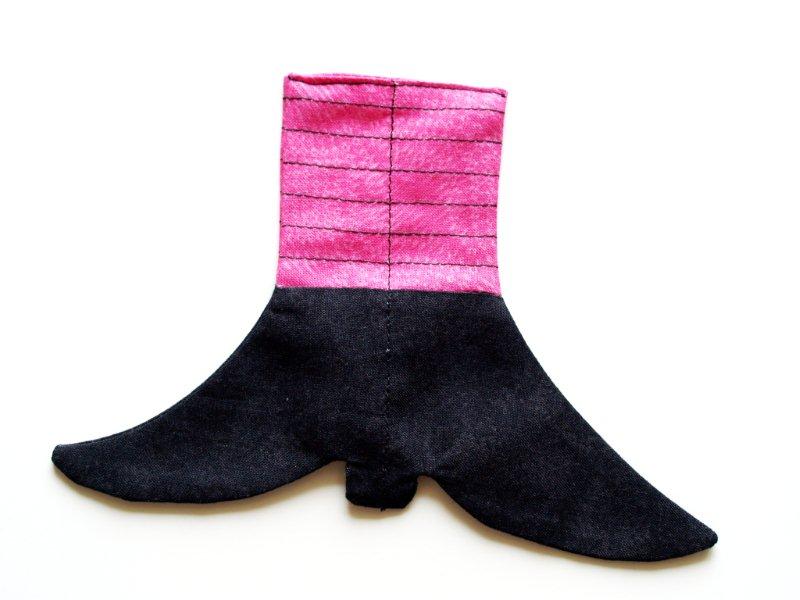
Place the two pieces right sides together. Sew around the pieces on all sides but the top.
Clip the curves and clip off fabric from the toe and the heel so it turns well.
Turn the piece right side out. It helps if you have something pointy, like a turning tool. . .or a chopstick.
Use it to make sure the toes and heels of your boots are nice and pointy.
Press the piece well. Turn the top under to the inside just a bit and sew the opening closed.
Fold the piece in half and finger press it to make a line.
Sew down this line to separate the legs and shoes.
Mark the halfway point of your dishtowel and match it to the center stitching line of the stockings.
Sew the stockings to the back side of the dishtowel.
Mmm. So cute!
But it needs something else . . .

Tie your two contrasting ribbons together to make two very small bows for the boots.
Make two larger bows for the towel and layer them on top of each other.
Sew all the bows on.
I hope you enjoyed the tutorial for my witchy little dishtowel!
My Super Cool Fantastic Announcement is . . . (insert imaginary drum roll here)
A Brand New Flamingo Toes Etsy Shop!!!!

If you don’t wish to sew your own witchy little dishtowel, you can buy a similar one at my new shop!!
There are just a few things there now, but I’ll be adding more all the time.
So check back often!!
Also – I’m entering this dishtowel in the CSI “Fall” Challenge! Check out all the great ideas there.
![]()


Awesome! Love it!!
Great!! going over to check it out!
This towel is so cute! I love the new banner! The hat & crow just cracked me up. Congrats & good luck on the new Etsy shop!
Beverly! You go! This is the cutest thing ever. Congrats on the etsy shop! I still haven’t got the courage ( or my act together lol)
Oh Bev, Bev, Bev! You are just too cute! I LOVE these!! You are so creative!
I.love.it.!!!
Oh my goodness, how completely adorable is that!
I agree,theres nothing wrong with pink for a witch!
cute! love your shop :)
Cute project and a very good step by step tutorial too. I followed your link over from It’s so very Cheri’s linky party. I’m new to her site but am enjoying all the craft projects that were shared.
That is so cute! I just may have to make a few for gifts! Thanks for posting the tutorial.
The new banner is so cute. I love the towel but the new Etsy shop is great news. Good luck. I am sure you will shine.
Oh, this is just so darling! Gotta be a nice witch since she’s dressed in pink! ;)
Be a sweetie,
Shelia ;)
BEV!!!! I’m so excited about your Etsy shop!!!! I’m off to take a look….
I LOVE it! Thanks so much for sharing. Will you be selling these in your Etsy shop? I’d love to know ~
Glad I found your blog. Guess I’m your newest follower. Stop by and say hi when you can…and have a great week!
Pat
That is SO SUPER cute! I LOVE IT!
LOVE this dish towel! I’ve been thinking about making a few Halloween dish towels of my own… think I’ll need to give it a try!
Thank you for the instructions. I have a friend who love to decorate for Halloween, and I need to get her a birthday gift. Cherry Kay
This is way too cute. Great tutorial. Thanks so much for sharing it. Here from “Between Naps”!
Witches and hot pink – I am sold. Super cute!
Congrats on your etsy shop (I am doing another drum roll for you…I am too chicken to start one)
This is so creative and fresh. I love it.
Congrats on opening an Etsy shop! I wish you much success!
What a darling towel and idea! I love it!
check out my giveaway!
http://easypeasygrandma.blogspot.com/2010/09/little-shrug-and-great-contest.html
Oh Bev this is so adorable I love it! You did a such a wonderful job on this. It is so unique!
OMG! What a super cute idea and some really creative thinking!! Fabulous job & loving the pink!
I love, love this. Witches and pink, two of my favs. I’m already excited about Halloween – maybe I need to make myself a countdown calendar :) Thanks for sharing- love your blog!
I love this! Its so cute. I’ll be featuring this on Friday-hope you don’t mind.
crystalscraftspot.blogspot.com
Yours is wonderful..I made one up just last week…and blogged about it lol…yours in pink is becoming..
blessings from quilt story madame samm
Love the dishtowel. Such a cute idea. Thanks for sharing.
So cute!!! Love it!!
Pink all year round! (and, too, October is Breast Cancer Awareness month so your dishtowel is just ahead of the game ;-)
So cute! I might have to make up a set to match my witchy kitchen decor this year (it says: Witches Kitchen, Come in a Sit a Spell).
This is adorable! Love that you used pink instead of traditional Halloween colors!
This is ADORABLE!!! And so creative!
Super cute! Going to add this to my ever growing projects to make list. Thanks for sharing this with us!
Woah . . . this is super cute! Maybe even with just some cute high heeled shoes for a friend-gift any time of year.
what a cute, original idea! Thanks for sharing.
Fun & original. Congrats !
Hugs from France.
Hey, this got picked up by One Pretty Thing at my blog. I forgot to tell you! Yeah for your etsy shop!
Cute! Is being featured Tuesday 9/21 on Random Crafty Georgia Girl for Crafty Tuesday. Stop by my blog for a featured button.
My Mom would LOVE this if I can find some green. My daughter would love the pink. Thanks
oh yes, the laces/bows make it. and i love the pumpkins and straw hats your flamingos are wearing! too cute.
How did you make the upper bow? It is adorable!
This is ADORABLE!! Thanks for linking @Creative Itch’s “Sew Cute Tuesday”!
Beverly this is fantastic! I will be featuring this post on BCD on Sept. 24th and made sure to include your etsy shop info! I’d love to help you promote your shop and give you a free month of ad space on the blog. I love helping out people like you especially because you’ve helped me with so many wonderful posts! Let me know if that’s ok.
Becca
So stinkin cute. And I love that you made it pink! Would like to invite you to link up with Make It Fantabulous! Friday!
Ok, seriously that might be the cutest Halloween thing I’ve ever seen!!! :)
Wow, what a fun idea! I love it. Great job!
Adorable project. Love the pink!
Absolutely darling, and I love the pink! Your shop looks so cute, I’m off to take a closer look :)
Thanks for stopping by Fabric Tuesdays. See you next week! :)
I Love it! It is great and the pink is soooooo inspiring! I have been toiling over the fact that I am an American transplanted into Australia…It is spring here! How do I decorate for Spring Halloween? You have opened up a whole new world of ideas in my head with your Pink witch towel! Thank you so much!
Kimberly
I always wonder what you’ll come up with, Beverly. This is adorable – love the pink.
I so love this-I’m really into pink and trying to find some pink halloween items!
LOVE IT! Absolutely darling!
~Lori @ Paisley Passions
Join my Linky Party Thrilling Thursdays
This is absolutely adorable! Thanks for sharing :]
this is so cute – brilliant idea for halloween, and how cute would it be to do elf legs for christmas!!!
I was thinking Santa Legs! Great minds think a like. :)
Oh, I love, love this because you used PINK! Where did you find the pink fabric with the cobwebs??
Thanks so much for the pattern and tut. I’ll also check out your new shop.
I’m visiting for Transformation Thursday. I’d love to have you come visit with me….oh, and don’t forget to tell me where to found that pink fabric. :0)
Have a wonderful day,
Stephanie ♥
I really love this towel. It is wicked.
I love hot pink and black together. The spider web fabric you picked out is fabulous and add rick rack to that, and there is no way this towel could be anything other than fabulous. What a cute holiday decoration that uses a nontraditional color! Thank you for joining us at A Crafty Soiree! I always enjoy seeing your great ideas!
I LOVE this! What a fun and clever idea!
its looking fine..cute…
i love this idea and featured it on my blog :)
This is absolutely one of the cutest things I’ve seen! Of course, I really am partial to pink, but even that aside – this is darling!
So cute!! I love this idea! Wish I had thought of it first. :)
Come by my linky list and link up your etsy site for some free advertising.
http://suzysartsycraftsysitcom.blogspot.com/2010/09/commercial-break-thursday-promote.html
suzy
I just saw that you were the top pick on the CSI project this week! CONGRATS! You totally deserve it! :]
Haha! Those are awesome! I love the colors. You did a fantastic job!! Thanks for sharing! :)
Following along! Have a great day!
What a great and cute idea.. really like this. If you ever need new recipes or want to be featured than come on over and check us out and e mail us
Hey lady! I saw you had quite an honor today at CSI with this towel. You rock!!!!!
This dishtowel is adorable! Love it!
Thanks a bunch for joining us this week!
Holy Cheez-its…you need to sell this!
Freaking adorable sister!
FREAKING ADORABLE!!!
I’d snatch on of these badboys up in a nanosecond!
Gosh darn cute.
OMG! I see you do sell them.
Off to check it out!
ADORABLE!!
KareyEllen
KareyEllenDesigns.blogspot.com
I love this!! Those shoes and the pink, awesome!
I love this…too cute!
Thanks SO much for joining in on Thrilling Thursdays @ Paisley Passions. I hope to see you again this week :)
~Lori S.
Thrilling Thursdays @Paisley Passions
DARLING + CONGRATS on your new shop! thanks for linking up to a Crafty Soiree last week… hope to see you again tomorrow
Very cute! and I love that it doesn’t have to be orange and black to still feel all halloweeny! Thanks for linking up to Topsy Turvy Tuesday’s!
Beverly, I did a Pink Halloween Post last week. Here is a link:
http://katspurrfectboutique.blogspot.com/2010/10/happy-pink-halloween.html
The 10-7-2010 post is pink too (see home page).
I’ve never seen these before, but I’m loving them! Very creative and festive!
So cute! :)
Jen