I’ve mentioned that I love to cook. And eat of course – but that usually takes cooking first. And while I have a great selection of cookbooks – I also have a ton of recipes that I’ve printed out from the web or copied from magazines. I’ve filled up a binder that my Mom made me – and more. It was time for a new one.
You’ll never guess where I went “shopping” for ideas. What? Anthropologie you say? Well of course. And as usual – they delivered. You’re shocked. I know.
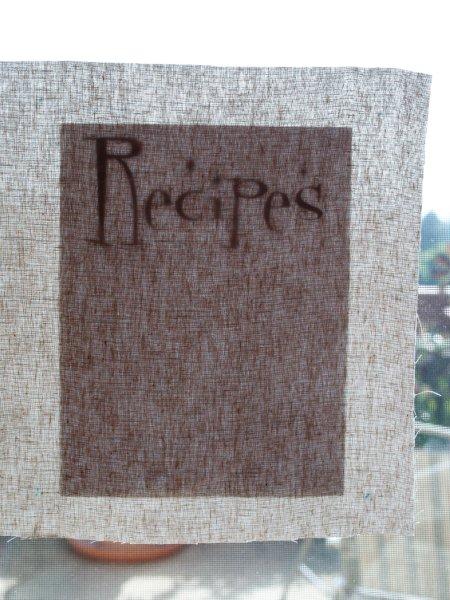
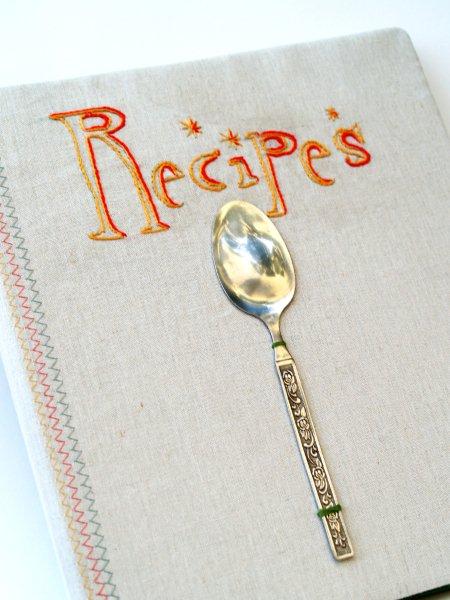
I found the cutest little Recipe book.
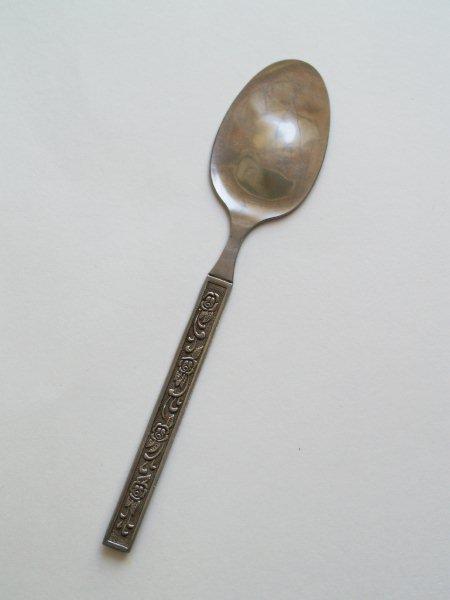
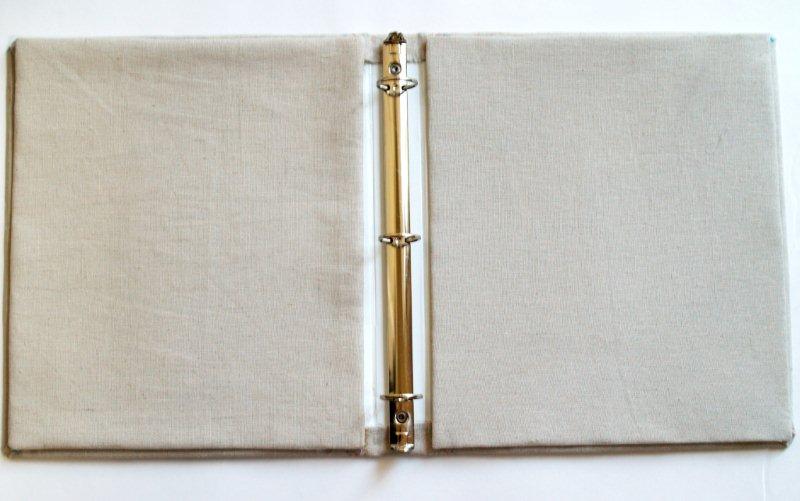
I loved the design of theirs – and that little spoon – but I wanted a Binder version. Here’s mine!
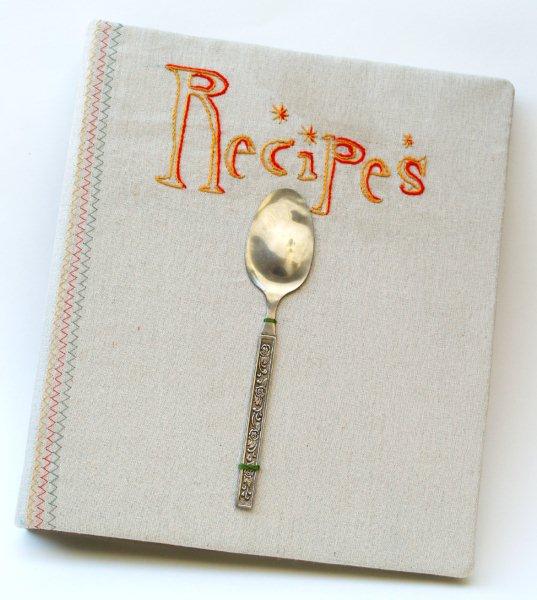
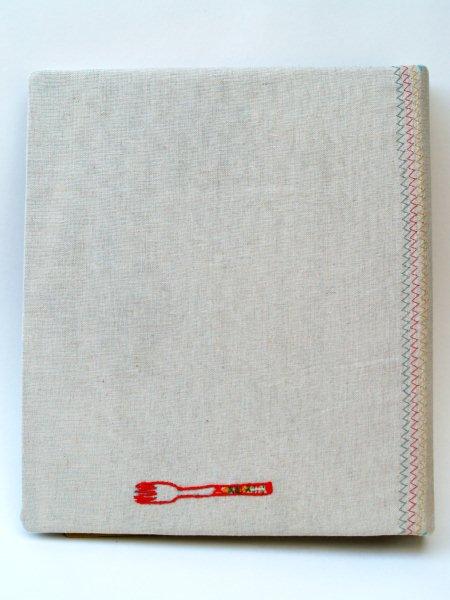
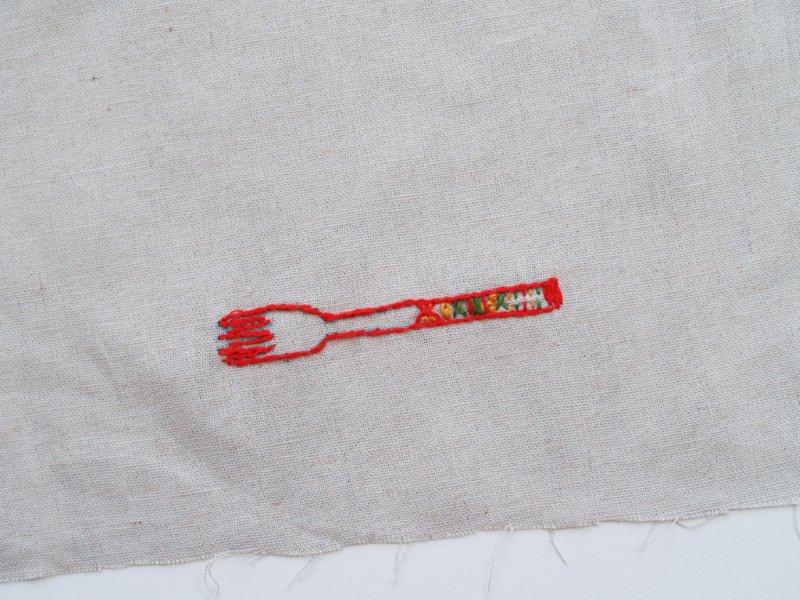
I even did the little fork on the back of the book.
I’m really pleased with how it came out. I used a more retro-diner style font but I kept to the colors and style because those go great with my kitchen. I also changed the text to “Recipes” (plural) rather than just “Recipe”. I plan on keeping more than one in there and not having the plural would have bugged me. haha.
Here’s the original:

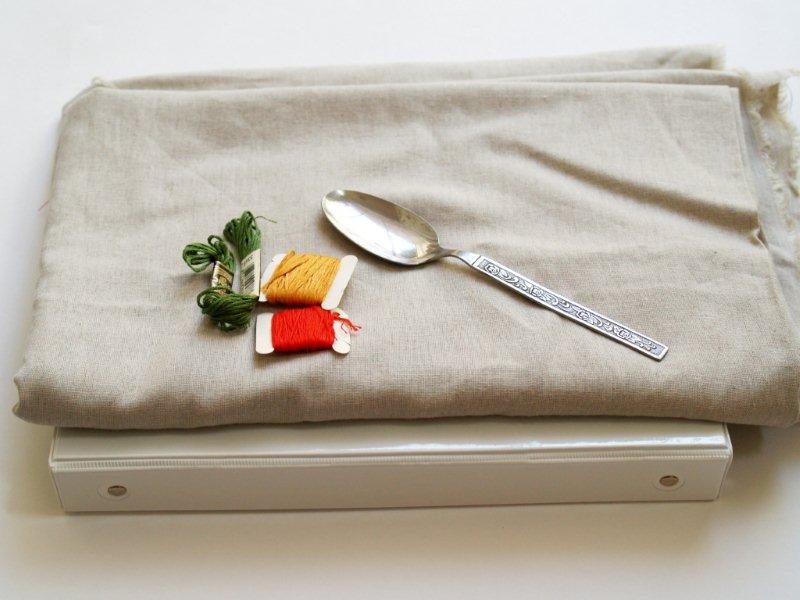
Here’s the supply list if you’d like to make your own. You’ll need:
-
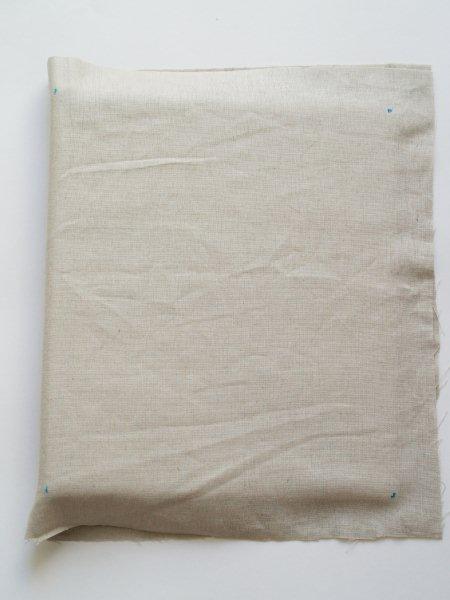
Fabric for covering the binder – a little more than twice the size of the binder
-
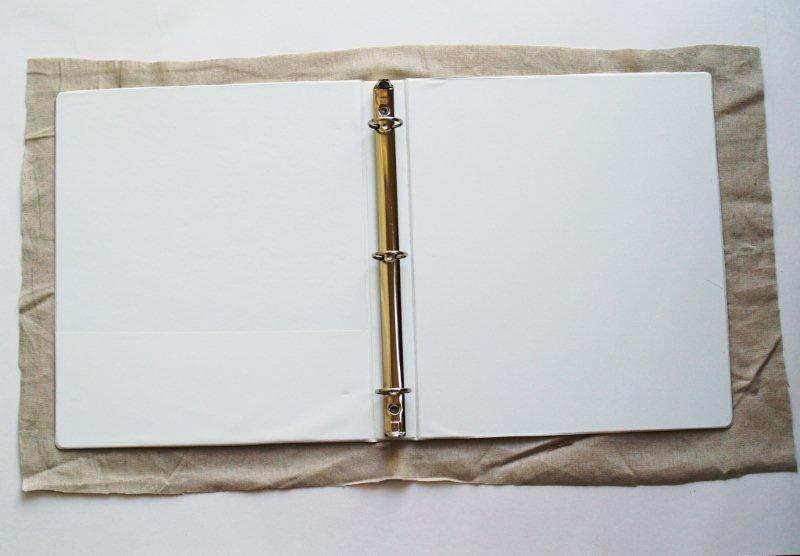
A Binder or notebook – mine is a 1″ Binder
-
Embroidery Floss and Coordinating Thread
-
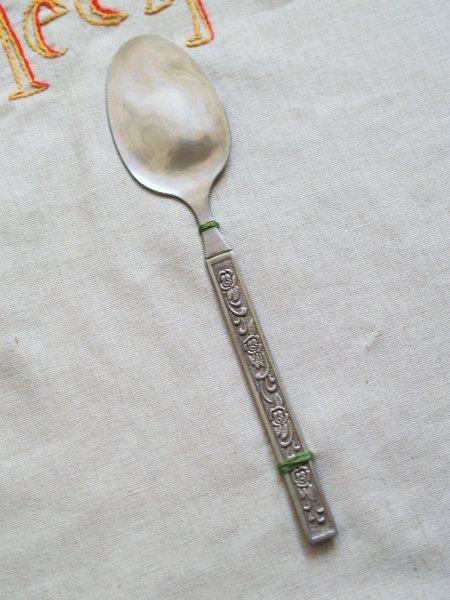
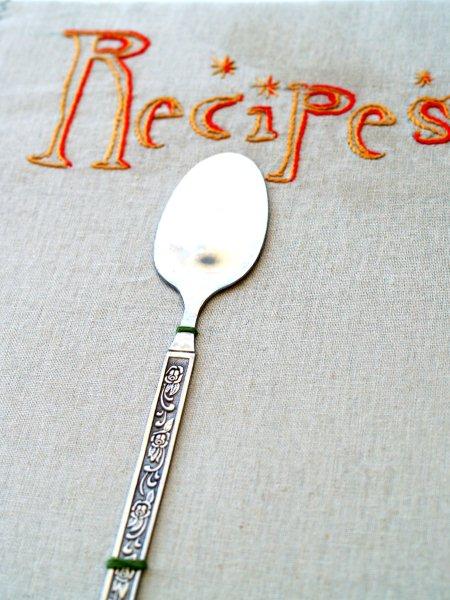
A spoon :)
-
Hot Glue Gun and Glue
-
Posterboard or light cardboard
We’ll start with flattening the spoon. You can do that at any point but it’s the most fun so why not start there?
Lay your spoon on an old towel outside.
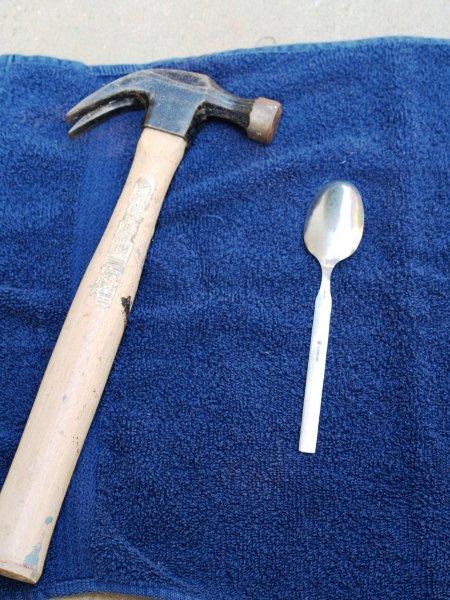
Cover the spoon with the towel and, using a hammer, beat the spoon until it’s flat. It won’t take too long.
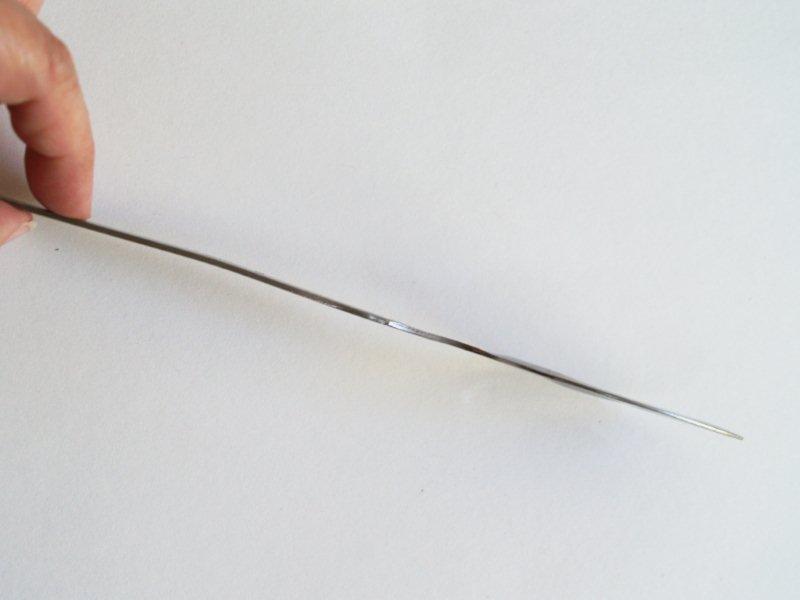
Wasn’t that satisfying?
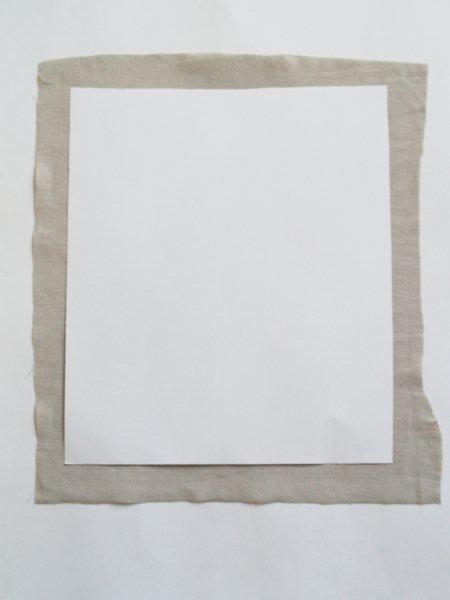
On to the binder! Cut out a rectangle of fabric about 1″ larger than your binder on all sides.
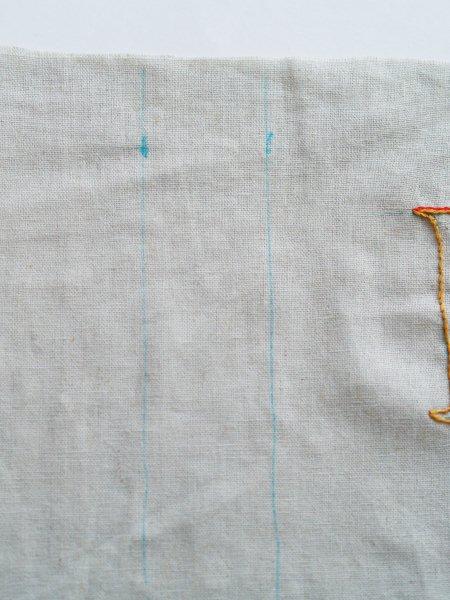
Mark the corners of your binder with a fabric marking pen. This will help you center your design and do the zig zag stitching. I hope you can see those little marks.
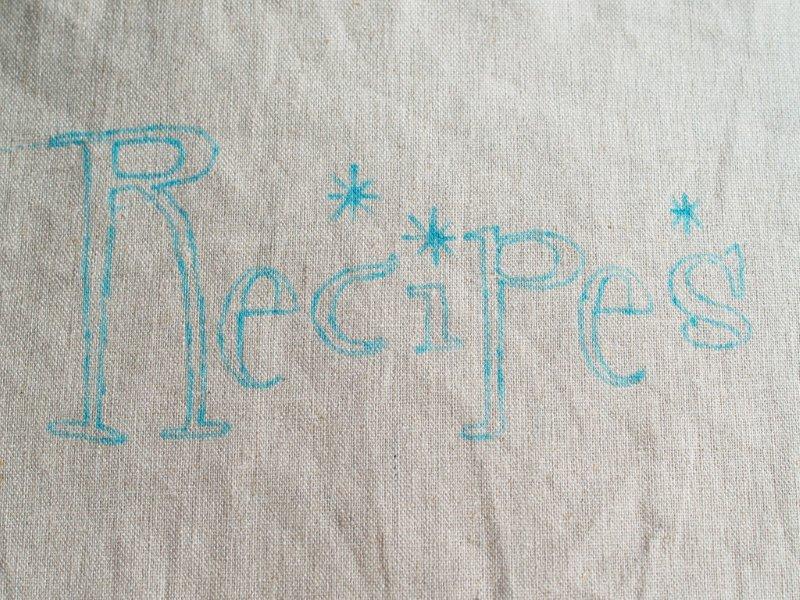
Decide on the design that you’d like. You can make your own, or you can print out the one I used at the end of the post.
Trace your pattern onto your fabric with a fabric marking pen. An easy way to do this is to tape your pattern to the window, then tape your fabric on top of that. The light will shine through and you will be able to easily trace the design.
Place your fabric in an embroidery hoop and outline the letters with a stem stitch. To do this, bring your thread up at the corner of the “R”.

Here is a picture to help you with the stitch. The point you brought your thread up is point “A”. Put your needle in at point “B” and then bring it back out at point “C”. There should be an equal distance between A, B, and C.
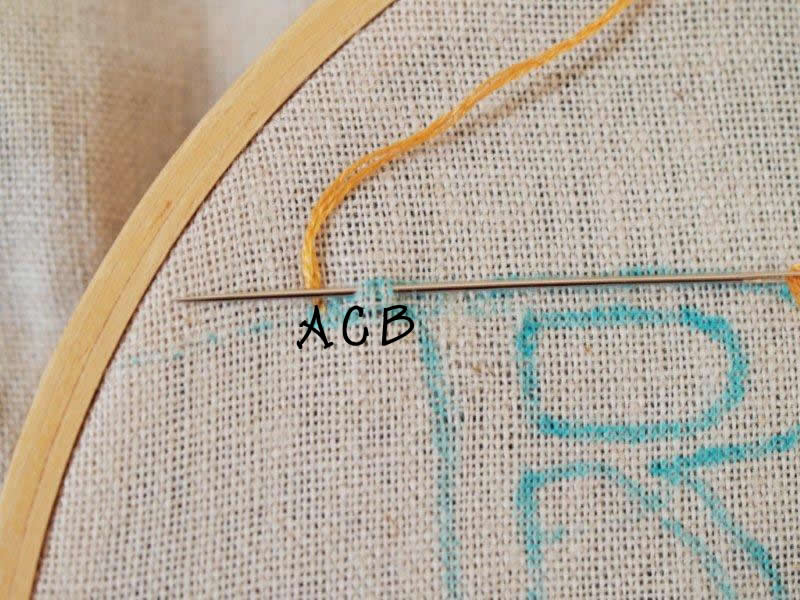
Pull the thread through.

Now repeat the steps, keeping the loose thread above the stitch. In at “B”, out at “C” but your stitch will touch the end of the previous stitch.

Continue this stitch around the outlines you’ve drawn.

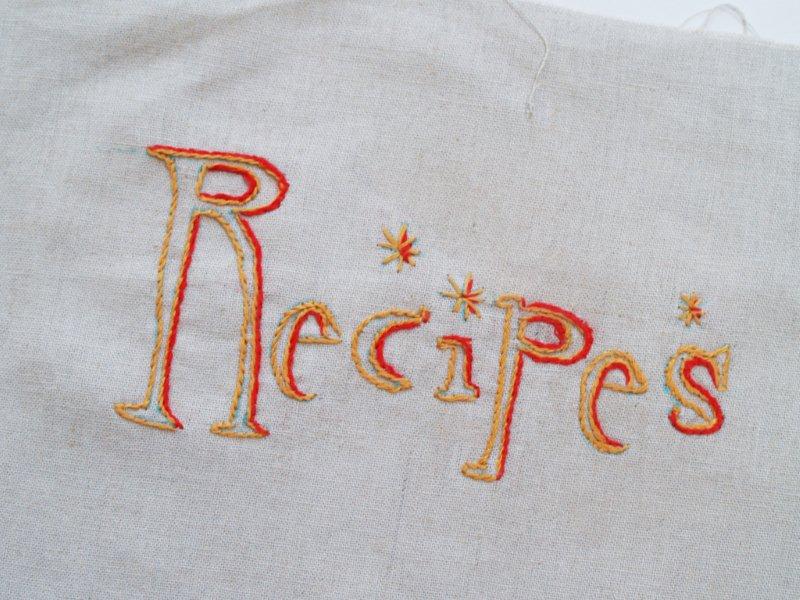
I sewed all the lines in gold embroidery thread, then I accented the right side of the letters with a reddish orange – kind of like a shadow.
For the fork, I traced the pattern so it would be towards the bottom of the back of the binder. I outlined the fork with the same stitch, then just filled in the end section with some random lines and crosses.
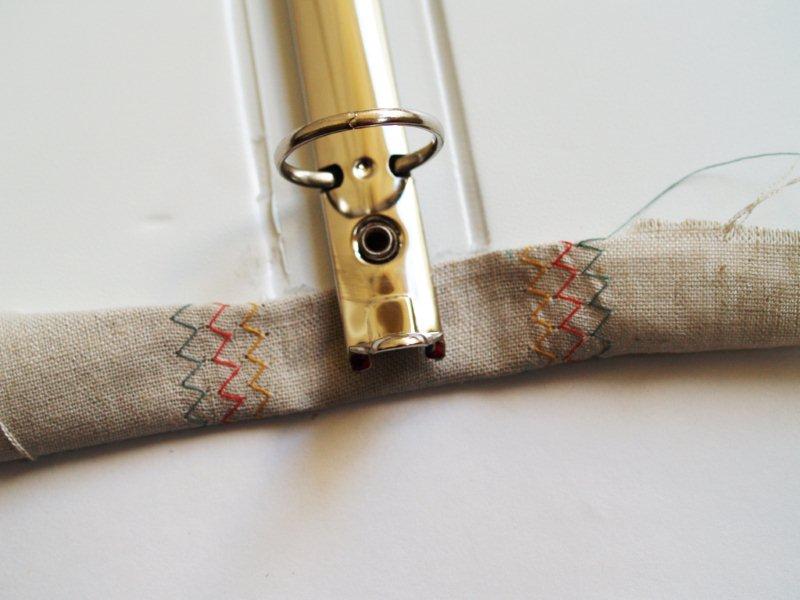
For the decorative zig zag stitching, I switched to my machine.
Using the markings at the corners of the spine, draw a line from the top to the bottom of the fabric. Repeat for the back.
Follow the marked line with a zig zag stitch, using thread that matches the colors you did in the embroidery. I did three rows on each side in three colors.
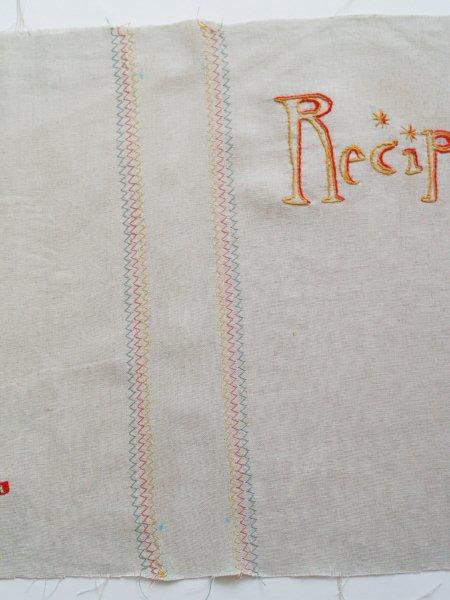
This is a good time to remove all your marking lines and dots.
Sew on your spoon. I sewed it at the narrow section and towards the bottom.
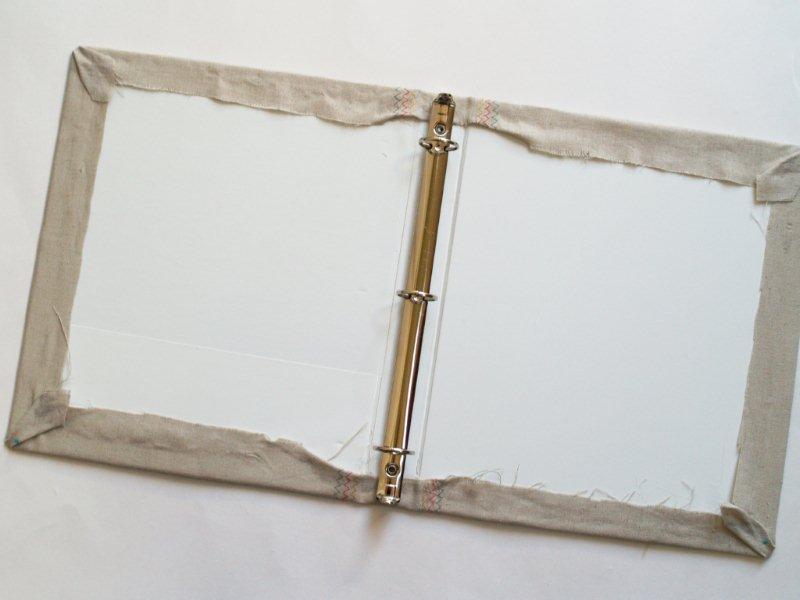
Lay your fabric out, wrong side up, and center your binder on it. Make sure the spine is between your zig zag stitching.
Fold the bottom center section under, at the spine. Glue down (with hot glue) this section, slipping the fabric under the metal binder piece. You should have no raw edges of fabric showing.
Repeat with the top center section.
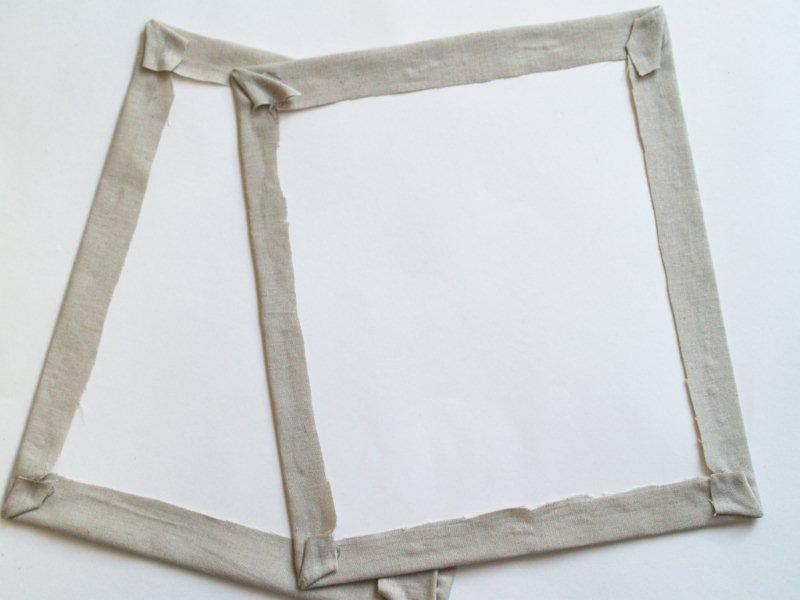
Fold over the left side section and glue down. Pull the fabric tight but not so tight that it stretches or distorts. Don’t worry about raw edges here – this will be covered.
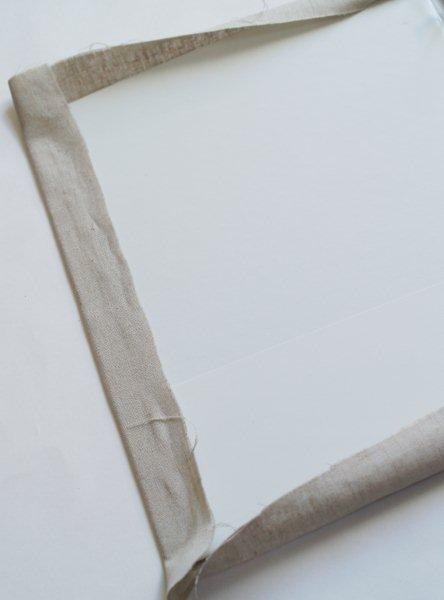
Repeat with the right side section. Then glue down your top and bottom sections.
For the corners, trim a “V” of fabric out of the piece that is not glued down. This will help the corner lay down flat.
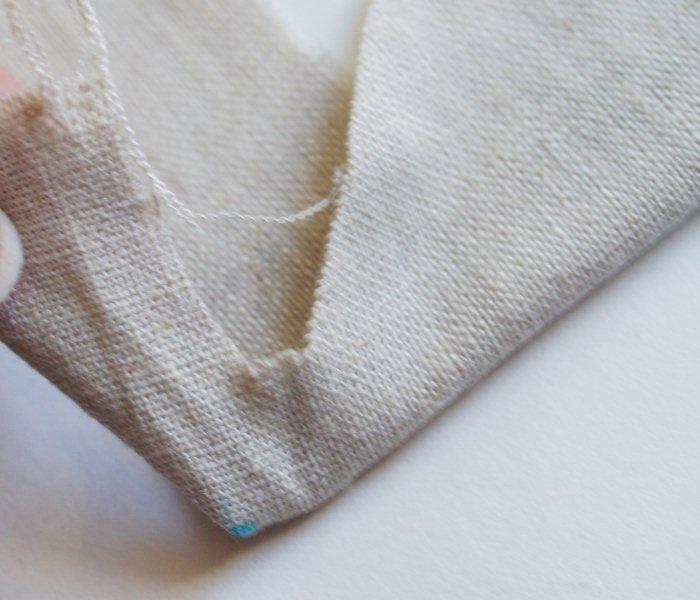
Glue down each corner.
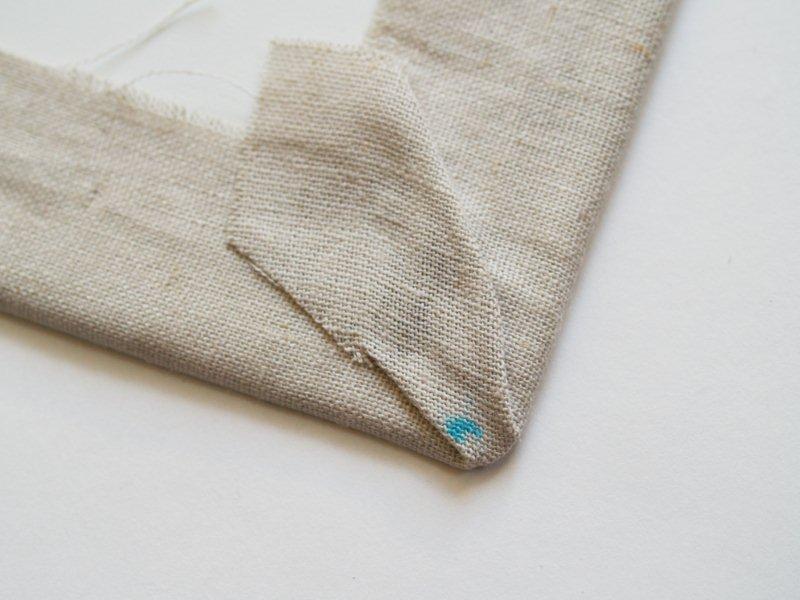
The outer edges of the binder should all be glued down now.
Cut a piece of posterboard or light cardboard slightly smaller than one side of the binder. Make sure it doesn’t cover any of the spine or the binder won’t close properly.
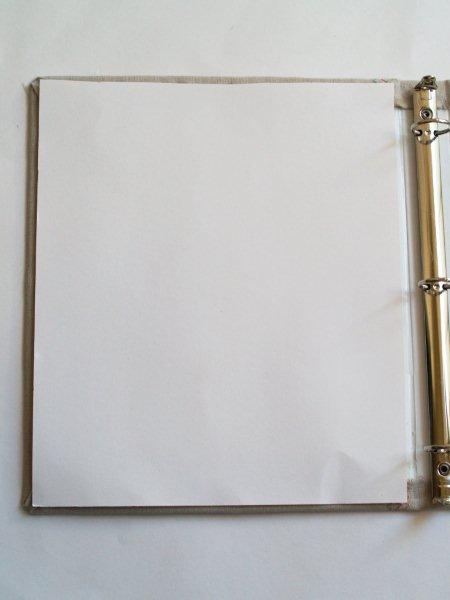
Cut a second piece for the other side using this as a pattern. Cut out 2 fabric rectangles slightly larger than your posterboard.
Obviously it doesn’t have to be perfect. Yes. I failed rectangle cutting in elementary school.
Glue down the edges of your fabric to the posterboard just like you did with the binder. Start with the sides first, then do the top and bottom, then the corners.
Turn the rectangles over and place them on the inside of the binder. Glue one down on each side, making sure to get the edges and corners really well.
You might also want to add a bit of glue under the top of your spoon to help hold it down.
Wasn’t that fun? Other than those little glue gun burns. We won’t mention those.
As I was making this, I thought of a couple of ways you could do it differently. If you wanted to skip the gluing, your could sew a cover for the binder, making the sides into pockets that you slip the binder into.
Or you could make the whole thing no-sew, and use a transfer or fabric paint for the design. I love options!
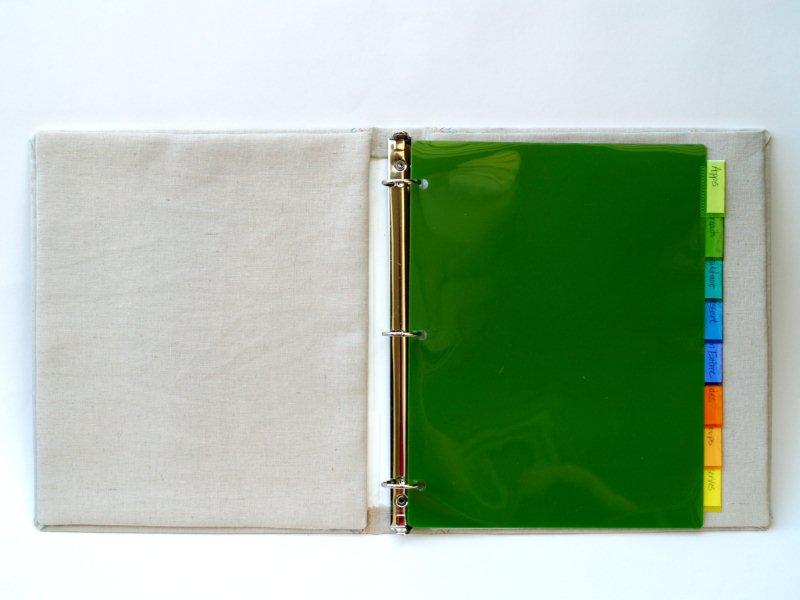
You can put dividers inside to organize your recipes. I also have plastic sleeves for the pages, so I can reuse them without getting stuff all over the page. I’m a messy crafter and a messy cook.
I’m starting to think Christmas presents. I am thinking about Christmas way earlier than usual. This would be fun to give as a gift, with some of your favorite recipes. You could even take it a step further and embroider their name inside.
Here’s the download if you’d like to use this design. As always – I love hearing what you think!!
[dm]7[/dm]


Bev,
I love your tutorials always, but this one has me so excited. What a GREAT idea! Its so easy and I love it!
What a darling book…is it fair to say i like yours better than the store bought one? so cute…what a great idea for christmas gifts…it is never too early to start planning!
Oh yay you are my first link up thank you so much for linking up! As always with your crafts love it what a great Christmas gift idea!!!
This is so cute. I love the flattened spoon, it adds such a great flair!
Great project! Well done
That turned out really cute!! Great job!
Oh, I just *adore* this, Bev! I have SO MANY printed recipes stashed away in a drawer. I really need to make one of these!
Bev, it’s great!!! Your tutorial is so detailed, and you have totally inspired me to make one of these. BTW I will make it plural too, that would make me crazy too!
Kewl idea!….except that was my favorite spoon. ha ;)
Great tutorial, Bev! Seriously, how is it that I want to have one of everything that you make?
i L.O.V.E. this idea! It’s absolutely darling and I can’t get over how great your tutorial is! I would’ve never gone that extra step of making the inside covers pretty like you did! Love a great Anthro knock off!
following you now! Looking forward to learning all sorts of great things from you!
Oh my gosh I love this so much! What a wonderful amount of love and thought in this project. Thanks for the how-to, I’ll be linking.
Great job on the binder!!
So cute! You did a great job!
This is so cute! I have been sorting my stacks of recipes for a week now, and went out this afternoon looking for large blank cookbook. I didn’t find anything and tonight I see is great idea! Since I need something a little larger I’m thinking of doing two of them….Great job! Thank you for sharing!
Wow I love this Idea. I also have a recipe binder and it is completely boring. I would be great if it was cute enough to leave on the counter.
Thanks so much for the cool Idea.
Hammer & Thread
This is an adorable recipe book. I need to make myself one to hold all of those recipes I print off. I don’t like cooking from the computer screen.
Super cute idea. Thanks.
this looks so amazing. i love it…especially the real spoon on the front.
thanks for linking up to TAke-A-Look Tuesday on Sugar Bee Craft Edition – you were featured today! Mandy, http://www.craftedition.blogspot.com
Amazing how you can take an ordinary idea and turn it into something so personal. What a great job, I love how you used a spoon to decorate. :)
That is an awesome binder! Your tutorial is so well put together that I think I could possible attempt that stich! thanks!
This is absolutely perfect! I loved the smashed spoon. You did a good tutorial on the backstitch, too.
I’m all about organization and this is a GREAT way to keep all those treasured recipes organized and readily available.
Thanks for the how-to and inspiration!
Great idea and also wonderfully clear stitching tutorial for foreign sewing beginners like me: I had dreamt of that for months and had never dared trying anything.
Thanks for sharing!
This looks great (: So cute. I’m visiting from the Shabby Chic Cottage’s Transformation Thursday.
Thats is so unique – love the flat spoon and anything made with linen
Seriously…how precious is this!!!?! I need one! :D Thank you so much for linking up to my party at Frou Frou Decor!
Have a beautiful weekend,
~Terrell @ FFD~
How cute! Such a pretty binder! Now I need to find a fabric marking pen and practice embroidery. Thanks for the fantastic how-to!
Wow that’s really cool! I just have a plain white binder :-( I actually like your version so much better!!!
I found you via frou frou decor.
I love it! That’s so much nicer than my plain old black binder!
The stitching is so cute! I especially love the little fork on the back . . . soooo cute! And you are too kind to mention me! ;)
Oh wow. I have been eying this recipe book over on Anthro for weeks! I never, ever would have thought to recreate it and even with your fabulous tutorial I don’t know that I could!
Thank you for sharing this delightful tutorial.
Very cute, love the spoon!
We are so glad you shared your recipe binder with us at Anything Related! I love it!
{Rebekah}
I LOVE this! i saw your link on tatertots & jello…& thought that i would come over to see your tutorial. i actually have been organizing my recipes in a 3-ring as well. i think i may be doing this to make it look super cute. thanks for the fun idea!
I thought this was awesome, really. And the flat spoon! The photos for the stitching were very clear as well. Awesome job!
This is a beautiful project! It would be perfect for a new bride!
love that! the funny thing is i had that same silverware growing up! my mom later gave it to me for camping silverware and we still use it! you did a great job on the tutorial!
There are no words for how much I love what you did! This is really a great tutorial, thank you! I’m definitely making one or 20 :)
I bought the anthro recipe book a few months ago and I am not pleased with it at all!! You made a wise choice to make your own – and you did a great job
Wow, I love this recipe book! In fact I like it better than the Antro one… I can’t wait to make up a couple of these for Christmas presents. I think I’ll make a smaller one for my neice so she can put the recipes she makes with her mom in them. She may only be 5 but she loves anything from the kitchen already!!
I LOVE this! The embroidery is AMAZING, and the flat spoon is gorgeous! I’ll be featuring this tomorrow! Thanks for linking up to Topsy Turvy Tuesday!
You are just amazing! You have such a talent…I am always impressed!
This is super-ubber cute! love it! thanks for sharing it!
This is so cute! I have a question though. When you sew the flattened spoon on is it sewed through the plastic of the binder too to secure it? Otherwise I would think the weight would stretch the fabric and droop. Maybe i missed something, please advise :)
Love it! I’m featuring you in a post tomorrow on crazydomestic.com. Feel free to grab our “I was featured” button!
What a great project! Christmas gifts for my children with family recipes!! It is only January and you have inspired me to work Christmas! Thank you.
Love it. Love it. Love it. And I love that now I know how to easily flatten a spoon!
I absolutely loved your idea(s). Wish I had happened onto this before I gave one this summer to a niece, but I still have others to give to so–you can bet I’ll be looking forward tio trying this. I love the idea of a spoon on the front.
What a lovely idea! I’m totally doing it for myself :)
Thank you so much for the very helpful instructions! I have been looking for a better way to organize my recipes and I think this will do perfectly!
Ummm, yea, so you rock!
I really love what you did! I’d like to feature this on my website/blog, http://www.deliciouslifememories.com, which is dedicated to creating your own recipe binder. May I post some of the photos to our gallery and add links to your tutorial for readers? Isn’t it wonderful when you see something great but then you take your own spin on it and it comes out even better?
Love it! I like yours better then the “Anthro” , looks much better! Good job!
I have been wanting to make my girls one containing the recipes I use the most. This has inspired me to do it! Thanks!
How lovely! The flattened spoon is so nice. Could I be on your Christmas list? ;)
This is sooo adorable! And yes, even better than the Anthropologie version. I’ve wanting to do a binder for my mom– her favorites recipes have been relegated to very unorganized plastic baggies for a while now & it’s always a chore to locate a specific one. This goes beyond my imagination & now I’ve got so many ideas for how to customize hers! Not only did you show me the cutest binder, but taught me the best way to trace a pattern, how to stem stitch, how to flatten a spoon… Such a useful tutorial!! You didnt assume we knew how to do anything (I don’t). Thank you!!
Trying to make 4 of these by Christmas…wish me luck! My mother-in-law passed away over the summer, and I thought this binder would be a beautiful way to preserve her recipes. Quick question…how many strands did you use for the embroidery?
I’m so sorry for your loss Kristl, but I love the idea of preserving your mother-in-law’s recipes in the binder!
For the embroidery I used 3 strands of floss. I would love to know if you get them all done and feel free to post a photo on my FB wall! I’d love to see them!
You really are a great teacher! Very thorough, not to mention the visuals. The embroidery was fantastic. Never saw it shown that way.
Thank you for explaining each detail.
What a great idea!!! I have been looking for ideas for months and nothing has inspired me until now! I am making a Recipe book of my late mother’s recipes which were written on any scrap paper she could find, sometimes making it very difficult to decipher! I love the idea of the spoon, I have my daughter’s baby spoon and fork which would be the perfect size for the cover; on my book I would put one of the spoon’s I still have from my mom,s set. Thank you so much for the inspiration!
I love that idea so much!! What a sweet way to personalize the binder!
You are so fantastic! I love this! I think I’m going to use as a bas for personalized binders, with different decoration and subjects… and make fabric pockets in the insides with a touch of elastic. I love you! This is perfect!
Loved your tutorial. You got me in the mood to start making the gifts. I want to do this for my daughter and daughter-in-law for Christmas. May do one for others if I get real ambitious. Thanks for your great help!
What a sweet idea for gifts for your girls! I hope you have a lot of fun making them! :)
Love this pattern – used it for small dollar store photo albums. Before I glued the inside covers down I put a strip of ribbon on both the inside front and back covers, half way down from the top. After I glued the inside covers over them I had ties for my photo album. It’s been awhile since I’ve made them, thanks for reminding me.
What a great idea, making this ASAP. Thanks for sharing.
I mentioned this post on my blog! I attempted it… If you wanna see my try check it out!
xxxoo Randell
Love this so much, Bev! xo