You all know we love a good Anthropologie knockoff around here – so a couple of days ago when I was browsing online I came across this mirror.
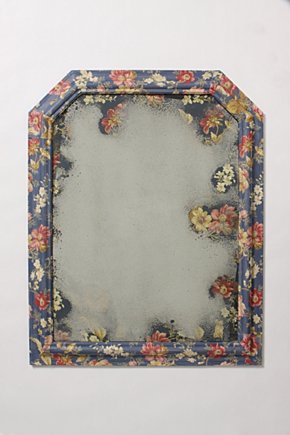
Oh I definitely need that.
Hold the presses – did that say $498??? Huh. We can do better than that. :)
So after scouring the thrift shops, cutting myself on mirror glass, and overcoming an unreasonable fear of Mod Podge, here is my version!
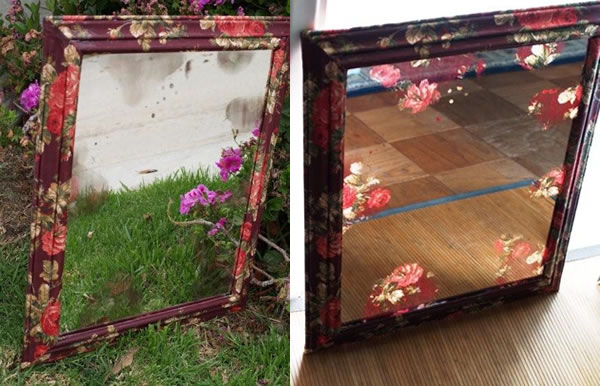
(Bear with me here – taking a picture of a mirror is a bit tricky. It’s difficult to get the right angle to show off the whole thing, without just taking a picture of yourself)
Ready for the tutorial? Here goes.
You’ll need:
- A Mirror
- Easy Off Oven Cleaner
- Fabric (enough to cover the frame and the back of the mirror)
- Mod Podge
- A Staple Gun or other framing tool
I went searching for a method to removing silvering and came across a great tutorial at Mitzi’s Collectibles. She did a similar project that is very cute. I’ll be honest in that I skimmed to see what she used and kind of ran with it my own way.
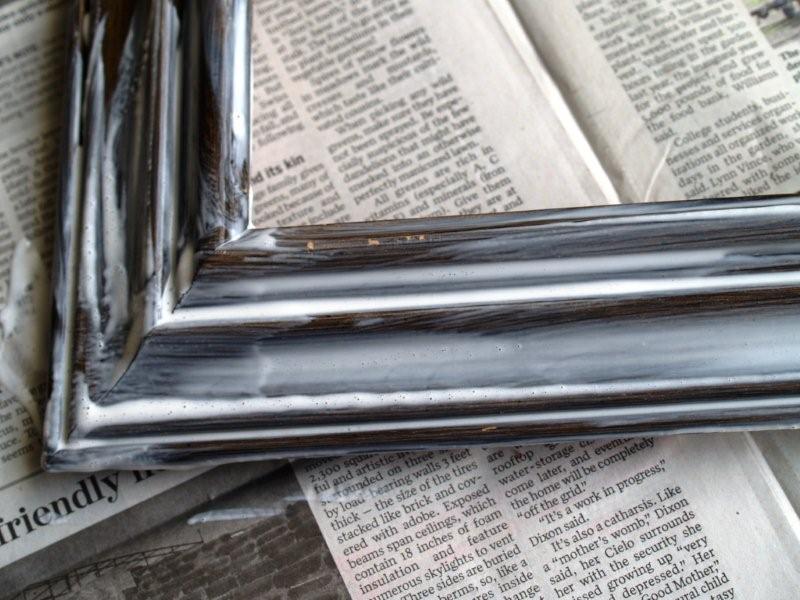
I started with a frame that I found at the thrift store.

Obviously not clean. But the look was exactly what I wanted and the price was right. See?
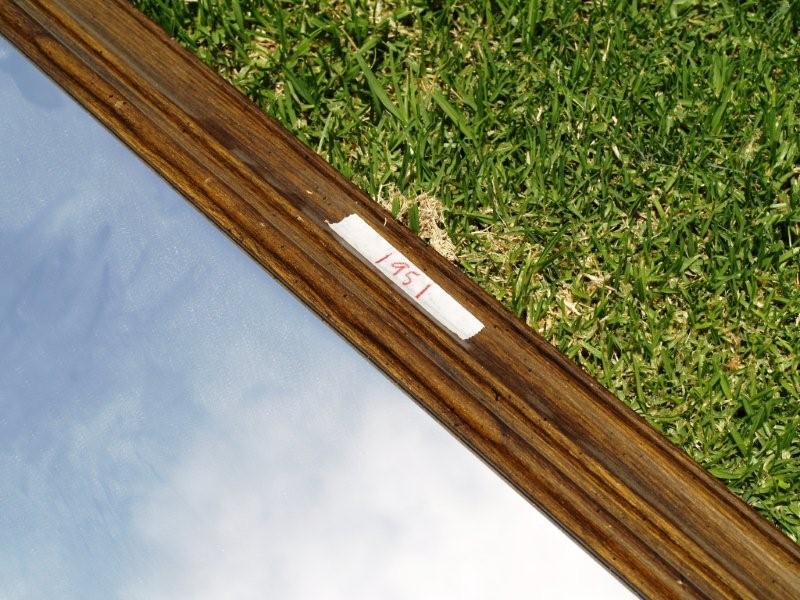
We actually had to ask on this one – because it just said 1951. $19.51 seemed way to high – and it was. This little baby was $1.95. That’s right. Sold!
Start by taking your mirror out of the frame. This one had a backing on the frame so that had to come off first.
Lay your mirror down on a protected surface.

Safety Alert ( in other words – learn from my mistakes) PLEASE be careful when handling the mirror. These things can bite. Especially if it is an older mirror – it would probably be even more likely to have rough edges. Helps with the rustic look but not with your hands.
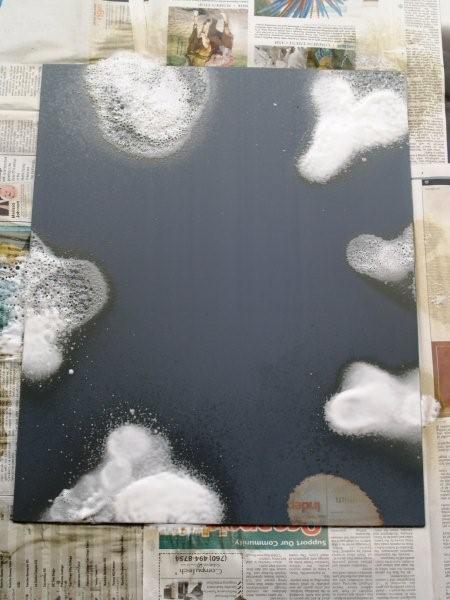
Grab your oven cleaner and spray a small place near the edge of the mirror. I recommend doing this test spray first so you can see how the silvering comes off and how you’d like to do your spray pattern.
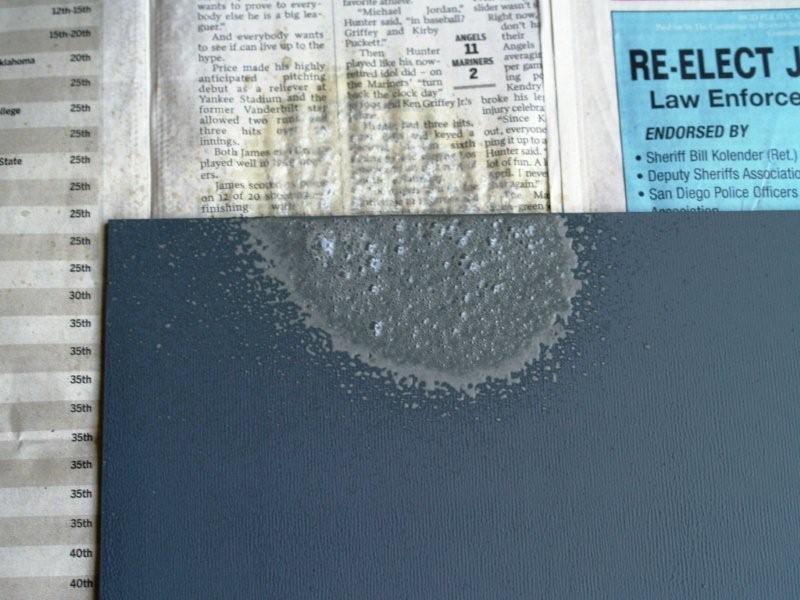
Now walk away. Let that sit for at least 5 minutes. Longer if you can stand it. It drove me nuts not messing with it, but I didn’t want to make the pattern look funky. And the longer you leave this stuff on there, the easier the removal is.
Since you’re being good and letting your mirror alone, you can start on your frame. Grab your fabric and Modpodge.
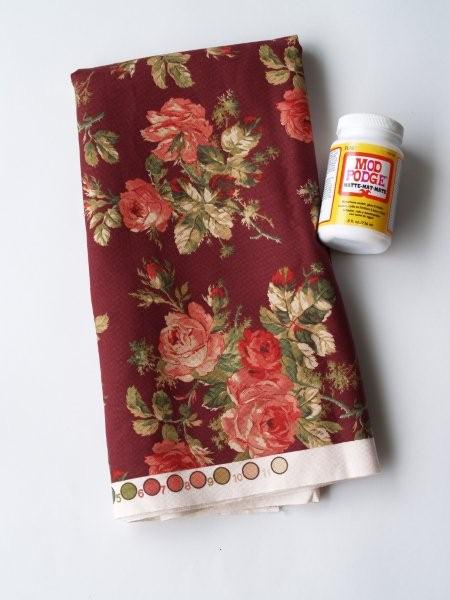
I have a secret to tell you. I have never used Mod Podge in my life. Never. I know, saying that could get me blacklisted from the Crafty Bloggers Association of America, but it’s true. I’ve always admired other projects – you can do some impressive stuff with it. But I’ll be honest – it has always intimidated me. What is it made of anyway? Is it just Elmers in a cool bottle? Some unidentifiable substance brought to the first crafter by the fairy godmother of home ec and camp craft time? Who knows. But one of the points of this blog is to try new things – so I’m divin’ in. And rambling. Let’s get going.
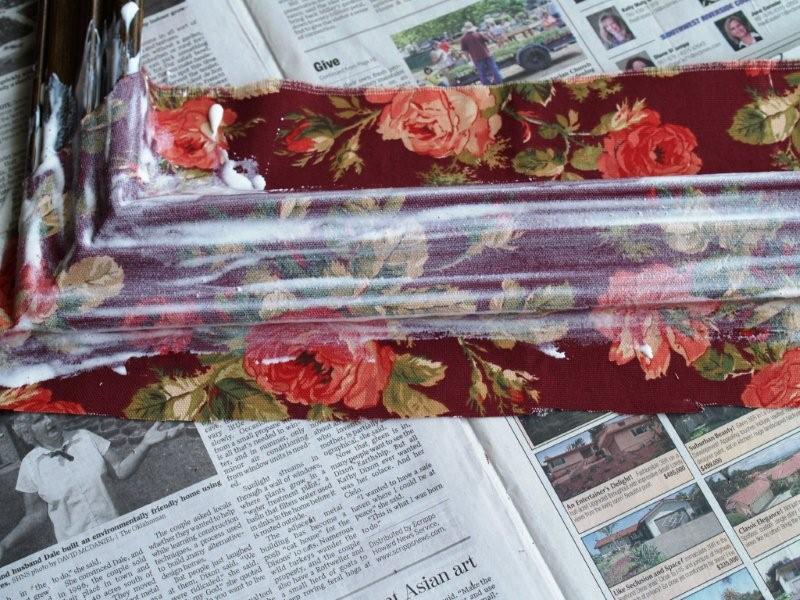
Cut a piece of fabric long enough to cover one end of the frame, with some overlap.
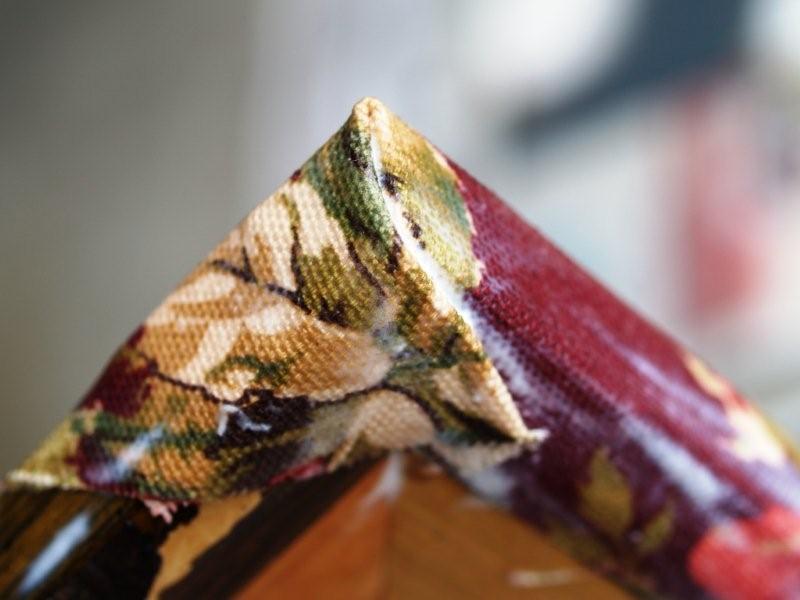
Spread the Mod Podge on the frame along the front side and a little ways up around the corners. If your frame has molding, make sure you get in all those little grooves.
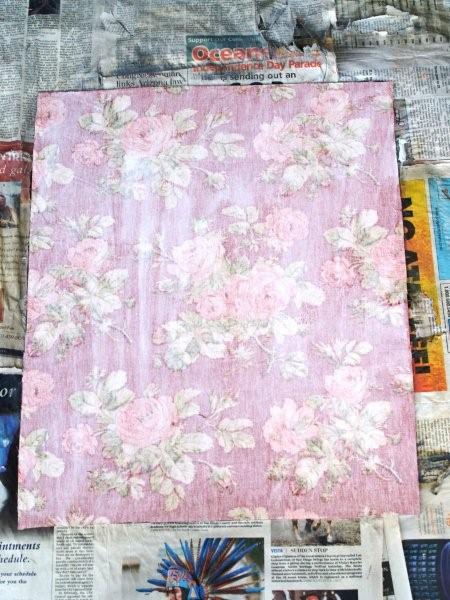
Now lay your fabric on the frame and start covering the fabric with Mod Podge.
I clipped the fabric at the inside corners so it would fold around the frame.
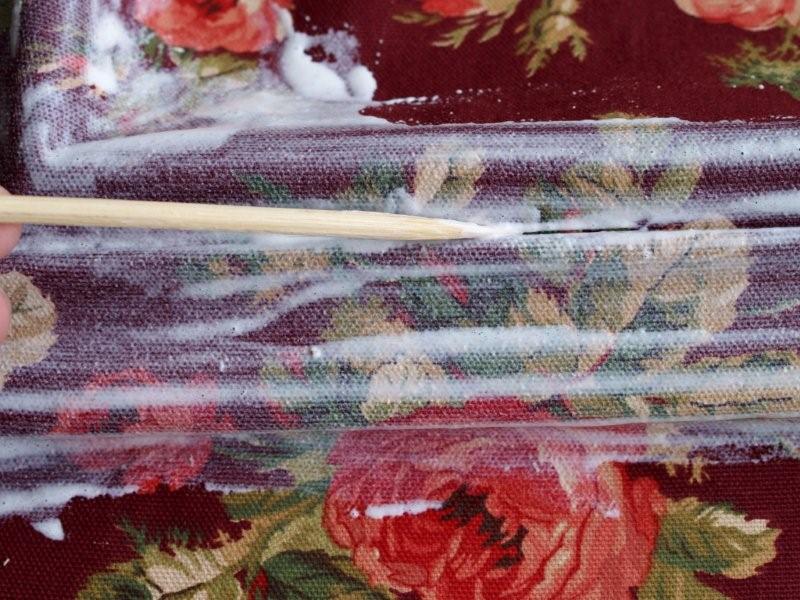
Press the fabric into the curves of the molding. Find something pointy to use in the very small grooves if you have them. I used a wooden skewer.
Continue covering the outside of the fabric in Mod Podge and wrap it around the back of the frame.
I got some great advice from you all when I asked for help on the corners of my Photo Canvas Wall Art – so I cut triangles out of the fabric at the corners to reduce the bulkiness and then folded the edges over.
You can do the opposite side as well at this time, then leave the frame to dry a bit. By now you should be thoroughly covered in Mod Podge. I was. ;)
Let’s go back and check on our mirror.
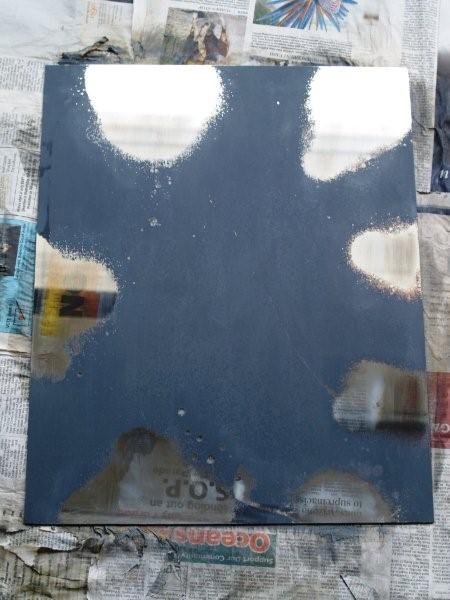
Start rubbing off the oven cleaner – the silvering should come off pretty easily. I used an old scrubby for this.
**Update** Make sure whatever you use isn’t too scratchy – you don’t want to scratch the glass.
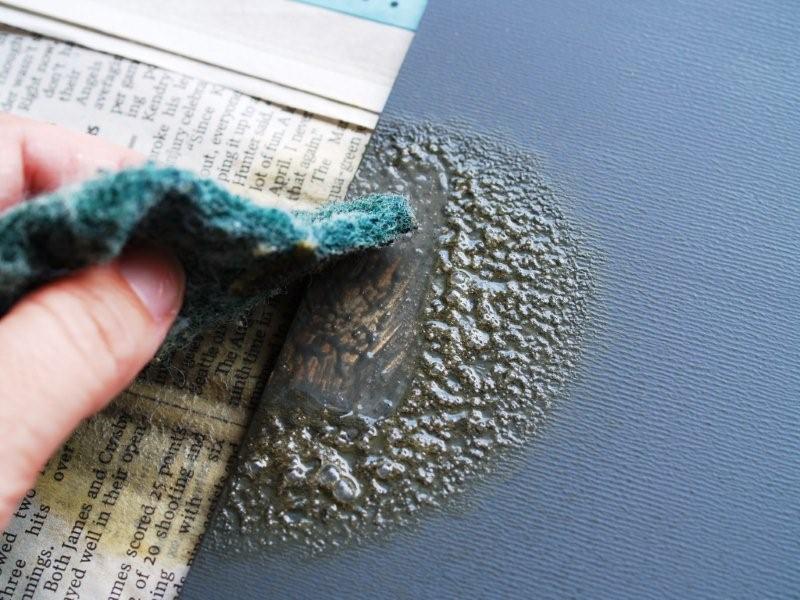
Keep scrubbing.
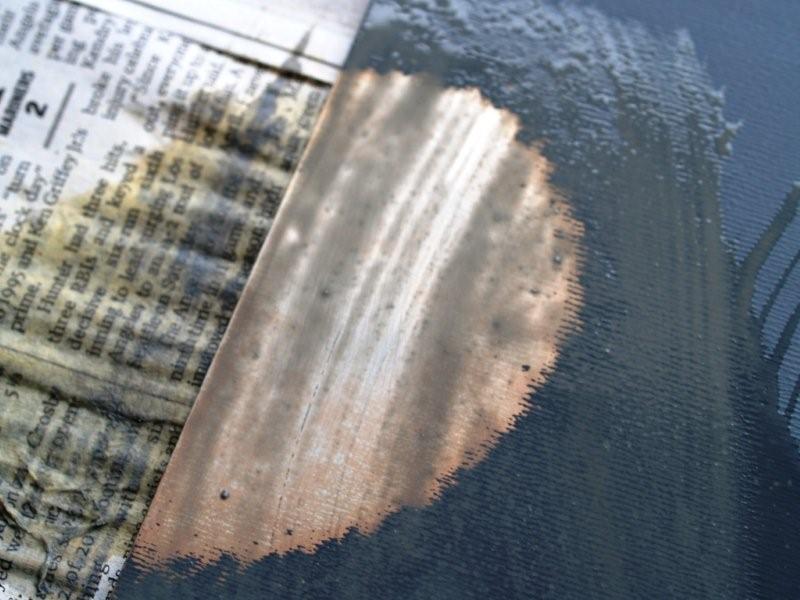
At this point the silvering should be gone, but on my mirror I still couldn’t see through it yet. I took a bit more scrubbing to get off whatever was still on there. Keep scrubbing until the mirror is as clear as you’d like.
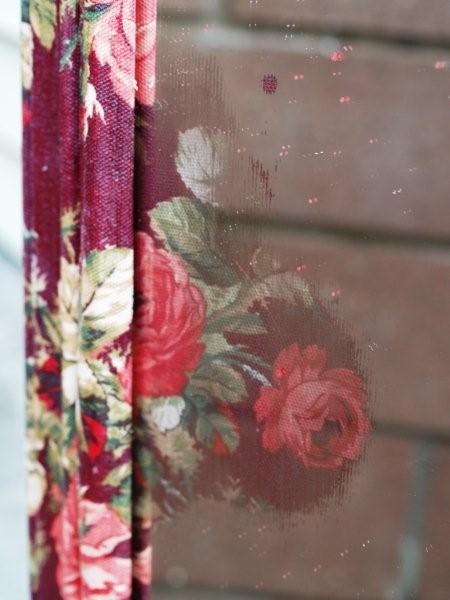
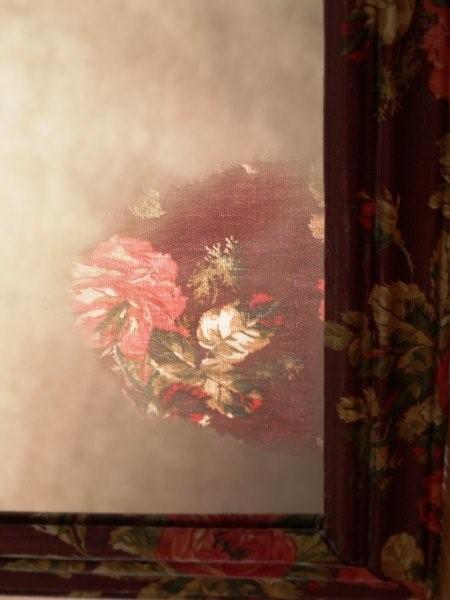
I wanted mine to be a little subtle – so that at different angles the fabric showed through lightly. I didn’t want it to be quite as clear as the Anthro version. (The beauty of making it ourselves – we get it the way we want it. haha)
Now that your test spray and removal has gone well, spray the rest of your mirror.
Leave that to dry a good long while. If your frame is dry, you can start the Mod Podge on the the remaining sides.
Follow the same steps as before, but at the corners of your frame, fold your fabric down so there is a fold line running from the inner corner to the outer corner. Mod Podge this all down really well. Sorry, I forgot to take a picture at this point. I probably would have stuck to the camara anyway. Did I say this stuff was messy?
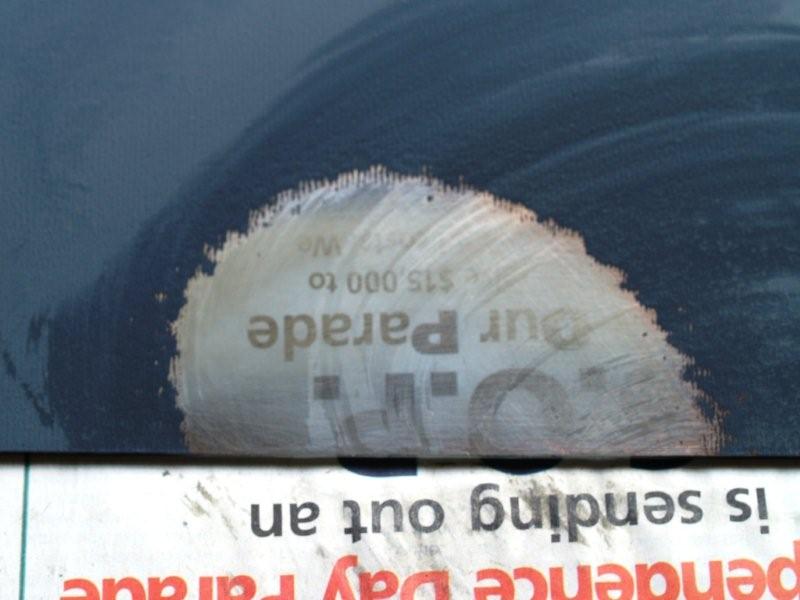
Head back to your mirror and work on all your spots. This will take a bit, just keep scrubbing until the glass is as clear as you want it.
Clean off the back of your mirror really well. It took me a couple rounds with Windex to make sure it was clean and not streaky.
Cut your fabric the size of the mirror. Lay down a light coat of Mod Podge on the back of the mirror and lay your fabric on it. Make sure there are no air bubbles. Cover the back of the fabric with Mod Podge.
Once the mirror and frame are dry you can put them back together. Clean the front side of the mirror and lay it down in the frame. If you mirror was a tight fit to begin with, you might need to cut out some of the fabric. An exacto knife works great for this.
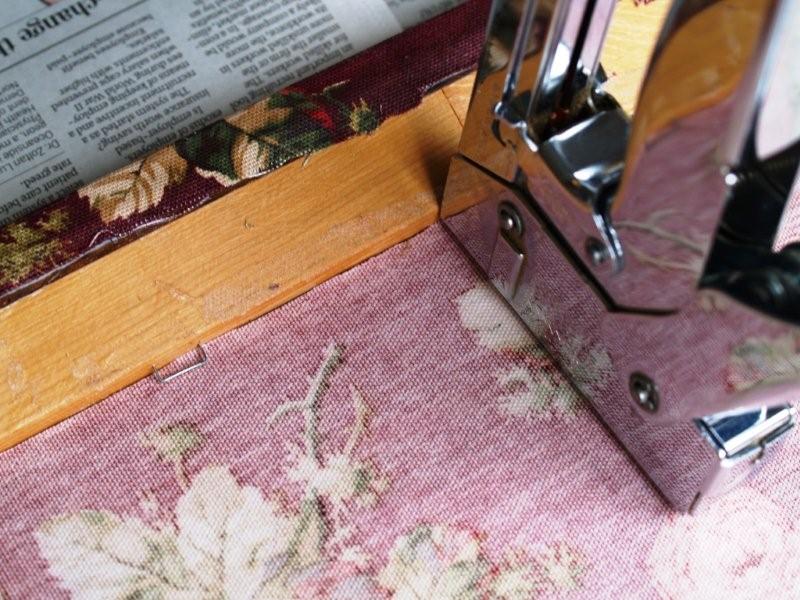
Use a staple gun to hold the mirror in place. Set your gun about a 1/4″ away from the side and staple. This will embed the staple in the frame but leave a little piece out to hold the mirror.
At this point your can put a backing on your frame if you want, and reattach your hardware if there was any. And you’re done!
Here are some of my picture attempts. :)
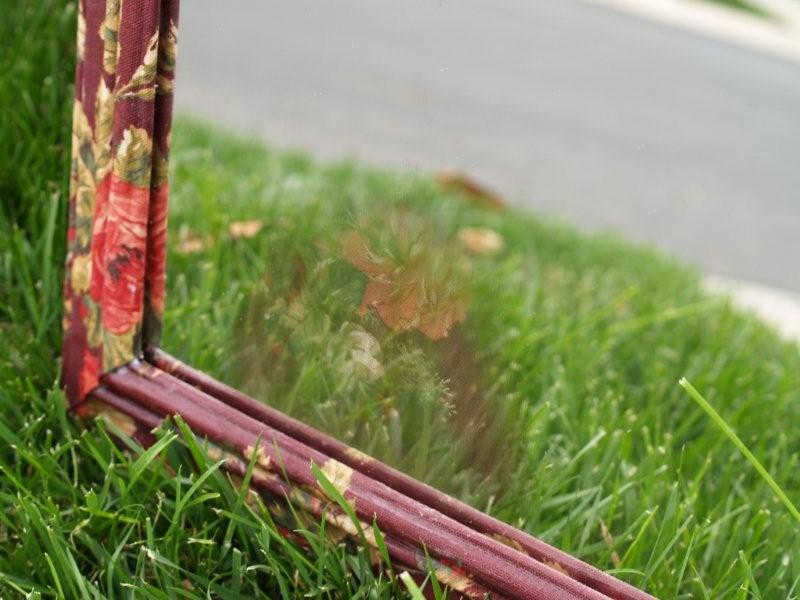

(You can see the frame well in this one but not the mirror so much.)
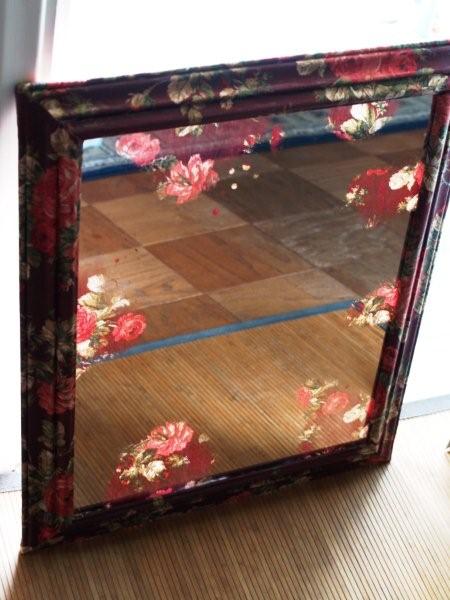
(This one you can see the mirror really well, and my floor, haha, but not the frame so much)
I hope you can get a good idea how it turned out.
So the Anthro frame was $498. Everything I used came from my stash except the frame. So technically I only spent $1.95. But even if you had to buy the materials – you’re probably only looking at $15-$20. Waaaaay better than $498. :) That makes me smile.
A successful first Mod Podge project! woohoo! I’m now an official Mod Podge convert.
I’d love to hear what you think.


Totally ~ Completely ~ Absolutely AH-MAZING!!! I love it and can’t wait to do one myself. Thanks so much for sharing!!!
Are you freaking kidding me!!! LOVE LOVE LOVE!
What a great job! I am really impressed. I may have to try this. I might tea stain the fabric to go with some other stuff I have.
Thanks for sharing!!
LL
Love this project! It is lovely. You are so clever. This will be on my list for sure.
looks great! im saving this tutorial!
thanks!
Wow, I really like how you put the fabric on to the frame, good job! :)
Get OUT! Is there anything you can’t do? This is awesome. Keep the Anthro knock-offs coming! :-)
you did an amazing job- absolutely beautiful. And it beats insane Anthropologie prices any day! Thanks for the inspiration! I shall be a new follower!
My daughter and I had already decided to “hack” this Anthro piece…thanks for the tutorial!!!
Great tutorial! I love anything that is reminiscent of Anthro!
that is so cool!!!
That is so cool!!!!!!
Your mirror is beautiful! Great job, I like your version better than the Anthro one! ~Marcy
What an amazing transformation! You are so clever!
A great make over and great savings. You are good girl! LOL I love Modeg Pod. I hadn’t used it in years. I use it on my boxes. Great stuff isn’t it.
Super duper terrific!!!
This is a great idea, I want to do something similer for my guest room. Thanks so much for the idea!
What a great way to re-use an old ugly mirror. I’ve been reading your blog for a while now and I’m enjoying it greatly.
I’m putting together some posts for while I’m on vacation next week and your blog and this post are going to be one I feature. Would you possibly send me a picture to use?
Amber
How sweet is that? I would love it! Thanks Amber. :)
That is an amazing DIY!! I love it!
AWESOME!!! You did a great job. I think I like yours better than the Anthro version!
Great idea! I like it very much. Remind me to discuss an idea with u later. K?
Great tutorial. I will have to try that. I connected with you through my sister’s blog Red Couch Recipes. She just got me started. I actually visited you because of your darling name! So cute. We will have to have an Anthopologie day and make several of these. Thanks for the detail you put into your tutorial.
I think this is my new favorite blog! What an awesome mirror!! Now, I will have to add that to my list as well!! Thanks for dropping by my blog today.
What a cool idea. I love the fabric under the mirror.
You did a great job!
Thanks for sharing @ Anything Related No.11!
{Rebekah}
soo awesome! i love this!
BEAUTIFUL AND VERY CREATIVE PROJECT. THE FABRIC IS A PERFECT CHOICE. LOVE IT-MUST TRY IT!
I love it!! You are so talented.
love it!
One word…AWESOME!!! I love it.
Oh my goodness – Love Love Love! Simply gorgeous and the mirror technique is fabulous! Like the original but yours is beautiful! Fantastic job! Thanks so much for joining The Sunday Showcase. I greatly appreciate it! Hope you have a wonderul week! ~ Stephanie Lynn
You did a FANTASTIC job! I actually like yours better. I have to try this…I wonder how it would look in black fabric with white flowers?..thanks!!!
Hi Beverly – I’ll be featuring your mirror tomorrow! Stop by and grab a featured button if you like. Thanks again for joining The Sunday Showcase! ~ Stephanie Lynn
Would love it if you would join me for my 2nd linky party going on right now!!
http://lifeinmypjs.blogspot.com/2010/06/pajama-party-2.html
~Ela
This is so beautiful! You did a great job and thanks for the tutorial on removing the silvering.
LOVE IT!!! You did an amazing job!! Thank you for sharing! I’m going to follow your blog as well! YAY!
Terrell
I love it! It looks very Anthro!
how smart are you??? I am in awe and I love that mirror too. I always wonder how people think of this stuff. Thanks for sharing the detailed tutorial. I will be trying this.
Pam
Wow – that looks SO do-able…and well worth saving the $500 for! It turned out great!
Fabulous. What an outstanding job you did. I have never seen something like this before. I admire you greatly because I am not good with things such as this. Great job!
Best regards,
Gloria
P.S. Love that fabric too! I wish I knew where to buy that for chair covering! It’s so pretty.
Wow! That’s quite a transformation. And your tutorial was great. I would love for you to link this post to my Time Travel Thursday or Tips & Tricks linky parties.
You can get the details here:
http://thebrambleberrycottage.blogspot.com/2010/06/brambleberry-cottage-linky-party.html
Each party runs for six days, so come on by!
Hope to see ya there!
Liz @ the Brambleberry Cottage
http://thebrambleberrycottage.blogspot.com/
Excellent tutorial and awesome project!!!! Thanks so much for sharing!
that is very cool. i like your fun writing style and the fabric choice is great.
xo
elyse
How beautiful. What a fabulous technique.
I am hosting a giveaway and I’d love it if you stopped by!
Laura @ along for the ride
This is amazing. I am so following you. LOVE THIS PROJECT! Please visit my blog and if you are so inspired, I invite you to follow me in return! Good luck in the contest!
Thanks for taking the time to figure out how to replicate this mirror so I don’t have to. I love this project. Thank you for sharing!
That is gorgeous! It is definitely going in my to do file. How you ever figured out how to do that is beyond me. Love it.
Oven cleaner! Who knew! Love it! I’m going to have to try this one for sure.
Really clever…the possibilities are endless…I gotta go buy a mirror, now!
i love that! i might have to try it! i have to admit i’ve never even looked at anthro’s website or a catalogue- my friend’s are always sayin’ what great stuff they have! but too expensive- this is a great alternative!
I love this idea – amazing! The possibilities are endless! I am definitely hitting the thrift stores this weekend to find at least 1 mirror. Thanks for the instructions.
Have you ever heard of Instructables? This project is a definite for them, especially with all your photos Take a look at instructables.com…In case they ask, you can give them my name…As I was looking at the step by step instructions, I was looking around to see where I could hang one like this, We don’t have a lot of wall space in Florida….mostly windows.
Laurel
I popped over to chekc this out the other day…I don;t think I left a commnet..if I did I missed it in this go around (I must sleep more).
I love this mirror and your tutorial is great. I really want to try something like this…I would never pay $500!
I have been crafting for longer than I care to admit and I only recently (in the past 7 months) used Mod Podge…I had no idea what I was missing.
Thanks for linking up!
what a great project. It is almost like magic the way the fabric peaks through like that. Thank you for sharing. I am a new follower and look forward to see more!
Oh my Gosh! I know you have a lot of great comments here about your mirror, but I had to put mine in too! I LOVE this idea. Can’t wait to try it. My husband just walked by my and I stopped him to show him what you did! AMazing. Thank you for the great tutorial too! LOVE it!
This is the coolest thing I’ve ever seen! I totally want to try it!
Great idea…love how it turned out…SO i won’t turn you into the Crafty Bloggers Association…really a virgin mod podger??? :)
I wish I could tell you how happy I am to have come across this project! I have several mirrors that are in my sorage-room, just gathering dust, and waiting to turn into something like this. I’m in the process of making over my mom’s vanity for my 18 YO, and I wasn’t sure which direction I was going to go in about a mirror. Well I do now!
I just wonder if I could make this work on a curvy framed mirror. If not, I have others.
Thanks so much for this GREAT copy-cat version! Love, love, love, it!!!
Whoa… fabric?!?! That is so creative. I love this! Thanks tons for the details, I’ll be linking.
I attempted this project last summer, using vintage wallpaper on the mirror, and leaving the frame alone. I love your version using fabric on the frame! I’m going to try it…..your tutorial is excellent too, by the way!
Wow.You did an awesome job!I love your mirror better than the anthropologie one.Thanks for the tutorial.
This is so gorgeous! I can’t believe how great that fabric looks on the frame itself – and the little glass peekaboos are beautiful & look so vintage. Thanks for showing us your process! Off to snoop around the rest of your blog…
this is fantastic! i am bookmarking this – i’ve been looking for a good mirror project.
What a brillant anthro-inspired idea !!! Thank you for sharing. Clarice
Gorgeous!! Can you imagine the type of fun mirror things you could do with this technique for Halloween?:) I think I have to pilfer your amazing technique. Thanks bunches for the how-to and the what-not-to-do’s.:O)
Hi- I loved seeing this guest tutorial on Remodelaholic because I had been wanting to do a project like this. Previously I thought I’d have to use paint thinner and acetone and it seemed messy. Well, I tried it…and it didn’t work for me. Would you mind looking at my blog post about this and helping me figure out what went wrong? Thank you!
I am really loving this idea and hope to make one in the near future….I just have to find more space in my house for another mirror.
oh, and can I link this to my blog?
The mirror turned out great and thanks for the tutorial using the oven cleaner. I now have a new project to tackle.
Ummmm, you are totally amazing. I have always wondered if you could mod podge fabric, and just never gotten around to trying it. You rock, nice to meet you :).
Awesome tutorial. I’ve stopped by your blog a lot lately..great ideas! By the way love Mitzi’s blog, too:)
Omigosh, if I loved this any more I’d have to marry it!
Wonderful project and fantastic execution! Thanks for sharing it with us.
I love this! What a cool idea.
ABSOLUTELY LOVE THIS! I’m going thrift shop scouring today so I can give this a try!
you know when I go to craft fairs or see things for sale that are really expensive I always say to myself I can make that. I love you’re mirror idea. great job! I love crafting and finding new ideas.
I absolutely love this. Definitely going to go try this.
MOD PODGE! I love that stuff. Thanks for the great ideas!
WoW! your version looks WAYY better than the original one ( the blue one) .. Good JOB!!! — you’ve totally inpired me!
I have always been interested in Mod Podge since I read about it a lot on. Unfortunately, I have no idea where to get that in my area. Anyway, your mirror is really beautiful!
you can get it at walmart in the craft area…thats where i got mine
Christian jewelry-makers interested in consigning or selling some pieces for our online store, please visit the site and contact us.
شكرا- هذا شيء جميل واÙكار رائعة اتمنى لك مزيد من التطور
Hello,
I really love this idea. I am wondering if you can give me any tips. Every month I have a craft day with girlfriends and this was our craft last month. However the oven cleaner didn’t work for any of us. There were five of us and all of our mirrors were different but the oven cleaner didn’t take of the backing. I’ve seen several tutorials that say to use oven cleaner but I feel like I am missing something! Can you think of a reason why it may not be working for us? Thanks for your help!
Here’s the address for the website I mentioned…..http://www.instructables.com/id/
So beautiful. BRAVO
That is just excellent! And I like yours better then the $499 one. I am so going to try this. But I am thinking of doing a smaller type mirror. Why not?! And my fear of mod podge may also be broken. (-;
I love this!! Now I know what I’m going to do with one of the Goodwill mirrors I have stashed in the garage!! $498 indeed!!! Thanks for sharing!
You are so very clever!
Hey there!
Wanted to say i LOVE your site. I run a blog about thrift shopping and I really wanted to feature this project on there. I didnt know where I could e-mail you so sorry i left this as a comment! I would of course give you full credit and I will tag your blog on my links list. Let me know!
[email protected]
thanks and keep up the awesome work!
Tierneymarie
I like your a LOT better!
wow, this is fabulous, I would never have guessed that you used fabric to cover the frame,
it looked kinda hand-painted I thought maybe even patterned paper because you got the crisp lines so neatly
I think you did a great job
hats off to you x
God bless you from England
Crafteresa
Wowza! As Isa would say…I’m not sure how you find time to do all these amazing projects, but I am WAY impressed!
I am going to try this with an old mirror I got nearly 40 years ago as a wedding gift. But I am going to try to remove the silver backing with window cleaner! My daughter used window cleaner on the bathroom mirror and got some under the edges of the mirror and the silvering came right off in just a few minutes.
It never hurts to experiment and window cleaner smells better.
thanks for the great photos and a wonderful idea.
IM in love, this is is just gorgeous
o.m.g. for some reason I wasn’t paying attention properly and I got to the end of the tutorial and I realized the oven cleaner had turn to mirror into clear glass. I clapped happily like a child! Surprise. ;-) This is amazing I like just the fabric covered frame too….
This is absolutely beautiful! I can’t wait to make one~thanks so much:)
http://vintagerevivals.blogspot.com/2011/04/amazing-acid-mirror.html
this is a link to a similar crafty mirror. this one didn’t use oven spray but something called muriatic acid available at home depot type places. it also says not to use a mirror older than the 80’s. hope this helps for the people who complained the oven cleaner didn’t work. I think old photographs might be interesting instead of fabric behind the mirror.
Just a note muriatic acid is VERY caustic-so use with EXTREME caution.
I “stumbledupon” this, and I have to say that this is a really beautiful project! I know now what my friends and family may be getting for gifts this year! My best friends daughter is graduating from high school,and with the right fabric this is going to be an awesome gift! Thank you so very much for posting this!!
Love this so much and I have the perfect mirror to do this with.
when you mod podge the back of the mirror do you go over the places that are now just glass as well, or do you work around them???
this is awesome! — definitely my next summer project.
Just for everyone’s benefit, here’s a link to homemade Mod Podge! SO EASY! I haven’t had a chance to use it yet, but all the comments SWEAR by it! http://sunnyslifeinrehab.blogspot.com/2010/08/homemade-decoupage-medium.html
This is such a GREAT project. I’ll be making this ASAP-just need to f ind a frame. I love how detailed and well explained your tutorial is-very easy to follow and VERY inspiring.
Thanks,
Sonja Doyle
Regina, Sk
Canada
I LOOOVE THIS! I stumbled here a while and I’ve been meaning to try it. I finally did!
http://www.facebook.com/media/set/?set=a.10150714362755360.704715.748320359&l=607cb0d310&type=1
Here’s a link to my version. As you can see, I sort of broke the mirror getting it out of the frame, but I like my crafty solution to the problem!
Wow,that is really cool.il ovethe way yours turned out.
Hey thanks! This will be my next project after my current old window project. Oh, and mod podge is just elmers glue and water. about a 2:1 ratio, but I’m never precise with it.
Hey, I really like this. I too have never used mod podge. I’m going to give them both a try! Thanks for your great tutorial. Keep em coming. x
I love this! I actually think I love your version more than the Anthro one. Definitely gonna give this a try, being the mod podge addict that I am! Thanks for posting!
OK THIS IS AMAZING MIRROR, I can get more idea from this post.
Thank you so much Beverly
I love this!! This is exactly what I need for my new bedroom! And I’ll definitely be sharing this with my friends! Thanks for sharing!! :D
Quick question though! Does the frame need to be wood? Because my local thrift store has one with a sort of fake wood paneling on it. Do you think that would work?
I love this , so creative and decorative for home entrance …… thanks so much
WOWWWWWWWWW!!!!! Congrats, not only you made it cheaper, but way better nice looking them the Antropology version. Thanks for taking time to take the pics and share with us…
Warm regards all the way form Brasil
*Ü*
Thank you, I really love this!!
Mark
My mirror had paint over the silvering to protect it, I think just like the one you used. What I found to be easier was to daub on paint stripper (not thinner, STRIPPER) using a sponge brush in the areas where I wanted to remove the silvering. I could get a lot more control with the sponge brush, too, which was a bonus. After about 5-10 minutes, I scraped off the stripper with a putty knife, and it took the paint right off. I was careful to daub on in a rounded, random pattern so I didn’t get a lot of straight lines. Once the paint was removed, I used the oven cleaner on the exposed areas to remove the silvering, which for some reason the stripper didn’t touch. The rest of the back was still protected by the paint, so I didn’t need to be careful not to overspray or overscrub the oven cleaner – the scrubbing only took it off from the areas where I’d already stripped the paint. I found this to be much easier and much less time consuming.
Wow, that is absolutely amazing! I might just have to do this sometime..
I am so glad my daughter turned me on to Pinterest & I found you! I got a mirror like this a year ago & haven’t done anything to it yet…. THIS will work! Thank you soooooo much for sharing & all the details!
brilliant and beautiful!! I’ve shared your post here: http://dollarstoremom.com/2012/02/pinterest-picks-27/
Thank you!
I finished this project today and I really like it! I have to say it was quite messy and tedious, but the result was worth it. I had NO luck with oven cleaner though. I ended up buying spray on paint stripper, which worked well, but still required alot of scrubbing, which I did with steel wool. I used an oval frame, which is very pretty.
I tried the oven cleaner, but could not get the silver layer off of the glass and was getting very discouraged, so I tried liquid toilet cleaner. I put about a quarter sized amount on back of mirror, used a q-tip to spread to desired area, silvering came off immediately, wiped with wet rag to nuetralize cleaner and was done. I love the mirror, and plan on making another one for a gift
This looks FANTASTIC!!! I’m going to try this with a huge mirror and B&W pictures of my son in the middle of the glass, with mirror remaining around him. Hope it turns out as good as I think it can!
I love it! Great job!!!
This is so great! I’ll do this as soon as I found the suitable “incredients”. I really love that you can see the fabric through the mirror.
Love it. Can’t wait to try it.
What a great idea! This is gorgeous, I love it!
I’m in love with this one! Thank you so much! It’d be great with some pastel/floral fabric too :)
Ooooh why are there so many beautiful diy projects around? There’s no way I’ll ever catch up with my to-do list!
Freg. Fregen great idea I have old mirrors that already miss some backing I was going to throw them away cause they were no use anymore, But by doing this it makes it look like a picture, and I can make some to put on steaks and plaint them in my flower garden. again, you’ve save the day, Thank you for your great idea,
AWESOME! I actually like yours better.
This is gorgeous! I totally want to make one for my room now! Thanks for the awesome tutorial, $15 is SO MUCH BETTER than $500!! This sounds like a fun summertime craft :)
http://www.simplysoftbabyloft.etsy.com
Awesome tutorial! I’m always the girl who would rather make something than pay 500 dollars for it! Thanks for sharing!!!
I love this tutorial. Loved it sooo much I actually did my own. It didn’t turn out as nearly as pretty as yours, but I still liked enough to hang it in my hallway. I hope you’ll stop by and check it out! Love from Whimsically Homemade!
oh so delighted I stumbled across this :D thank you so much most definitely my next project!
What a fabulous idea! Thanks for sharing.
interesting indeed….
but when to try it :(
I did my mod podge on my frame; the easy off oven cleaner did not work to remove the silvering on the back of my mirror- I did not have an old mirror maybe that had something to do with it…what to use? I googled it and it says to use Muriatic acid- here is where I got my information http://www.ehow.com/how_5668801_remove-grey-backing-mirrors.html . Hope it works as my frame is beautiful.
I found that Heavy-duty semi paste paint stripper worked to remove the silvering on the back of my mirror. The muriatic acid was only sold in a gallon container; not what I wanted!
My mirrored project is complete. i love it! I might try another one!
Thanks for sharing.
it looks pretty easy i will try it mybe it will my room a vintage look. thanx so much:)
http://ww.galydichterstyling.com
it looks pretty easy i will try it mybe it will my room a vintage look. thanx so much:)
http://www.galydichterstyling.com
Okay, that is pretty cool. It took me a moment to realize how the visual effect was created.
I can’t believe you’ve never used Mod Podge before! I’ve been using it since I was a baby. Okay, not really but since I was like 8. I’m glad you’re using it and enjoying it. :) I loved this project. I’ll have to try it!
One of my favorite things — Taking a ridiculously expensive item and running with the idea to DIY for a pittance!!! Great
results! Kudos!!!
What an idea its just amazing. I wanted to make something for my sis-in-laws wedding anniversary and I’m glad i landed here.
So cute! I love Anthropologie, too, but I think everything is ridiculously overpriced. If only I could quit my job and craft/blog/write/sew/cook full time.
Beautiful. What a great idea and great tutorial. Thank you.
Hey, this is beautiful! I am wondering, does this work with paper? Will paper transfer onto mirror? Thanks!
I think you could definitely use paper on the back! Wrapping it around the frame might be a little tougher – it probably depends on how grooved your frame is.
Incredible. For that $500 you could make more way more than say 10 of them – figuring it might be hard to find more starters for just $1.95- but still, some wiggleroom on your expense — sell them for minimum of $100 each and CLEAN UP! Lots more mod-podge for you! haha! LOVE it.
Absolutely beautiful. I purchased two big, ugly, plastic framed mirrors at the local thrift store and one mirror already has parts that could use a beautiful fabric backing.
Thank you so much for sharing your creativity.
Beautiful! I have an old mirror in the garage just waiting for me to attempt this project, wish me luck Thank you for sharing this x
Nice. I saw one done with old photos. They had only used steel wool to take away enough silver backing to make the photo look like a memory. Never pay retail prices for something you can do a better job on ~ not to mention cheaper cost you did a great job.
I cannot wait to make this mirror for our guest bath. All I need now is someone with just a tad of Easy Off since I have a self cleaning oven and don’t need a whole can.
Yours is even more amazing than the brand new one you found online! Fantastic idea I can’t wait to try it out :)
I like yours much better than the anthropologie one! Beautiful!
I’ve seen this done using acid, but I like using oven cleaner so much better. A little more household and kid friendly. I might give this a shot. You do have to be careful using older mirrors though, because older ones were made using mercury. I believe it’s on mirrors made prior to 1940 or so.
would this work with heavy paper? I had an idea of using old maps, or wrapping paper.
It would definitely work for the backing on the mirror. I think you might be able to do it on the frame too, if your frame is pretty simple. If your frame is very detailed or has deep grooves, you might have trouble getting the paper into those spots, but otherwise it should work.
I’d love to see a photo if you give it a try!!
I can’t wait to try this. I lovvvvvvvvvvvvvvvvvvve mirrors and this is a fantastic tutorial. Thank you for sharing!!!!!!!!!!!!
Fantastic!! Thank you for posting :-)
~Thank you ~ For all your posts. That Mod Pod. As we call her here at my house little ol Trussville, al.
Fantastic tutorial!
It looks beautiful :D
Great idea and instructions! I just completed my version today.
That’s awesome, Bev!
I am absolutely sure that I will try this someday!
Looks amazing! What kind of Mod Podge did you use?
This is beautiful. I have 2 questions.1)When you put the mod podge on the back of the mirror ,won’t it show through the glass on the parts that you want to see or do you not put modge podge on those parts and only on the rest? 2) On the last step, why do you put modge podge on the back of the fabric after you’ve put it on the mirror? Thanks ,Regina
I bought spray mod podge. Will that work as well as the past???
Vicki, I’ve never used spray mod podge before! I would think it would work just as well on the back of the mirror, not sure about the frame. I think it would depend on how detailed your frame is and if you have enough mod podge to stick the fabric in your grooves and details. It’s definitely worth a try though! :)
Ok so I bought the Walmart brand of the easy oven cleaner. Tried my test spot and after 30 minutes nothing comes off. You think it’s because of the off brand or the mirror?
Im having an issue too! Everything was going fine until after the dark layers on the back came off…then it just looked like a doubke sided mirror, n that wouldnt come off!!! Maybe its the mirror?
This vintage inspired DIY mirror idea is really very cool. I like cloth color and pattern you have used as this is going to team up easily with all sort of backgrounds.
i was looking for my first spring project for a newly redecorated living room. i’m not looking any longer!! what a great idea and kudos for the H U G E savings. can’t wait to get started. now if mother Nature would just cooperate. :(
fab tutorial! very impressed! I am an old mod pdge girl! but this looks like a huge project! congrats!
Brilliant! Great Tutorial Wonderful Sense of Humor. Bravo.
That’s a great knockoff! I love the idea of doing a fabric frame–it looks great =D
http://familyfocusblog.com
nice tutorial! lovely results!
xo
elyse
Hi, I loved this mirror so I thought I’d revamp my old mirror. I brought a cheap duvet and as like you, this was my first encounter with mod podge. The frame was a bit fiddly but managed it ok, but I’m not going to lie, it was a nightmare removing the back of the mirror but I got there in the end and I absolutely love it. I loved it so much that I covered photo frames too. Thanks for inspiring me
So i tried doing this…. and the only problem was that the dark layers on the back came off, just not the rest of it. Like, it looked like a double sided mirror. No matter how many times i sprayed and left it to sit, or scrubbed, it wouldnt come off. What do i do? How can i get it off now? So frustrating!
Hi Sarah,
I’ve run into this a few times as well. Unfortunately, it seems like mirror backing is widely different. On some I really had to scrub, like with a dish scrubbie. You have to watch that a little, as it can scratch the glass as well. I know there are some more potent chemicals out there that others have used but I haven’t tried those, I was a little worried about anything too strong. Sorry I’m not more help!
That is really impressive as I have never seen a mirror like that. Excellent job.