I have been dying to make/buy a photo canvas for quite some time. My dad has a beautiful one, with a photo of a Hibiscus flower. It’s amazing. And I’ve seen great options around blog land too, but I just wasn’t sure quite what I wanted to do. The photo canvases can be pretty expensive – usually over $100 I think.
But then I found something wonderful at Office Depot. Want to see what I did with it?

Pretty fun right? It’s so hard to tell what the texture of the images are, but here’s what I found at the store.
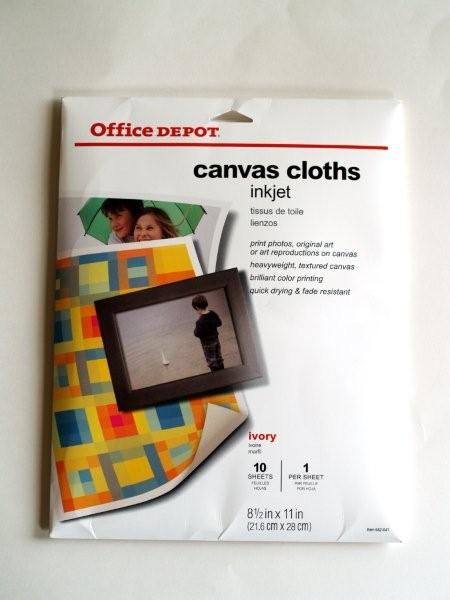
That’s right, printable canvas paper. Seriously? Has this stuff been around for a while? If it has, don’t tell me. I am enjoying my little discovery. :) I was so tickled when I saw it, I snatched it right up.
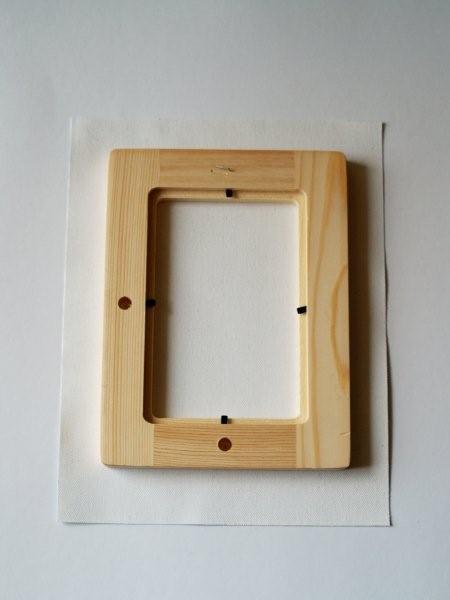
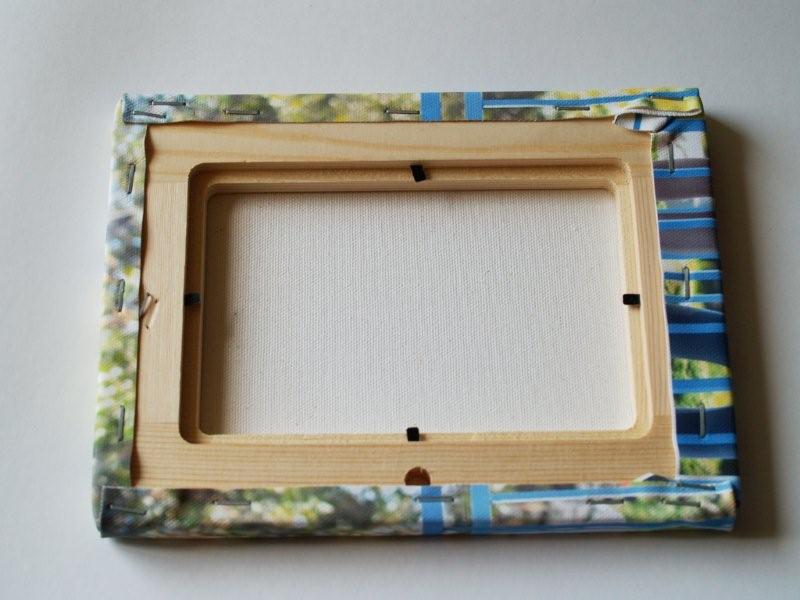
Once I had the paper, I knew I needed something to stretch it around. I checked in the art section of Michael’s for canvas stretcher wood (I don’t know what the actual term for this is) but there wasn’t any small enough for my paper. But in my searching, I found this:
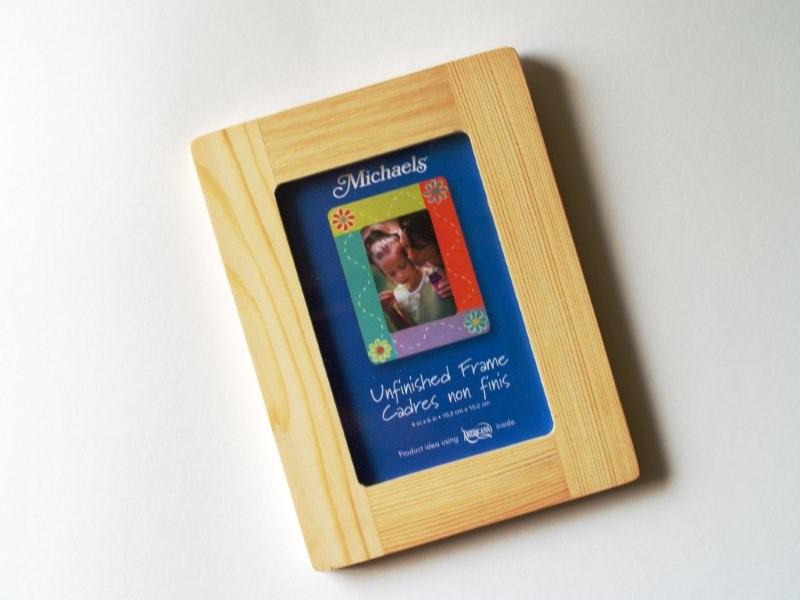
Michael’s has these little wooden frames for $1 right now. And they are the perfect size! Woo hoo! :) Now we’re in business.
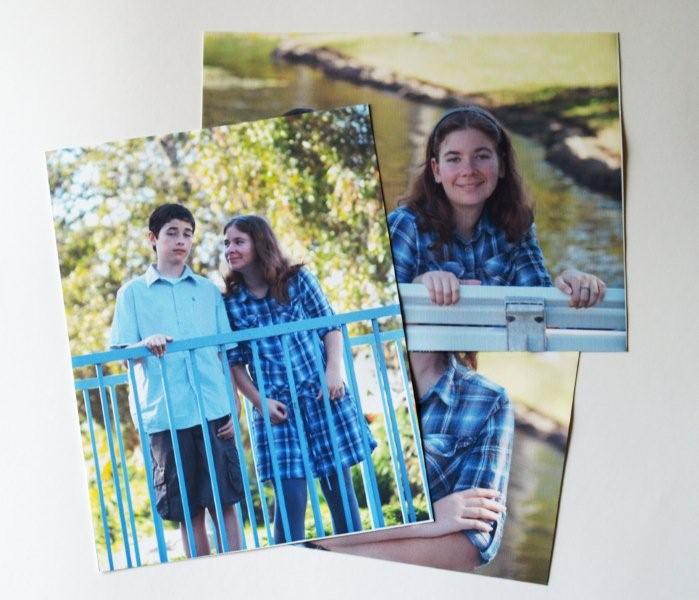
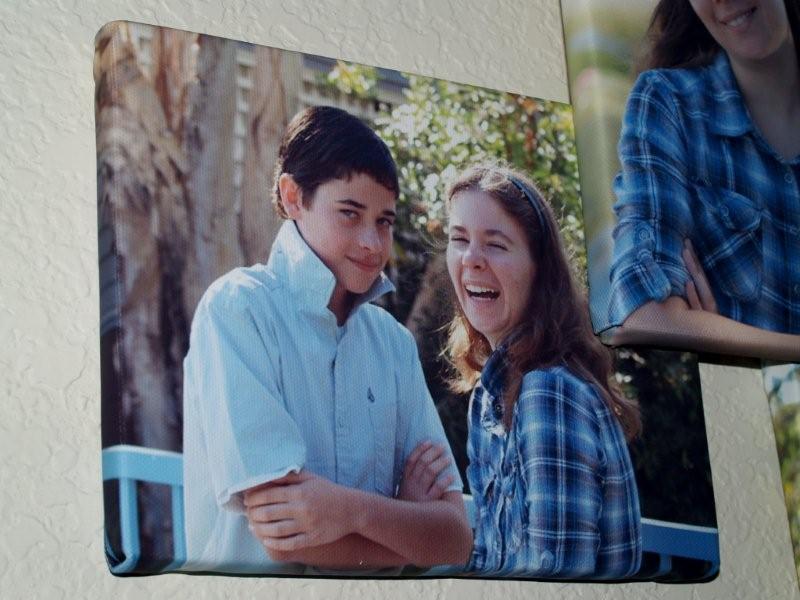
I had a ton of photos that I had taken of the kids around Christmas time that I’ve been wanting to use in some way for a long time. Some of them are sweet, and some are pretty goofy. My kids are monkeys. Obviously.
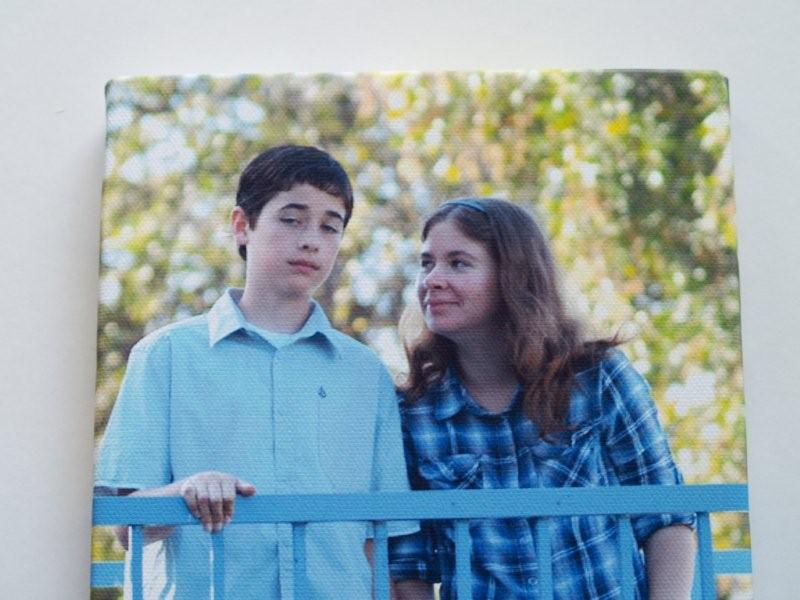
I printed out each of the images at the draft setting, just to make sure they’d wrap around the canvas well and not lose any important part of the photo.
Then I printed each image out on the canvas paper.
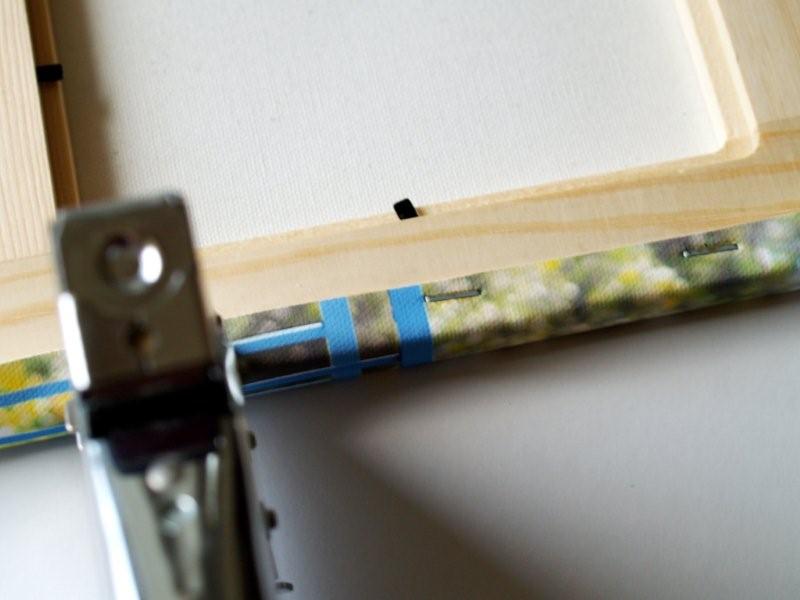
Once they were all printed, I laid them out, one at a time, and put a frame in the center.
I started stapling around the sides, leaving the corners free.
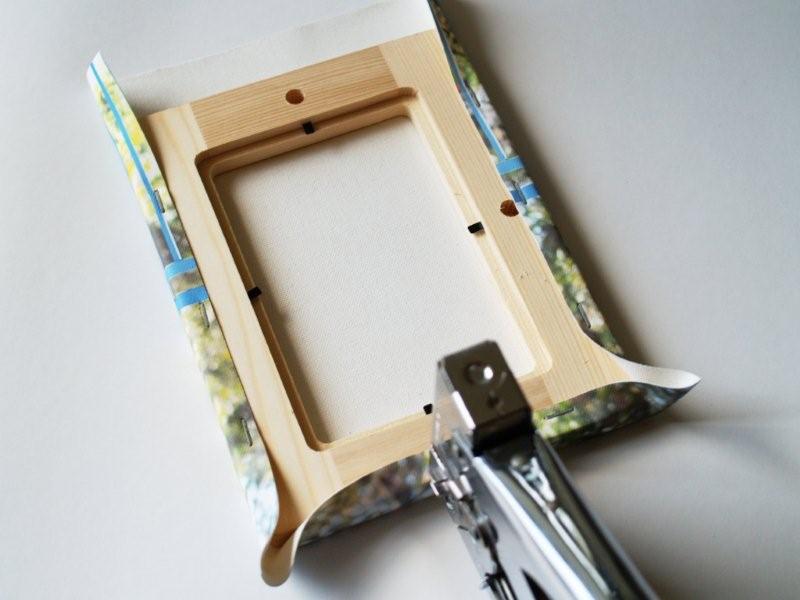
Once the sides were stapled, then I worked on the corners, folding the sides down and stapling more.
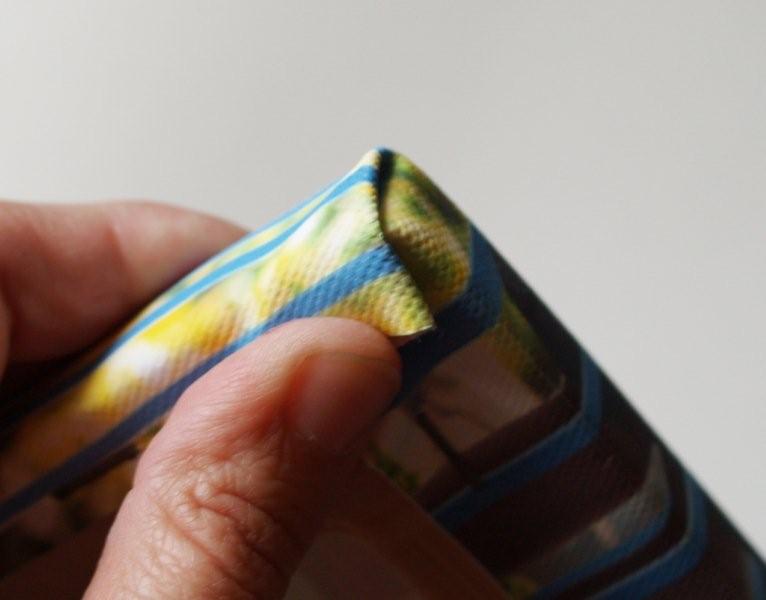
I wasn’t as happy with this part of it. They didn’t lay quite as flat as I was hoping they would. If you have a technique or suggestion, I’d love to hear it.
Once the corners were all done, we had a finished canvas!
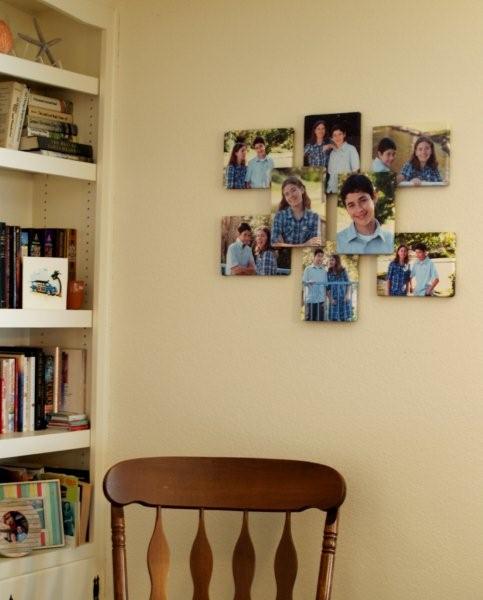
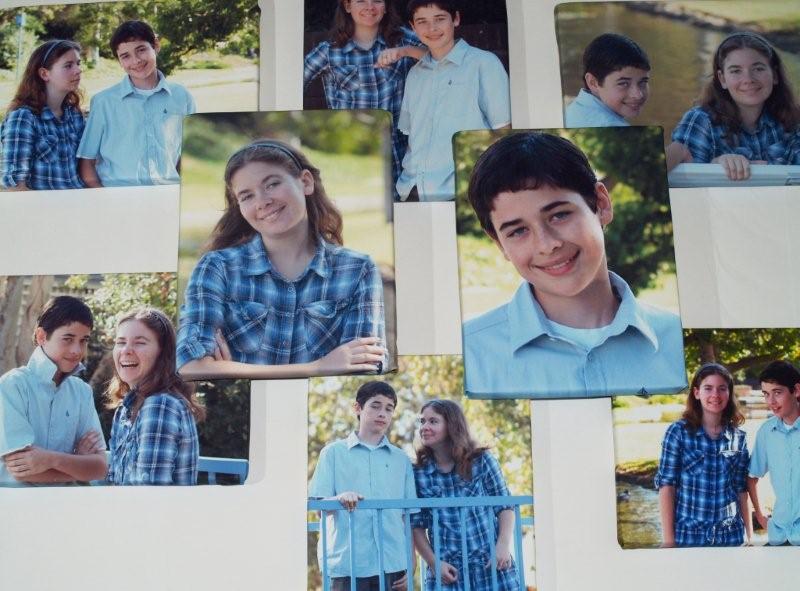
I just repeated these steps for all the canvases. I then laid them out to try different placements.
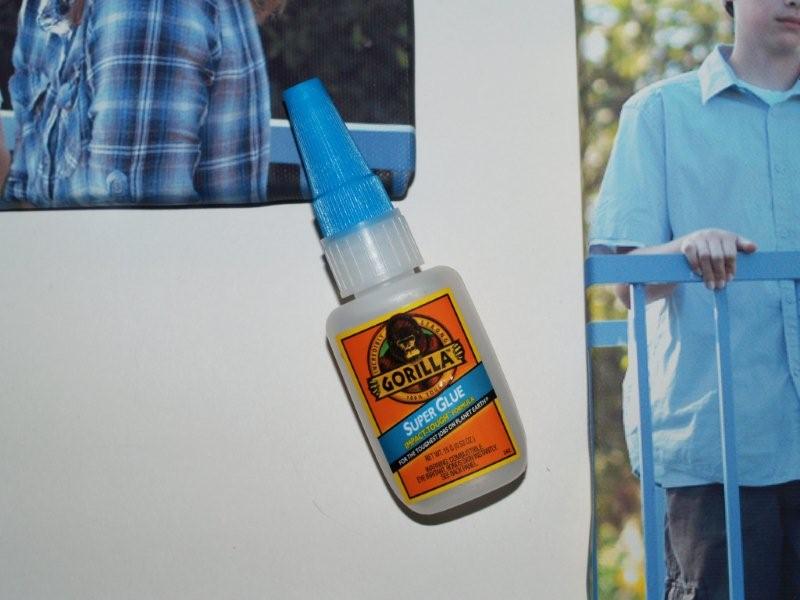
Once there were all set up the way I liked, I used my handy dandy Gorilla Glue to glue the top two canvases onto the bottom ones. This worked really well. They are stuck on tightly. I let it dry overnight so it would be good and set before I hung it up.
I put several nails up, one under each bottom frame.
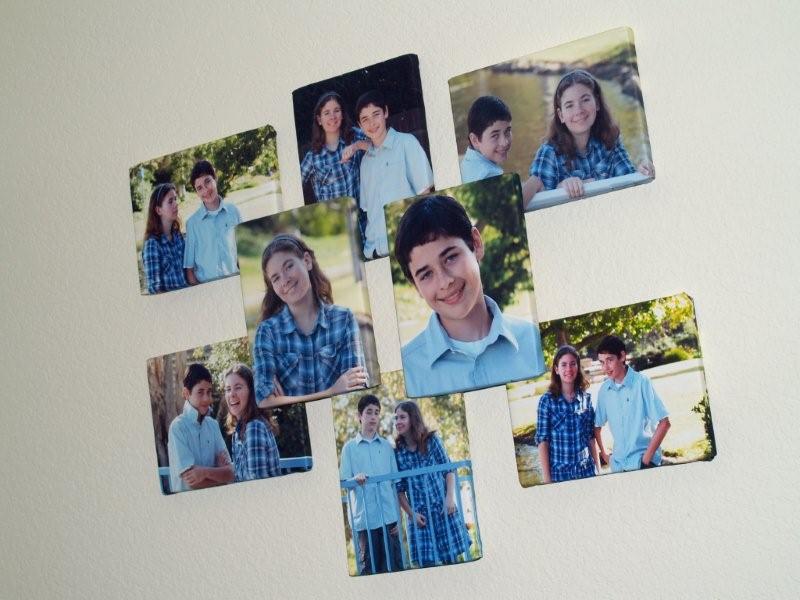
I really love how it turned out! I know those large canvases are great, but they’re only one picture and I would have had a hard time choosing only one. :) This way I get a bunch. And the canvas paper looks so great. It printed up easily, never got stuck in my printer, and was dry immediately.
Here’s a picture so you can see perspective on the wall.
One more photo for you. . .
So my photo canvas adventure ended up costing me around $18. ($10 for the canvas paper and $8 for the frames). Not too shabby huh?
What do you think? Has anyone done anything similar?


Fun! That’s a great idea! I had no idea about the canvas paper ;-)
What a great idea and your project is GORGEOUS! Canvas printer sheets? I have to go get some RIGHT NOW! I have lots of paintings I’d love to print on canvas, man, my brain is humming now. Thanks!
This is such a wonderful idea! My parents and my in-laws 40th wedding anniversaries are in 2011. I think I may make a collage like this for them!
That is a fabulous idea! I will have to see if there is anything like that here. :)
Bev,
What a great project! I’ve never seen paper like that before. I may have to buy some this weekend :) Thanks for the idea.
What a great idea! I’m definitely going to have to remember this one.
Beautiful! I knew about this stuff but hadn’t seen it in action. You can print straight onto regular fabric also, but I haven’t found a way to make that colorfast yet. Looks like this stuff is the way to go!
That is so great! I have never seen the canvas photo paper before. Great idea & good job using the frames too!
Never heard of canvas paper but you can bet your bitty I’ll be finding me some soon!!! I can’t wait to do something similar at my house!!! So clever!!
I LOVE this idea! I will be dong this (if my Office Depot has the paper) for my 4 kiddos.
Oh, and thanks for the comment on my button necklaces…I’m new to this blogging thing so it excites me when I get comments! :-)
WOW!!! That looks really amazing!! I have never seen the canvas “paper”–I will have to look for it! I just love how you placed them all together, and on top of each other.
Thanks for such a wonderful idea!
Wow!! These are fantastic!! I love them. Bookmarking for future project. Great find =)
Hi Beverly,
Thank you for visiting my blog. I’m returning the visit! :-) I did not know that these canvases existed! Thank you for sharing them. I have an idea for how to use them already. I’ve been wanting to print some of my son’s bird pictures and modge podge them onto canvas. I think I will try this instead! Yours turned out awesome!
I am your newest follower…I don’t want to miss any more of your ideas!
Sharon
I didn’t know about that printable canvas paper either! the project is fabulous!
What a wonderful idea … got my brain a-churning! TFS!
Holly, hollyberryelf.blogspot.com
This is a very impressive project. Do you have a particularly good printer that you use? Turned out great
LOVE it! I had no idea they had printable canvas cloth. I’m going to go get some RIGHT NOW! SO fun, and it turned out great!
Whoa… I love this! What a great idea! Thanks so much for the great idea, I’ll be linking.
Beverly I love this! I had no idea they sold such a thing! Fabulous job! {you should enter this in the DIY Club Competition} So creative! I be featuring this today! Stop by and grab a featured button if you like. Thanks again for linking to The Sunday Showcase! ~ Stephanie Lynn
I am diggin that! Love the prica and the visual impact is worth way more!!!
Oh my gosh, I just bought 2 canvases from a company and I wish I saw this first! I didn’t know that stuff existed! I’m definitely going to be doing this!
So cute!! Love the canvas paper idea. We must have been separated at birth, I plan on blogging tomorrow about a very similar canvas photo idea that I did over the weekend!
:)r.
I love canvas photos, but also don’t love the price. I am definitely going to look into this. Now, for those corners, there is a way to take care of it so the frames lie flat against the wall – really meant for a square corner frame – and I will attempt to describe it. What you want to do is, after the photo and frame are properly lined up, right side down as in your photo, cut a small square out of each corner of the photo in line with the edges of each side of the frame and ending just at the frame’s corners (you will have to play around with this obviously). The purpose of this is to remove the bulk. You can now fold each side of the photo over the frame and the cut edges will meet nicely on the back of the frame at a 45 degree angle. You could probably figure out how to do this on a curved frame by perhaps using sewing principles, i.e. when cutting the canvas mirror the curve in the frame’s corners and then snip a few times around the curve to the frame’s edge and then carefully fold each section to the back. Did I totally confuse you?? Anyway, it works.
Peggy,
Thanks for the help! That makes perfect sense. :)
I love this and cannot wait to do something like this with my family pics. Now I need to go explore the rest of your blog and see what other great ideas you have to share.
These are so cool! And so easy!
Your comments on my blog made me laugh and smile :) I’m so glad you like it and chose to follow! I feature recipes at least once a week generally, so I hope you enjoy!
Katie P
http://foodwineandmodpodge.blogspot.com
I had’nt heard of the canvas paper but it does give me some great ideas for another project . Thanks for sharing this . I think it came out really nice and yet very unique
Ok…now I TOTALLY want some of those canvas cloths! Thanks for joining us for Anything Related!
~Bridgette
Wow, You did a great job!! I have seen similar set ups for so much $$ that I just never thought twice about them! Very clever idea, with the cheap frames. This is very creative, I can just see a whole wall of them!
Tip on stapling the corners. Start from the middle of each side stapling opposite sides, alternating the heighth and width sides. When you get about 1 1/2 inches away from the corners, pull the “point” of the corners toward the middle and lay it flat. This will cause the corners to have a mitred edge that you can staple down. It would be so much easier if I could draw you a picture =)
oh so fantastic. I now want to do this with my two little monkeys! Glad I found your site!
I love it Bev, I can’t wait to show it to Vance, I bet he’ll want to try something with your idea!! Great discovery!!!
Its a great idea and your project is Superb!I have to get a canvass sheet myself right now! My brains is buzzing right now with so many ideas and thanks to your information.
These look fabulous. This is a great project. I had never seen it but I asked my photo and techy hubby and he knew about it–why didn’t he tell me???
I have an idea for you abou the orners. I would think it would work but I have never used the canvas paper before. My technique comes from sewing corners and gettiong rid of the excess fabric so it isn’t a lump in the corner. You can’t turn the canvas inside out so it will be a little trial and error. When you sew a corner, while it is inside out, you round the corner of the fabric. You want to get rid of some of the fabric but not delete so much it pulls the threads out, then you make little slits from the sides up towards the stitches so the material has some give. My idea would be to staple up towards the corner but not all the way to the corner. Then do the other side towards the same corner. As you get close to the corner, round out the excess fabric, pleat and staple down. I hope that makes sense.
Cheri
Loving that canvas paper! Awesome. I adore the way you put your photos together. Really fantastic. Thanks for linking to the DIY Club.
Love this Beverly! So creative and clever! Thanks so much for linking to The DIY Club’s Competition. We greatly apprecicate it! Hope you are enjoying your week! ~ Stephanie Lynn
I love that idea and at a great price too! I am going to have to think about where I can duplicate it. Thanks for sharing!!!
This is absolutely inspiring! I Love It!Where you nervous about printing on the canvas? did it do well in your printer? I woud be afraid it would jam up! I am dying to find out!
I’ll be looking for this! Great product that I had seen before.
Great idea, I didn’t know about the canvas either, and I have a $17.88 rebate card from Office Depot, so guess what I’m gonna buy!?! Thanks for sharing!!!
I love this! what a great idea. I just found you from u-create. You have alot of really great ideas. I know that right now you can get a free canvas at http://www.canvaspeolple.com, incase you wanted another one. =) Thanks for all the tutorials.
Thanks so much for entering again.
Cheri
I love this tutorial! My family and I just moved into a new house and this would be a great gift to make my mother to put on our empty walls for Christmas.
I featured your Tutorial on my blog as well!
http://ohthatscrafty.blogspot.com/2010/10/photo-canvas-wall-art.html
These are fantastic! I have to find that paper and visit a craft store to hopefully find those frames still. I found this courtesy of Scrap Girls and will be sharing the link on my Tumblr page. Thanks for the great idea!
“stumbled” on your site today. I think if you printer the picks on textured paper it might look the same. I think that you would have to use square frame though. Could you use thick cardboard in stead of the frames? I live in a small northern Canada town and there is no way I am going to get canvas to print on here. I can buy textured paper at the $ store. (They seem to be everywhere don’ t they?)I will let you know how it works.
This is a nice present for those who are experiencing deep relationship with their best friends. Or even couples, it will do.
Love it!
í’ve tried to find canvas clothes in the netherlands but they don’t sel it here… oversee shipping is probably not possible..
too bad. It looks like i have to try something else
thanks anyway for the idea…